I could not confirm it. Blanka’s blocking hit-boxes are basically the same as his neutral ones. Most are. One exception is Balrog, who can avoid attacks by blocking. Crouching is known - and verified - to move hit-boxes forward quite a bit.
Still, as you know, it is often a good idea not to block so as to be able to move freely after whiffed pokes or lariat/jab SRK spamming.
I have noticed Ryu’s fierce hadouken has a larger hitboxes for some period after the start-up and just before the recovery. While the projectile moves faster, it has a larger horizontal range for some time.
I see. Then he was not actually right: they do not change at all. She can, but (specially Ryu’s) cross-up tatsus are always a risk. The only guaranteed way is timing it perfectly so that the leg always hits behind as the character lands, which is something I do not know how to do. By crouching, Chun also risks eating a roundhouse-fierce-hadouken combo, which would pretty much end the round, so against players who know the timing and distance for deep cross-ups that can be disastrous.
It would also be great to have other data for throws:
dizzy meter boost
distance opponent is thrown
distance your character is moved away
your character recovery on throw
opponent character recovery on throw
actual throw range to-hit and get-hit boxes
etc.
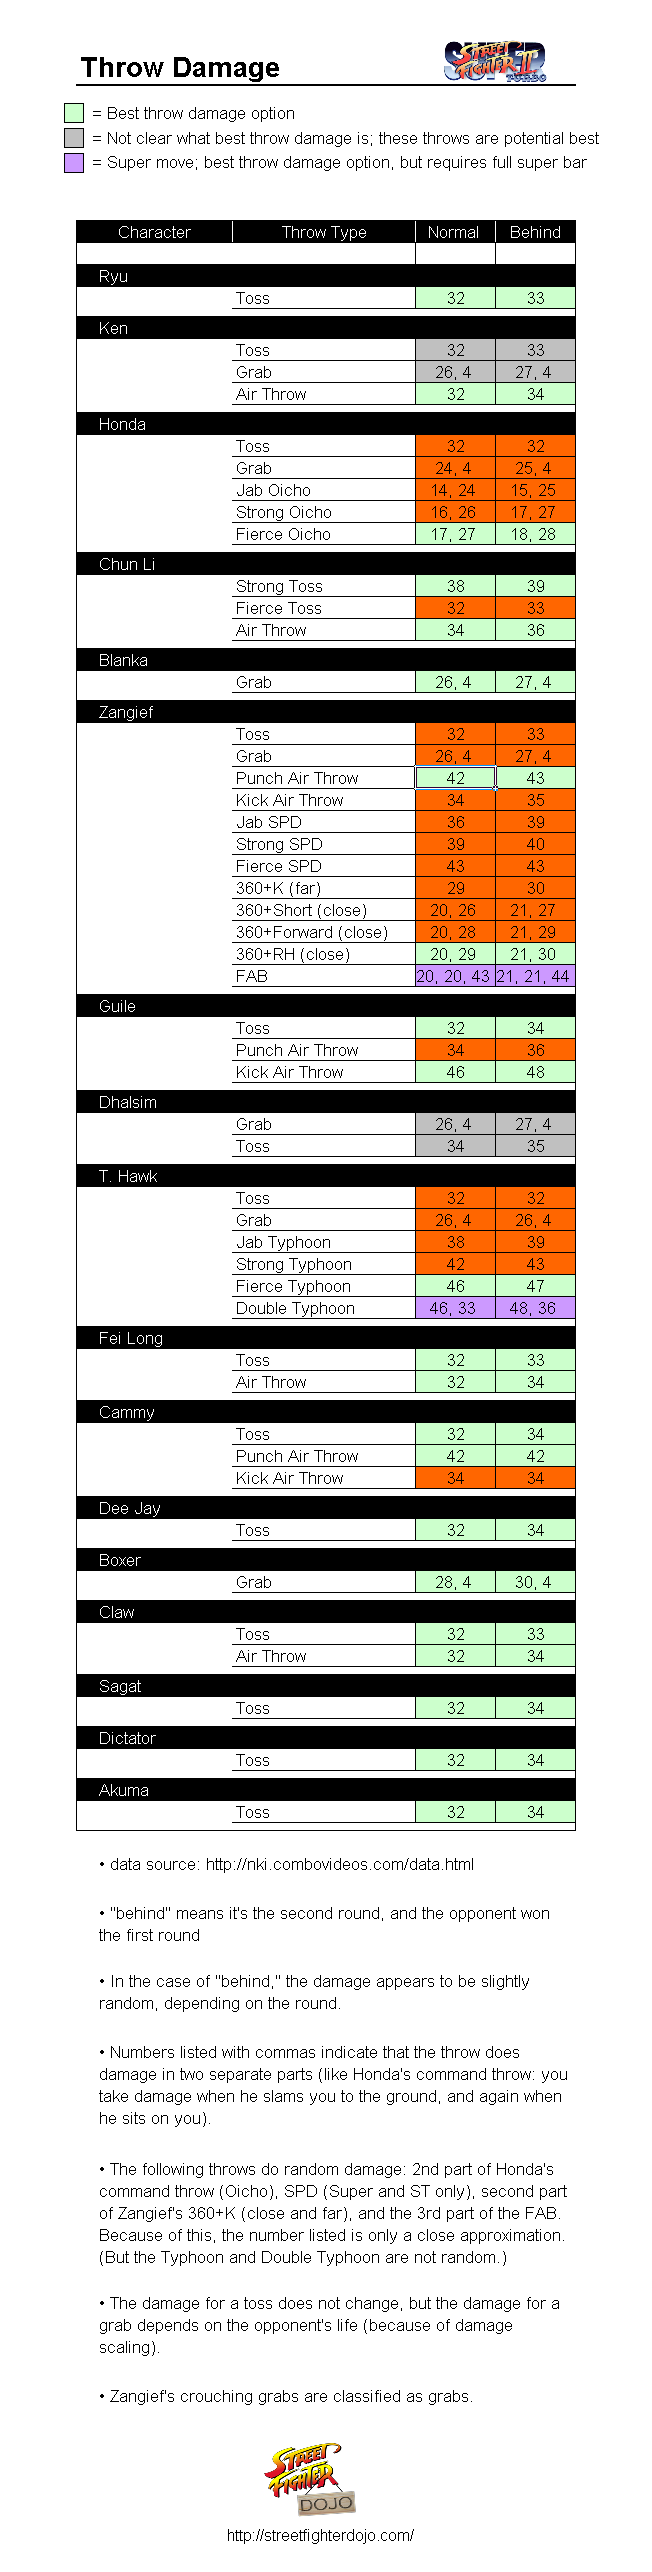
Taking the data from link #2, I implemented it into the following image:
I can work on a similar image for the 1st link (basically a comprehensive throw range chart). Though I am not sure using the measurements from NKI’s site are the best number. (do they refer to distance from one character’s centerpoint to the edge of the other character’s “to-hit” throw hitbox?)
I also can make bar charts showing a character vs. each other character in their throw distance advantages by degree.
Great stuff, zaspacer. If you will accept a suggestion, it would be to add a space between the commas and the numbers for throws with more than one part. In Europe (UK aside) and South America, commas are used to separate the integer part from the fractional one, so it is hard to not read them as non-integer numbers at first glance. Say, Honda’s grab looks like 24.4% damage.
Don’t forget that normal throws can be softened for half of the damage so you have to take that into account when you want to go for your highest damage throw. Secondly some [media=youtube]YW2VXsNQvns&#t=8m24s"]holds allow for canned followups or even set up for safe jumps into another throw or less safe throw loops. Holds can also do far more damage than normal throws (though hold can be struggled for zero damage it’s very rare). Some throws have quick resets near the corner after a throw tech and you have stuff like Dictator’s cross up slide after a throwtech. Remember that O.Characters cannot tech or soften throws, meaning you get more damage, plus [URL=“http://www.youtube.com/watch?v=w7S5BWioIEo&#t=2m05s”[/media] off of okizeme. There’s lots more than raw immediate damage that you need to factor in when deciding what throw to use where and when.
I just captured some images yesterday and this is wrong.
Almost all the hitboxes are identical whether you’re in block animation or in neutral position.
The only cases I see differences for some characters are when the head is tilted (the tiny hixbox at the top), and that is negligible (it is tilted backward so it’s better than neutral).
I’ll include both images later when I update the standing and couching section with pushboxes included.
[edit: updated. seems like only boxer has a difference hit box when in block animation (leaning back)]
Ditto on the quick resets in the corner: I must have been swept after a bite on the corner like a 1000 times, due to mashing in lag. There is also the Chun getting SPD’ed on the corner, and the “maybe it’s a bad idea” at softening Fei’s kick throw when cornered.
Maybe the chart would be more useful if it was sorted by throw range, then by damage, with the strongest throw at each given range highlighted? So, Zangief’s would look like:
Fierce SPD (highlighted)
Strong SPD
Jab SPD
360+RH (close) (highlighted)
360+RH (far)
360+Short/Forward (far)
360+Short/Forward (close)
All the grabs
FAB (highlighted with the super color)
Sounds like a smart change. I’ve made the change, just refresh the page to see the updated version.
Two ends of the spectrum.
Geo does not think move damage info is useful.
VirtuaFighterFour thinks that move damage info is useful, but it is not the only variable to be considered in a game situation.
I agree with VirtuaFighterFour, but I have a slightly different take on it:
Move damage info is useful, but it is OFTEN not the only variable to be considered in a game situation. (since I agree with VirtuaFighterFour that there are multiple variables in determining which throw to use, but I recognize that there are some situations where you are only concerned about raw damage)
In answer to geo’s question, you would refer to the chart when you are playing a character with multiple throw options that have different damage, and decide on the best throw for the situation based on range, damage, possible tech, position on screen, positional follow-ups after throw, etc.
Chun’s Fierce and Strong throw have the same range. But if you want to maximize damage, you will use her Strong Throw. If you are going to negative edge command throw an opponent, timing it so that you cycle through your best damage options first can give you a better shot at doing more damage.
Agree 100%.
Great breakdown.
Toss throws can be throw teched by N.Characters to reduce damage by 1/2.
O.Characters cannot throw tech toss throws, meaning you get maximum damage, plus additional damage potential off of “okizeme”.
A toss throw that is throw teched will also change the recovery time/position/game state of an opponent being thrown. Some toss throws have quick resets near the corner after a throw tech and you have stuff like Dictator’s cross up slide after a throw tech.
Grab throws cannot be teched.
Some grab throws allow for canned followups or even set up for safe jumps into another throw or less safe throw loops.
Grab throws have variable damage and have the potential to do far more damage than toss throws (though grab throws can be struggled out of by an opponent for zero damage, it’s very rare).
Look over these bullet points and see if they are correct/good. Once approved I will add them to the image footnotes. Also, please add more bullets that you think should be included.
About Blanka. His jump forward HP. I used to believe it had two different hitboxes during it’s animation. Am I wrong about that?
Also about electricity. I believe the retation between active and non active hitboxes were a mistake. Checking the hitboxes in HDR Classic mode and just by experience I believe electricity is active constantly. It never get’s beaten by a move it otherwise beats, which negates the probability of non active hitboxes.
The only thing I find lacking still with the hitboxes is a single neutral rame before the attack animation. This would serve as a reference. Like some moves push the character forward, some pull them backwards. Going right into animation frames you lose some of that information which can be useful in determining what has the best range or the best evasive qualities or whatever.
Also, invincibility frame data and such would be nice to put in.
Lol sorry for being demanding, just some suggestions. AWESOME job dude.
edit whoa I didn’t realize Blankas throw straight up outranges Sims noogie and Boxers headbut. T.Akibas site led me to believe they were equal.
Yeah, I thought that too, doesn’t Blanka have an animation where his hands are pointing straight down? I believe this frame has a hitting box.
I used to think that too. It’s cuz I was looking at their range vs Ryu and thinking it was the same range vs each other. Now I just use the absolute values and compare Blanka’s range vs Dhalsim and vice versa. Blanka beats everybody’s normal throws except Honda.
BTW papasi, really good work, this is becoming a very useful tool like NKI’s site, and will be a definitive guide to Old and New characters. However, there are a couple of things that concern me:
-O.Ryu’s close Short and Forward are the same as O.Ken
-N.Ken’s far Short is the same as his close Short with a slightly different hitbox
-O.Ken and N.Ken’s Fierce Shoryuken and N.Ken’s Super has a different animation for the 1st hitting frame, it’s the same as the 1st frame of the Jab or Strong Shoryuken, except it hits
-also I know I said this before, but I would highly recommend having all the different strengths of all Special Attacks because some strengths have hitbox differences, like N.Ken and N.Ryu’s Jab Shoryuken has a different size vulnerable hitbox than the Strong or Fierce Shoryuken, this was one of the biggest limitations of YBH IMO
IDK that Dhalsim’s Yoga Blasts had different size hitboxes based on the strength, good shit. = J
I could be that by being in a block position, the cross-up tatsu triggers block state and freezes you into facing away from the cross-up. While if being in neutral position, the cross-up tatsu does not trigger a block state and the character is able to change their facing.
So it doesn’t change the hit box, but it changes the direction the hit box is facing.
Just a thought.
Also, it would be great to see/know the the duration of the block pose freeze. (is it a fixed min? does it change based on move? etc.) I sometimes use a whiff standing Jab to freeze my opponent in a block state before I go for a throw, so that control inputs they do in response during their freeze don’t execute. Likewise, Snake Eyes likes to do a standing Roundhouse vs. a wakeing-up opponent to freeze them into a block stun on wake-up, then he SPDs them when the Roundhouse recovers.
but i notice in game that it’s all red hitboxes. so i guess t.akiba’s mistake?
if anyone can confirm i’ll update mine to reflect this.
that is the standing hitbox at the top of each page. i didn’t want to include it in every move to reduce the clutter
yes, that’s what i want to. does anyone know if there are invincibility frame data out there? i dont think t.akiba has it.
if anyone can help out on this, it would be awesome.
yes, t.akiba’s table is hard to digest as is. after i break it down i found many surprise myself too.
what is the concern? they are not like this in HDR?
i already have pointed out this issue in the hitbox mode thread. the lua script generating the hitboxes has 1-2 frames delay.
for moves that stay in animation for at least 3 frames, i can just move to the last frame and still capture the hitbox w/ animation in sync.
but for move that only stay for 1 frame, the animation and the hitboxes are off.
there are a few cases in my jpeg capture. the fierce dp is one of them. however, all the hitboxes are still correct, it’s just the animation is out of sync.
i hear you dude. i already did that for all the N chars. I’ll update old ryu/ken’s DP later
i believe so too. but need testing to prove that it really locks you in the wrong blocking direction and force you to eat a cross up tatsu
Sup, Zaspacer. I do not believe there is such a thing as being locked in, say, “non-cross-up” animation. I suppose it is related to getting pinned due to blocking and having to decide based on this fixed position. Add to it the inherent 3-4 frame input latency and [media=youtube]yY3Yx9mT6Ks&#t=3m30s"[/media] can happen. The fast forward tatsu is an old Ryu trick and it is possible to block it by moving the stick forward in time.
I did check the block lock-down on hit: it takes significantly more time to be able to walk then jump, use normal attacks or throws and specials. Apart from that, I guess it is more about messing up the enemy’s distance control, as they can recover from blocking while the attacker recovers from the whiffed move. Also, if the move is done too far (like almost full screen), then there will not be a blocking animation.
The standing roundhouse trick is quite old. It is a WW/CE thing, I believe (in WW Gief would land right beside the poor enemy and there was no reversal frame, so it was useless).
Edit:
I does not for a number of moves, such as tatsus. It lists the start-up, but it is completely vulnerable in WW, invulnerable in CE and HF, and invulnerable for 3 or 4 frames only in S2/ST. BTW, the ’ key moves the game one frame forward in mame-rr: that might help getting such data.
Edit nr 2:
I would add that tosses can not be teched for reducing damage if the full damage is enough to finish the round, that is, kill the enemy.