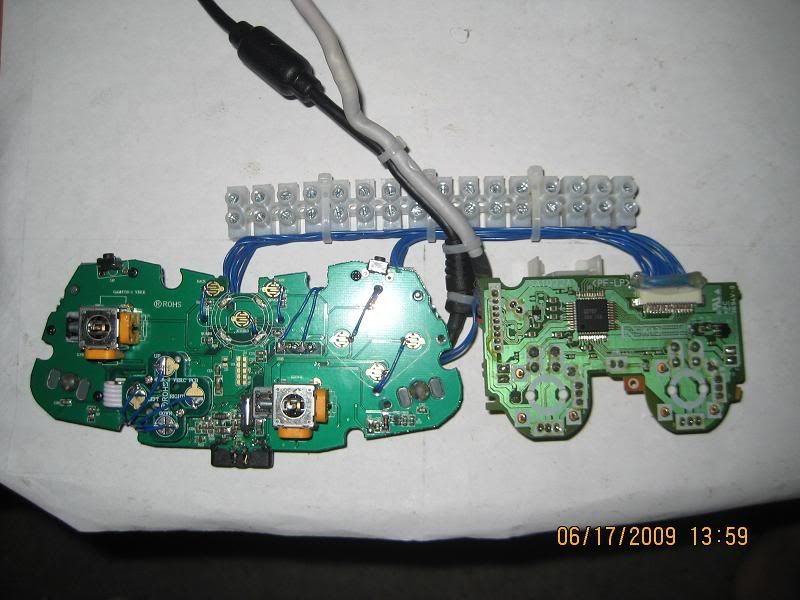
Dude, your soldering and application is a mess - sorry to be blunt. You have half melted wires, flecks of solder, and different wire sizes all over the place.
You are also missing a resister for the Left direction on the Cthulhu.
And why do you have a piece of wire running between one of the diode points on your Cthulhu? Please also get rid of the blob of solder where it says “usb only”.
Ah - and it looks like you’ve broken some of the contact points on the board where it says Select & Right. You’ll need to re-tap these points using a scalpel blade or similar to get them to work (unless Right is routed from underneath the Cthulhu in the first place).
My advice would be to start from scratch, clean everything up with some desoldering braid, and use only one type of wire (whatever you’re using for the thin black wire looks fine). Get some proper wire strippers, and practice soldering on a broken radio or something.
Do you think that is what is making my joystick tweak out. If so do you mean on the PCB cause im not sure where you would be talking about on the Cthulhu.
I’m looking at the instructions I got with my Cthulhu now - it tells you to use the instructable online guide. Nowhere does it say to put a piece of exposed wire between any of the diode points. It does say to bridge the connection between “USB only”, but this is unnecessary if you’re using an IMP board. I’ve just tested this again by soldering together my own rig, so I know that what I say is true.
This whole topic is a tutorial - from page 1 onwards.
From looking at those pics, I don’t think the Cthulhu in it’s current state is usable. I’d recommend giving it to a modder who knows how to clean it up properly, repair the broken connections, and start from scratch on your dual mod.
Too many soldering mistakes have been made (like not tinning wires, not keeping exposed wire as short as possible, being careful not to accidentally melt things with the soldering iron tip etc.), and the Cthulhu board has suffered as a result. It now needs experienced help. There must be at least one modder on SRK who lives near you who’d be willing to help…
If you want a future reference on how to solder, then look at the slagcoin website.
Look closely at the 4th photo you posted - it’s a closeup of the 360 motherboard. There is no resistor for “UP” (I have no idea why, the boards just seem to be made that way), but there should be a resistor for “LEFT”.
The resisters in question are the tiny brown rectangular things directly under the joystick solder points on the motherboard.
As long as the Cthulhu board pictured is nowhere near your 360 stick, and the stick is wired up as it originally was before modding, then yes - it should work on 360.
But your 360 motherboard has also been left in a very bad condition, so it would not surprise me if it was now also defective.
As said, give it to someone who knows what they’re doing, and in the meantime learn the basics of soldering, cleaning, and repairing from scratch.
Ok so I hooked everything back up and now up and left work but right and down turn on the home button and A and B do not respond everything else works fine. Any idea on where I should start to fix this problem.
^^yes you do. I followed it exactly and works perfectly. Late pic, thanks for this bomberman for this guide and madman for the small walkthrough on moving the back/start. Loving the 10ft GC cable.
Without getting too technical, and just as a quick primer, how feasible is it to dual mod an SE with an MC Cthulhu while keeping everything more or less reversible? I don’t wanna have to solder to the stock Madcatz PCB, so ideally I think the best thing to do is to get a hold of some of the 5/6-pin connectors (the ones that plug into the PCB with the ribbon cables attached) Madcatz is using, assuming they’re available and not proprietary.
I’m thinking I could grab some male/female connectors and then just make Y-splitter adapters (one end connects to the stock ribbon cable, the Y split plugs into the male end directly on the Madcatz PCB, and the other goes to the MC Cthulu). It’s a shame the USB cable is soldered directly to the Madcatz PCB instead of using a quick connect, but I guess I could snip the cable a few inches out and add some sort of quick connecting adapter so I can just swap between the stock cable and a cable that runs 5V GND etc. to the MC Cthulhu.
I think if we get together and track down these little molex/floppy style connectors (not sure what else to call em, I come from a PC background) and one of the builders takes it up to produce a bunch of Y-splitter adapters we can basically improve dual modding for SE’s (and even TE’s) with true plug and play MC Cthulhu compatibility, little to no soldering required. I think there’d be a huge demand for something like that.
I’m also interested in 5-pin to non common/daisy chained ground joystick harnesses for plug and play JLW, LS-32, cherry switch mods, etc.
And lastly, over the counter ‘breakaway’ style adapters for making GC, PS2, and Xbox cables. RJ-45 is a little ghetto looking in my opinion, and I’d like to see some more alternatives pop up. Personally I’m a fan of screw on or push-through connectors, kind of like these ones used on hoses. I’m sure some of you tech gurus probably know of something similar used for wiring? Anything smaller than RJ-45 and more cylindrical in shape, like the Xbox breakaway plugs is what I’m after. Something S-Video or PS/2 keyboard styled.
Please, for all that is holy, if you’re going to link to the min-DINs (which I use and enjoy myself. There’s more work involved, but I can trust the connection more than I do with RJ-45) then please also link to the crimp pins to go with it: http://search.digikey.com/scripts/DkSearch/dksus.dll?Cat=1442669&FV=fff40016,fffc0066
It’ll be rough enough with the crimp pins, and freaking wrist slitting impossible without.
Hard lessons learned from the miniDINs:
Once the outer sleeve is on all of the way, it ain’t coming back off. So make damn sure you get the arrow aligned in the spot you want it before pushing it all of the way over the center assembly.
Put the outermost sleeve on the cable and slide it to the end the very first thing! Don’t be like me and remember it AFTER you get the crimp pins on and put them on the pin piece.
Use a label maker to print out a small cheat sheet with the pin number and matching cthulhu column of your stick. Place label on bottom of stick. 2 months down the line, you’ll be making a new cable and curse because you don’t remember the pinout. Don’t be that guy.
