Dual-Modding a PS2 and Xbox 360 Stick (Updated)

Sorry, I should have added another PCB to the drawing. Your description sounds accurate.

http://img27.imageshack.us/img27/535/harness2uz4.jpg

If your stick looks like this I don’t see why not. I don’t have access to any Japanese sticks at the moment. I was trying to find one to mod with Seimitsu parts but that will have to wait for my tax return.

OT: Got a favorite Aphex Twin song? I’ve been on a never ending [media=youtube]8rjyVF6a4xo"[/media] kick for the past few months.

dropping by after finishing my tripple pcb mod>
http://img246.imageshack.us/img246/3840/dsc00066an4.th.jpg http://img90.imageshack.us/img90/3353/dsc00067ot9.th.jpg http://img228.imageshack.us/img228/9012/dsc00068wd2.th.jpg

the final version is different, I removed the mayflash ps2/ps3 pcb that’s on the left because it wouldn’t work with the multi pcb mod.

I just gotta say, hot glue pistol IS our best friend. I’d never had achieved a working and “clean” looking mod without it, now I’m sure nothing will move inside nor any connection will brake with time.

Very nice. What systems did you end up with? I recognize the 360 arcade PCB but not the white board. Hot glue is also my friend. I wouldn’t want to work on another PSX pad without it.

Also, how is the stick? Did you swap out the stick or buttons? I really want the SE version of it because that’s my favorite Hori case.

hehe, thanks (that was my first mod ever btw, it’s not great by any means, but it turned out pretty much as expected :))

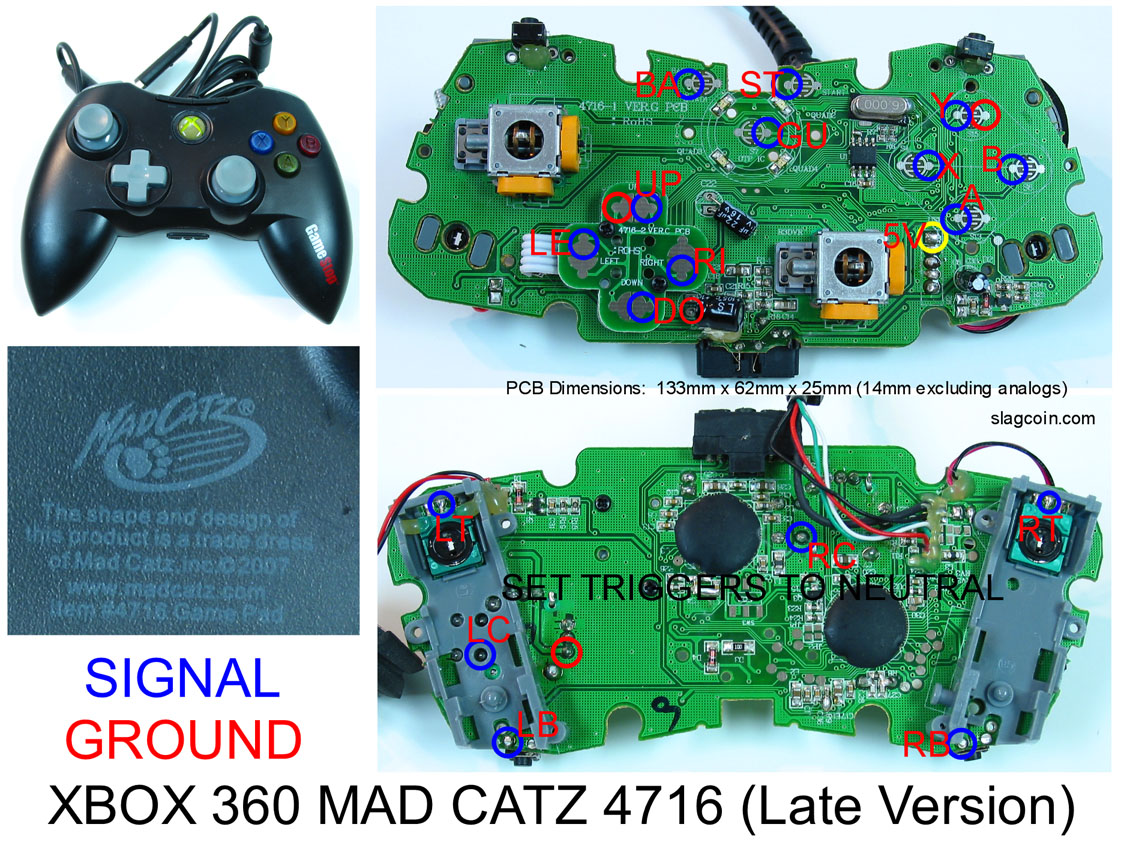
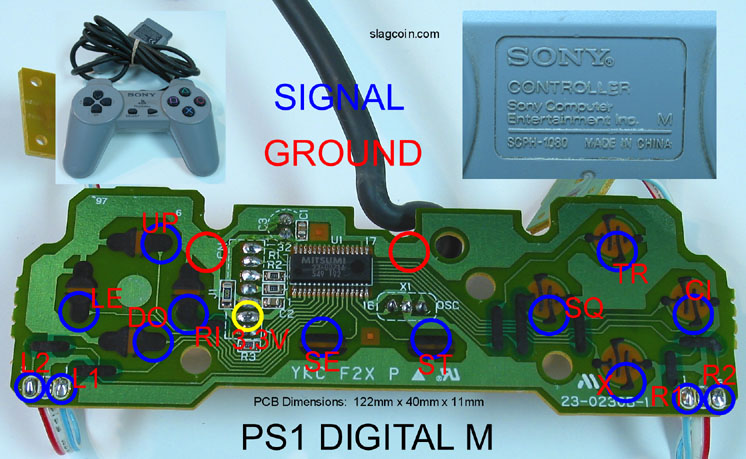
yep, 360 arcade (I got the HRAP mic hacked to the madcatz pcb, and the led1 to vcc, so it’s on when plugged on any system), the white one is an official gamecube controller missing the C-stick (works fine without), the one on the left was the mayflash, but it’s gone and a ps1 pcb is there now.

so ps1/2, 360/pc, gc/wii (and given all the emulators on pc or wii, I can play a lot of old gen games there too) (on gc only the digital pad got hacked so no Smash Bros support some action replay codes maybe ?)

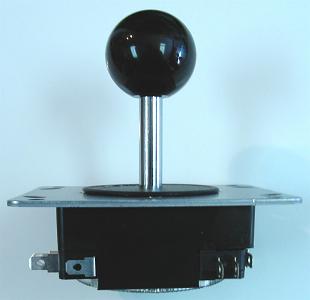
the stick was and still is fine, in the HRAP EX, the Sanwa JLF is stock, I’m quite happy with it so I’m not thinking about changing it nor the gate to octo :slight_smile: (I played a bit with the LS-32 on neo sticks, I get why it’s preffered for shmups and that some ppl like it better than sanwa’s for fighters, it’s just not my thing, that’s all)

the buttons however were just moved for now (I chose the SFIV layout for 360 and ps2, ans the Tatsunoko vs Capcom for the gc (green=P, Blue=light, yellow=medium, then strong and chohatsu) so yeah the buttons are still Hori stock I didn’t take the time to order sanwa obsf-rg yet… the hori stocks are not HORRIBLE but they’re not great either, feels like something is missing when pressing them, like half the arcade experience/feeling that sanwa’s or seimitsu’s would give.

yeah the SE looks really nice :slight_smile: sometimes I wish the HRAPEX had come with a white case too, but black is also pretty nice I guess.

overall, if I could have done things different after knowing what I did, I’d had gotten a ps2 HRAP and modded it to gc and 360 as Ihave right now a kinda useless hrap ex none common ground pcb and a mayflash ps2/ps3 pcb that won’t work for multi-modding either.
or as I finally finished my mod shortly before SFIV release, I could have gotten the 360 TE and mod it to ps2/gc.

one thing I miss from the PS3 Hraps/SFIV Sticks is the ability to swich to analog stick emulation, that could have been fun in some games I guess.

Hey people, I hope someone here can help me out.

I’ve just finished a HRAP2 dual pcb mod using a Mad Catz 360 pcb (2007 model) and a solderless hacked PS1 dualshock pcb. The diagrams and advice given in this thread were very helpful to me, and all relevant contributers will be listed in my “thanks to” section on www.neoempire.com

What I wanted to know is how to hack the Left & Right triggers on the 360 pcb so that they follow the (hopefully) default layout of the Hori EX2 stick. Currently I have the LB & RB points hacked, which I’ve only just realised is completely useless for a 6 button vs fighting game (when considering Capcom default layout schemes).

Any help is appreciated, as it doesn’t look like a simple case of running one wire from each trigger point…

Yep, that and cable ties…

:slight_smile:

There’s a guy working on this over in this thread. You’ll have to add some resistors like this because it’s not a straight wiring job.

Wow… thanks for the quick reply. That seems like the solution to my problem, and with a decent pic to boot.

It doesn’t look too difficult, either… just a matter of finding the parts… I’ll have a look around the shops tomorrow as I need to pick up a 2.5 mic extension jack too.

Regards,

I did it like that>
http://img359.imageshack.us/img359/4050/padhackrighttriggerew8.jpg
you only need a 100Kohms resistor (for each triggers)
L is using th same soldering points, the 2 on top with the resistor, the btns wire to the middle on.

did anybody see anything about trigger hacking for GC controller in the pad hacking thread ?

Ok, that seems a lot simpler than adding a diode as well… I’ll try this.

Thanks!

err, wait, I’m talking about the madcatz arcade controller pcb>

you’re talking about the madcatz pad ?
I think there’s something with needing a diode for newer revision yeah.

Yep - talking about the 2007 model of the Mad Catz wired controller:

(random bit of trivia - both 2006 & 2007 models of this pad came in white shells in the UK, so they look identical. The only distinguishing feature being the date stamps)

Regarding the diode, is there a particular type I need? I’ve not worked with them before…

EDIT: just found out about the info on diodes in another thread, so please disregard that particular question.

I’m about half way done dual modding my HRAP2SA into a PSX/Xbox360 stick, but ran into a slight problem.

I wanted my Select button to be “Select” for the PSX pcb and the “Guide” button for the Xbox360. So I tried putting both “Select” from the PSX pad and the “Guide button” from the Xbox360 pad into one part of the terminal strip, and through testing with the PSX PCB I noticed that the “Select” button (button 9 when testing through the computer) continuously fires. Is there a conflict between the guide button and the other buttons? I also noticed that the Guide button does not have an assigned # when testing it on the computer.

if you install microsoft’s drivers, a pop up will show up when guide is pressed.

if the select btm is firing continuously and all the rest is fine, then check the soldering of the select btn with a multimeter with “black” on gnd and “red” on the select signal, when nothing is pressed you should read +3.3V ou something like that, 0V would indicate that maybe your soldering is contacting vith the other side of the select contact pad.
anyway, check both signal and ground for select, guide, and select button with a multimetter to see where the bad contact is.

I haven’t checked the voltage of the Select button yet, but when I tested the select button individually by using the ground wire with the select wire, it works fine. The only time it will fire on its own is when it is hooked up into the strip with the Guide button. I will try putting other buttons in with the Guide button and see what happens.

I am using a PSX A-series, so its a solderless hack. I don’t know if that info will help or not with the problem.

yeah that’s weird if it worked okay by it self… never did a solderless hack btw, so I don’t know about that…

Is there a way to avoid the terminal strip and hook it up directly to the Select button along with the guide button as to avoid conflict with each other?

err…soldering both of them toghether or putting them in the same terminal strip slot wold be the same thing.

The guide button is acting like the ground wire. I tried testing the guide button with the other ones, and it makes them fire, as if it were coming from the ground wire. I installed the xbox360 drivers from microsoft and tried the guide button, but nothing pops up when I try.

edit: nm, i found the prob, looks like i accidentally put too much solder on the Guide button, I guess it was contacting both ends rather than just the right end.

I’m using the HRAP 2 SA and I learned that it used common grounding, so tomorrow I’m going to just solder the buttons and directions directly onto a 360 pad.
Should make me be able to have ps2 and 360 playability!!! woohoo

Alright I posted in the other thread named "2 PCB’s in one stick- Possible?"
If you are interested. It’s not that hard, but that common ground took a tremendous amount of time from having to go get another PSX controller and dual PCB’ing them both.