*Time to beef this up. Let me know if there’s anything else you want to see.
This is a noobs guide to wiring a PS and Xbox 360 pad for use in a stick. It doesn’t assume that you know how to do anything other than solder. If you can’t solder then I recommend watching some of the [media=youtube]I_NU2ruzyc4"[/media].
The foundation of this comes from a thread called 2 PCB’s in one stick - Possible? that I strongly recommend reading. Just don’t expect a very basic rundown. I don’t claim to be a master of wiring, soldering, etc. I’m the kind of person who wouldn’t normally attempt this type of thing… which is exactly why you shouldn’t be intimidated.
Supplies (RadioShack):
15-Watt Soldering Iron 64-2051
High-Tech Rosin Core Solder 64-013
22-gauge Hookup Wire 278-1224
Automatic Wire Stripper 64-2982
12-Position European-Style Terminal Strip 274-679
Female Crimp-On Quick Disconnects 64-4039 (Overpriced, order from Lizard Lick or eBay)
Helping Hands 64-2991 *Recommended: Magnifying glass/alligator clips
Supplies (Other):
http://img204.imageshack.us/img204/830/mc01pk8.jpg
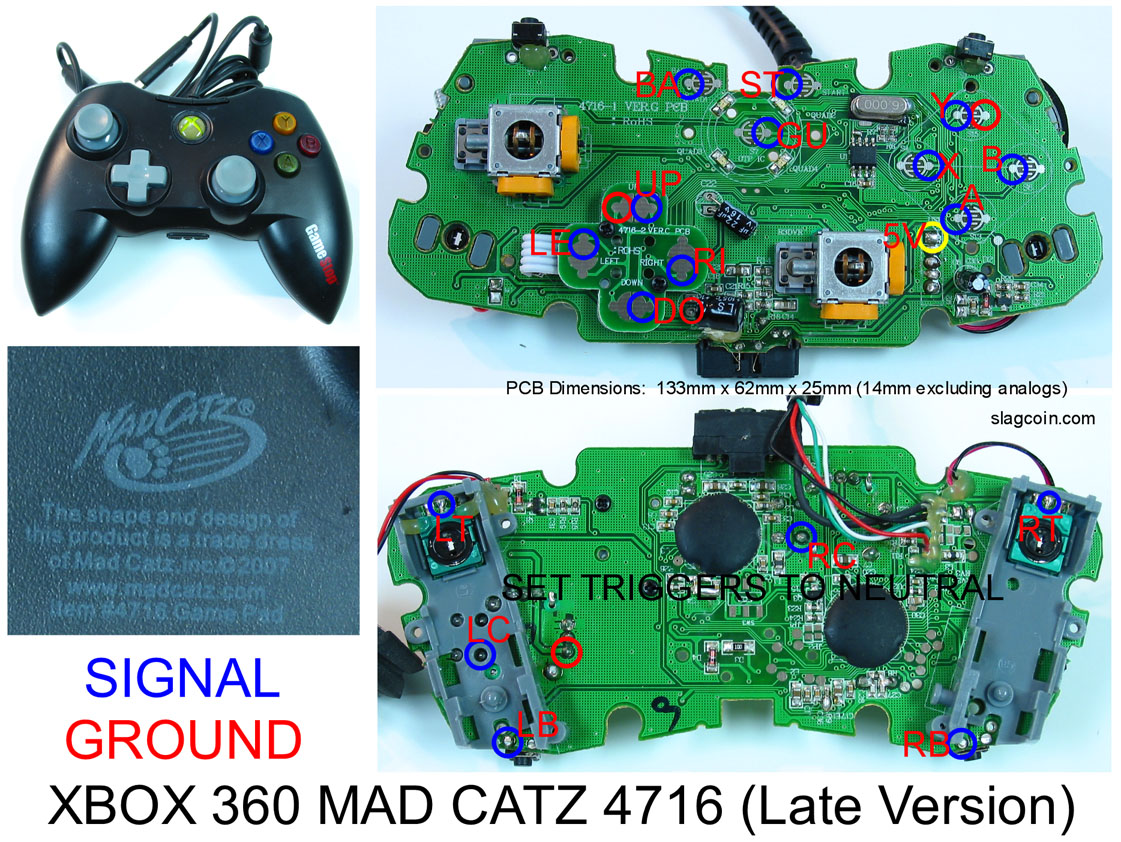
Mad Catz Xbox 360 Arcade GameStick (recommended) or GameStop rebranded Mad Catz pad.
The Mad Catz Arcade stick is easier to solder to and work with in general. They’re also very cheap ($10) if you can find them. Don’t pay $30+ for one of these on eBay.
The GameStop Mad Catz pad should be easily found. If you buy one, flip it over and check if it says 2007 or 2008. The 2007 versions uses the digram from Slagcoin. If you buy one today it’s probably a 2008 which can use my diagram instead.
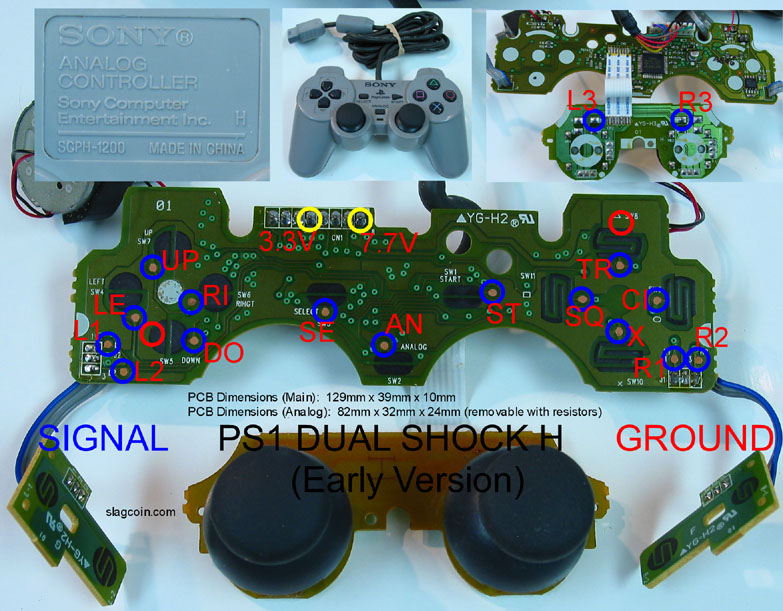
PS1 Dual Shock Controller (Get a couple if possible at a pawn shop/flea market)
The version of the PS1 controller doesn’t matter that much. If you find yourself getting angry while soldering it then take a look at the Spiffyshoes hack.
PS2 to USB Adapter
Glue Gun and Hot Glue
Velcro Strips
Scissors/Wire Cutters
Various Screwdrivers
Needle Nose Pliers
Instructions:
Hook up the PS pad to a USB adapter and connect it to your computer.
Browse to the Control Panel and open the Game Controllers.
Click on the Controller and then Properties to bring up the test page.
Test each button to make sure that the controller is fully functional.
Open Notepad and write down the number that corresponds with each button.
For example: tr = 1, cr = 2, x = 3, sq = 4 Do this for every button including the dpad. It will come in handy later.
Connect the 360 pad and test it. Write down its button mapping as well.
Crack open both of the controllers using a little Phillips screwdriver.
http://img264.imageshack.us/img264/3733/mc02tm6.jpg
Do not push on the PS analog sticks to remove them. You will break the PCB. There is a single screw inside that holds them in place.
Once the PCB is exposed browse to slagcoin and determine what type of pads you have:
http://slagcoin.com/joystick/pcb_wiring.html#PCB_DIAGRAMS
Place both of the PCBs in your stick to determine the placement you want.
Take the PCBs out and place them on your desk/tray in the same position.
Solder a wire to the ground of the PS pad. This will need to be long enough to reach the ground on the 360 pad.
Strip the other end of the ground wire. We will use it to test all of the buttons.
Solder a wire to one of the buttons labeled on the diagram.
Connect the PS pad to the USB adapter and open the Game Controllers/Properties screen.
Connect the stripped end of the ground wire to the stripped end of the button that you just wired. It should activate a number on the Properties screen.
http://img177.imageshack.us/img177/3199/mc05ci1.jpg
Wire each of the buttons and connect them to the ground to test them.
They should activate each corresponding number.
Test every wire/button to ensure that everything works as it should.
Once everything tests successfully hot glue the soldering points to keep them from lifting when you work with the wires.
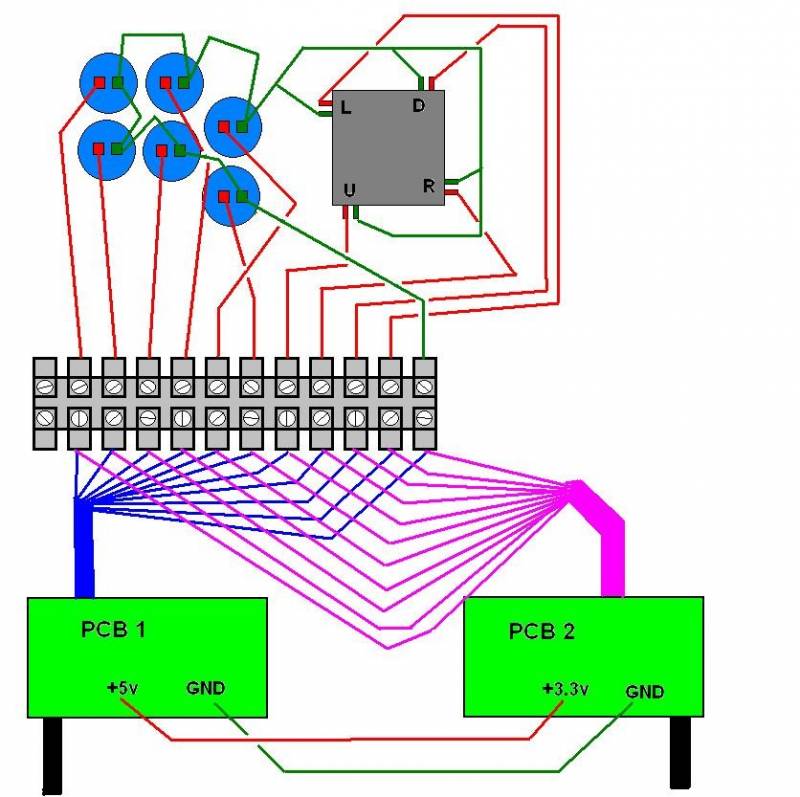
Connect each button wire (excluding the ground) to the terminal strip.
Repeat that last section for the 360 pad.
Connect the 360 button wires to the same holes on the terminal strip as the PS wires.
http://img177.imageshack.us/img177/3880/mc07xl1.jpg
Solder a wire connecting the 3.3V power from the PS PCB to the 5V 360 PCB.
Twist together the ends of two wires. One will go from the ground of the PS pad to the 360 ground. The other will go to the bottom right hand button.
Daisy-chain the ground around to every other button and the stick.
http://img207.imageshack.us/img207/3709/mc08so5.jpg
Run wires from the other end of the terminal strip to its corresponding button.
http://img207.imageshack.us/img207/1802/mc09vm5.jpg
Hook up the stick to your consoles and test it. Since you tested everything with Windows beforehand it should work as expected. Otherwise check for bad connections, etc.
Once everything is working use the velcro strips to secure the PCBs to the case.
http://img154.imageshack.us/img154/4183/img4099tnbw7.jpg
Buy a headset extension cord for $2 from MonoPrice (2.5mm Stereo Plug/Jack M/F Cable - 3ft) and curse like an angsty teen on live.
Here’s an ugly illustration which should give you an idea of what you’re doing. I wired up 8 buttons because on the original Xbox they’re used to return to the main menu:
Bonus Noob Tips (or how to learn from my stupidity):
-
Respect the soldering iron: Dont learn this the hard way. That cute little iron will burn the hell out of your finger(s) and leave you with a nice bubbled blister. Make sure the cord doesnt get tangled with the glue gun if youre using them both simultaneously.
-
Test, test, and re-test: Its better to know that everything is working than to speculate on why it isnt. Test every wire after its been soldered to ensure the connection is sound. Once everything is fully wired you should be confident that its going to work.
-
Scrape that PS pad: The PS pad isnt a very forgiving soul (Ive butchered a few). Ignore those little copper pads if you have them. Their only goal in life is to fly off of the PCB (There went my X button!). Scrape the black coating and solder to it instead. Its much more resilient.
http://img403.imageshack.us/img403/6540/mc04zb9.jpg
-
Hot glue beats lifted traces: Theres nothing worse than nudging a wire and lifting the trace. Hot glue your solder point/wires once theyve been successfully tested. Make sure in the process that the exposed wire doesnt touch two points.
-
Quick disconnects shouldnt be wimps: I picked this one up from Slagcoin. When working with quick disconnects, strip twice as much wire as you need and fold it in half. Squeeze the loop with needle nose pliers and youll get the equivalent of two wires. Give the wire a tug once its crimped and youll see that its not going anywhere.
http://img207.imageshack.us/img207/9844/mc10oc2.jpg
- Dont sell your Velcro short: Its tempting to cut the two Velcro strips the same length. Dont do it or within seconds youll transform into an angry noob. The top strip has to be longer than the bottom to extend over the distance of the PCBs (which surprisingly arent flat).
