Definately making one. As soon as I can get myself a tv ima start saving up towards a h2h set up.
Seems like the most difficult part is the top curved portion. I’m guessing you had previous wood-working experience before to get this accomplished. Do you use a router to achieve this kind of curvature? I am very envious of your Vewlix clone. Amazing work. You definitely gotta release the dimensions when you’re finished. 
lol Thanks!
I’ll get jealous if you did that…
The curved top is the most work that’s for sure but I only a very limited amount of experience to be honest’ I’ve just been patient more than anything else!
The curves were done with a router to make sure the pieces were the same and also to do the edges. I will release plans when I’m done.
This sh*t is really B-E-A-T-I-F-U-L!
Thank you for sharing those pictures, you make my day
Waiting for final result and for the blueprints too now 
wow man that came out super nice… you’re very talented
cant wait to see the finished product
Looks awesome!
Question though, are you going to make it so that you can fold up the control panel like in a real Vewlix?
Dude that is amazing, and to think that it only took you a week to do that kind of a paint job. So I guess you rolled on the water-based polyurethane clear coat?
My pleasure, I’ve enjoyed posting them and also the positive feedback it’s receiving.
Maybe it’ll take a little longer than I hoped (more explaination below)
That would’ve been nice but I’ve gone for a bolt-on approach so I can completely swap panels if needs be.
I wasn’t completely satisfied with the smoothness of the finish of the top piece so have sanded it back a little before I decide what to do next :looney:. I’m thinking of possibly using an enamel but the cure time is quite long and the finish is tricky to get right (any tips/suggstions/warnings anyone?)
Whilst I’m doing that, I’ve filled in the joins of the front of the control panel and primed the sides. I should be able to apply the vinyl to the front of the cp shortly.
I still can’t cut the lid of the cp to its correct size until the acrylic arrives.
It probably wont look as good as yours. Lol, You have dimensions you can give us?
wow @ the cab.
I’ll get the plans together as quick as I can after completion. Out of interest, do you have a preference for how these should look? I’m curious to know whether I need to do this in Sketchup or whether a more straight forward set with dimensions and a walkthrough/guide would be better.
I reckon with the right tools, most people could do this to the same or better quality.
Thanks Mr List!
I dunno, Im probably gonna steal the dimensions and go have someone cut them for me. I lack tools lol. My dad could do it too probably, But he’d need dimensions.
why not jus eye it up…?
Because, I want it to be pristine.
To be honest, I’m no good with Google Sketchup, I think for most new DIY people like myself, the set of dimensions and assembly instructions would be VERY helpful. It’s much easier than going through Sketchup and having to take everything apart, then get dimensions…waste of time…especially when you don’t have a lot of time to begin with.
Thanks for that, that’s what I figured. I have to say if I was after plans, I’d prefer simple diagrams with dimensions and instructions. I’ll still have a go at SketchUp but after I’ve completed the more traditional ones.
congrats man it looks like the real deal
all you re missing now is the panel and you could sell it as a real viewlix 
cant wait to see it finished
btw your paintjob came out very PRO…
Two Questions…
Can We get a Picture of the back?
Also, Are you going to put a Door on the front of it, or do you load the Console and such from the back?
Thanks! Still working on the paint job a little (anal about the smallest flaws). The panel is coming along nicely. The main CP section is filled and sanded down. I’m going to prime it so the vinyl will adhere properly so there is a bit to do yet.
The sides of the CP have been prepped and primed but will still need some more work to get all the inconsistencies out:
http://i218.photobucket.com/albums/cc26/SpaceHedgehog/VewlixSlimPanelSidePrimed.jpg
http://i218.photobucket.com/albums/cc26/SpaceHedgehog/VewlixSlimPanelSidePrimed2.jpg
Hot off the press when I took these (still wet…)
It’s currently disassembled again but here’s a previously posted picture of the back (this is before I lowered the monitor and speaker shelves - these are about 5cm lower now):
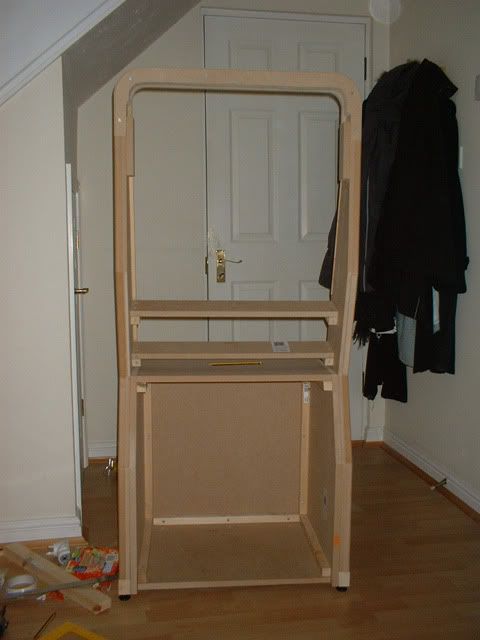
My 7 year old will need to access the XBOX so I won’t be installing this in the cabinet. TBH, I can’t see the benefit of putting the console in the cabinet especially as I’ll be connecting my PC to it as well. I can understand why people would want to do this but for me it’s all or nothing.
Edit: I may make some Vewlix style shelving or some thing similarly sad for the XBOX and amp to go on.
is there a reason it seems that you put reenforcement bars on all the edges of the inside of the base. Also, how many coats of primer , paing, and lacquer are you putting and how many times do you sand it on average? are you using an orbital or hand or what? thanks agai