Ok I see. Well ima go and buy a ps1 pad on ebay as we speak. Will someone help me with it when I get it. I really wanna use my PS3 stick on PS2
I’d check the early part of this thread. Most types of easily hackable PS1 Dual Shocks are covered here.
This seems like the right place to post this.
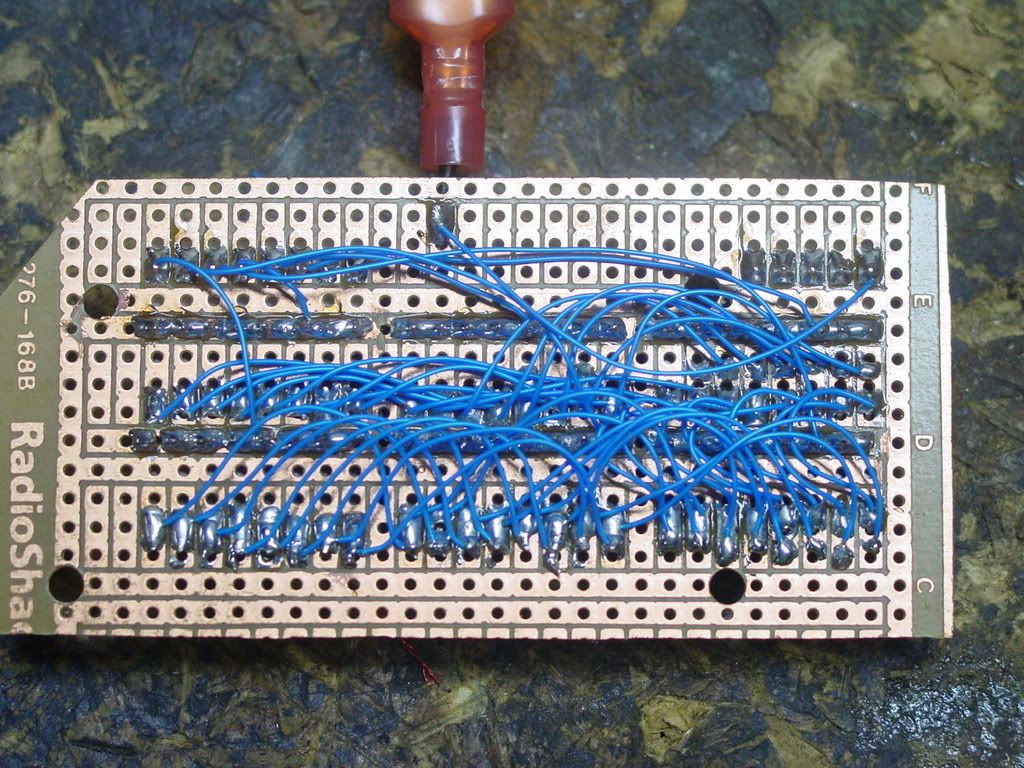
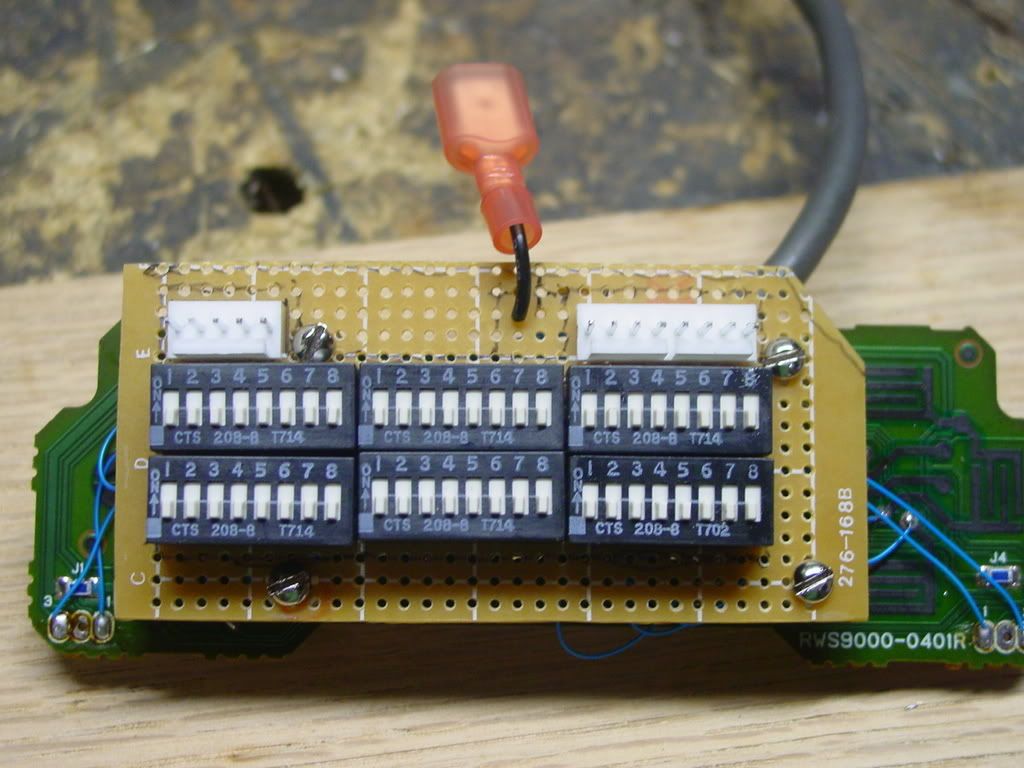
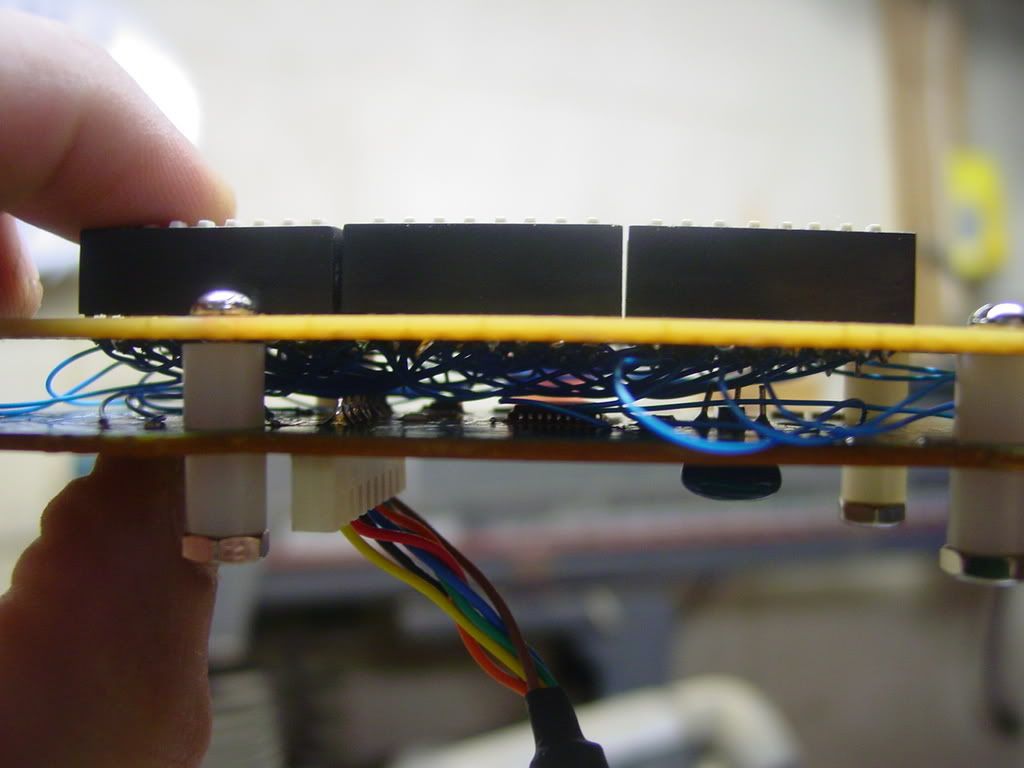
On the stick I am working on now I was asked to make the button assignements programmable but still be able to use converters for other systems. The person I am making it for was interested in the UPCB, but didnt have the money for it, and didnt want to have just one cable made and since converters dont work for it. So I put this little guy together. The wiring was a real pain being that I definitly needed more than two hands at a few points, but in the end I was able to get it all together.
http://i182.photobucket.com/albums/x277/Chaosdragon13/th_CustomPCB001.jpg
http://i182.photobucket.com/albums/x277/Chaosdragon13/th_CustomPCB002.jpg
http://i182.photobucket.com/albums/x277/Chaosdragon13/th_CustomPCB003.jpg
Basically each set of switches corresponds to one of the 6 buttons on the top of the stick and each of the individual switches corresponds to one of the 8 main buttons on a PS controller. So you can change around the button assignments by turning on different switches.
Then to make things cleaner in terms of wiring, the 5 pin connector is where the JLF will get plugged in, and then the 8 pin connector is where the 6 main buttons plus start and select will get plugged in. Of course, with things set up like that there is not place to plug the ground in for the buttons, which I only realized after my parts were shipped, so thats what the QD hanging on there is for.
That’s pretty damn creative, well done! (and cleanly assembled. Damn, great job.)
I don’t see any diodes anywhere. Am I correct in assuming there is a a direct 1 to 1 mapping, only? I’m not seeing how you could have jab set to R1 R2, short set to R1 L1, and not have either button pressing all three.
Will this work?
Ok I have taken a photo of the back of my PS1 pad(Grey). This is what is says at the back:(The little square)
SONY®
Analog controller
Sony computer entertainment Inc. H
SCPH-1200 Made in China
http://www.megaupload.com/?d=YASKQA4E
Will this pad work?
The link isn’t working for me. But chances are you should be able to hack the H series fine.
K thanks
Didnt even think of that when I was making it up. In fact I didnt even see how that was possible until now.
Just curious, where would I have to add in diodes to allow for multiple buttons? Am I right in thinking that I would have to put one in each time I chain one of the switches together? This way in the above example the signal for L1 wouldnt be able to back track through the wire connecting R1 to both swtiches.
But either way there is no way I am going to be taking this thing apart to add in doides. I will keep it in mind if I make one of these again though. But for now, at least there will only be a problem when there are multi-button assignments that overlap. I cant think of many games that happens in, at least not many where you couldnt easily press those combinations yourself on an arcade pad.
It will work with multiple button presses as is, but you can’t have overlaps. You could set 5 of the buttons to all be X, and let the sixth be R1+R2+L1+L2, and it’d work just peachy. The problem with overlaps is that they would affect any play button (short, fierce, jab…) that was set to any of the PSX buttons (X, [], O…) that were mapped together at any DIP bank. If you set 5 buttons to all be X, and set the sixth to be X, O, and [], any of the six buttons would press X, O and [].
I had to take a closer look at your wiring to answer the second question, and the answer is you’d have to rewire it completely, at least the wires dealing with the PSX board (the bottom half of each DIP switch). Because they are daisy chained from one to the next, you can’t. What you’d need to do if you make another one of these in the future is have the line from the PSX split, and go through a diode, to finally end up at the leg of the DIP switch. You’d need NUMBER_OF_SETTABLE_PSX_BUTTONS * NUMBER_OF_DIP_BANKS diodes.
PSX line for button---------+-----diode------DIP Switch----microswitch----ground
                            +-----diode------DIP Switch2----microswitch---ground
Please understand, Im not trying to harsh. That’s seriously the best hardware solution for remapping I’ve seen yet.
One question: does the psx pad I use have to have analog? like analog sticks
Toodles dont worry about correcting me, its always good to learn new things. And actually I am kind of annoyed at myself for not realizing that this could happen in the first place.
Thanks for the info.
Sorry for the double post but I have one final question. For replacing the HFS3(PS3) PCB with a PsOne PCB, do I have to use a digital or analog PsOne pad? Does it have to be a certain type of PsOne pad(I have type H)
Thanks
It is said that for best converter computability, you should hack a pad with analog sticks, IE, not the old only digital pads.
You don’t actually wire up the analog pads though. They’ll sit in your project box going unused.
In theory, most any pad type is hackable. Some require more effort than it’s worth–PS2 pads for example. The H series is a pretty easy hack. The firs post on this thread has a picture showing the soldering points.
I hope by this post you mean that the actual analog sticks from the PsOne PCB will go unwired to the HFS3 PCB, right?
Thanks for all your help!
BTW, the HFS3 uses a square shaped restrictor, how hard is it to change the restrictor to a better one?
You don’t actually wire up the PSone PCB to the HFS3 PCB. You disconnect (IE, desolder) and pull out the HFS3 PCB, then rewire the buttons and stick to the PSone PCB. The solder points you use are from the digital pad, not the analog sticks. Checking the picture on page one will probably make that more clear.
That I’m unclear on. I think the stick in the FS3 is a sanwa knockoff, but I’m not sure how different it is. Even if it was really easy, I’d say you might as well mod a sanwa stick in if you’re going to go to the effort.
easy solder - Goldpin PH 2,54
Thanks guys for all your help. @ Starcade RIP
Ok I understand now, the stick is wired to the D-Pad so the analogs from the PsOne PCB will go unused in the HSF3. So wouldn’t it make more sense to use a Digital Pad?
Sorry for the double post, but I have a few final questions about soldering:
1.What type of soldering pencil should I use. What watts?
2.What solder iron should I use. I can get resin core lead free iron for a steal.
3.Also, a question about wires. I solder 2 wires onto each button/direction on the PsOne PCB(like each button or dpad direction has 2 parts on the PCB),and then tie the together the ends of both wires, and then solder them onto the button on the HFS3? I have to scrape away the red and blue parts of the PsOne PCB to reveal the solderable copper,right? What knife can I use and also will using a pen-knife damage it?
4.Also where are the wires? There are ones used in the PsOne pad and then the ones used in the HSF3, where can I get my extra wire for soldering to each button? Each PsOne button uses 2 parts on the psb, thats a total of 20, because I dont use LI,L2? Can I take the wire from the unused PsOne buttons and the unused HSF buttons and give them to the buttons I only use? Also how do u take out the wires? Gently pull?
Any help appreciated for this n00b
Some people like to wire up the analog button just incase they want to play a game that requires you to press the analog button in order to use the d-pad. Personally I use the old digital pads since thats all I have access to, and I havent encoutered a problem.
Also I believe I read that there is a problem with the PS3, where you need to hit the analog button for it to work. Though the pelican converter is supposed to bypass that.
- Use a low watt soldering iron, I am not sure what a good range is so someone else can help with that. Personally, I use a 25 watt one.
- Any type of solder is fine, lead or no lead… Just be sure to get one with a rosin core since it makes things a lot easier.
- If you use a digital PS pad then all the buttons will use the same ground. Therefore you only need one wire for the ground, and then one wire for every button on the PS controller that you want.
When you wire it to the buttons on the stick, you connect the single wire from each PS button to one of the prongs on the pushbutton. Then you connect the wire for the ground to the other prong on button and then use a wire to create a daisy chain around to each of the other buttons and micro switches on the joystick.
For scraping the contacts on the PS controller you can use any sort of blade, just dont put a lot of pressure when you are scraping since the layers are thin. Personally I have use a razor, a kitchen knife, and a pair of pinted forseps, of of which work fine.
- For wire, you can either use what is already in the stick you are modding if there is enough, or you can go to an electronics store like Radio Shack and pick up some wire; 22 gauge or smaller works best.
I dont know what you are talking about for the wires in the PS controller. THe only wires in there are the ones in the cable, which you obviously need to keep so you can plug the stick into the system, and then there are small ones that lead to extra PCBs for the shoulder buttons.
If you want to take out the ones for the shoulder buttons then you can either cut them really short, or even better, you can desolder them with a desoldering braid or solder sucker, either of which you should be able to find where you get your wire.
Ok thanks. So if I use an analog pad for this project it should be ok, as I am wiring the dpad to the actual stick of the HFS3. This is my first time doing a mod/solder, will an analog pad suffice?
Ok I need to ask you if the following items will work. Here goes:
- Is this solder wire ok
http://cgi.ebay.co.uk/Lead-Free-Resin-Core-solder-wire-for-Soldering-Iron_W0QQitemZ110159925799QQihZ001QQcategoryZ106001QQssPageNameZWDVWQQrdZ1QQcmdZViewItem#ebayphotohosting
2.I am getting a soldering pencil elsewhere.
3.Does it matter what wire I use? I searched ebay and found copper and gold and stuff. On this page could you tell me which ones are best.(how far below 22 can I get, my brother can get me 3 or 4)
http://search.ebay.co.uk/search/search.dll?from=R40&_trksid=m37&satitle=22+gauge+wire
I dont understand? Whats ground? Daisy chain? Could you help me on this? When my item arrives could u help me with some stuff? Thanks