Anyone know if PS3 Sixaxis padhack to keyboard is possible? I don’t mean like Sanwa buttons for directions, I mean directly to a keyboard.
Does anyone have experience with this very cheap stick:
http://www.dealextreme.com/details.dx/sku.30476
It has PS2 and PC support, which is exactly what I need for my custom stick I’m building. Is the PCB inside this thing easy to re-use, or am I better off hacking a regular PSX pad?
I wanna assume that thing has the stupid conductive pad under the buttons, or the buttons are soldered directly to the pcb. It depends if the board is one piece, in which case it’ll be annoying to fit in a case well. If it has a main board, it should be simple.
If it’s anything like what I posted, you’ll probably be better off hacking a psx pad.
would i be able to test my padhack by plugging it in and touching the ground wire to each signal one at a time and see if that activates a button press?
Absolutely. That is the way to do it.
i came across the same problem on 2 Hori sticks: Hrap 3 and Hrap V3.
Setup:
Dual mod PS3/360, with an impboard and a madcatz 4716 late rev first batch (the one which doesn’t need trigger inverting), Xbox works perfectly, trigger hack is fine with a resistor.
PS3 Hori’s PCB side got L2 and R2 buttons constantly pressed.
The same setup on a madcatz PS3 is working pefectly fine. i do not understand what is the problem
Thanks for the help.
do i need to hack the analog button on the ps2 pad?
You can hack the analog button if you want. You don’t really need it unless you intend to use it as the home button with 360/PS3 converters.
Does anyone know how to find the voltage of a pad? I’ve got a random 3rd party GC pad but I can’t find the voltage. I’m trying to dual pcb a Madcatz Retro Arcade with it.
[edit]
My real question is how can I find the negative end of the voltage?
Remove the signal wire from RT and LT from the 360 board. Connect anode end of diode to RT signal line on 360 board. Connect cathode to the wire you removed from the 360 board.
Excuse me for my noobish question Toodles, but what is Anode and Cathode ? i suppose it’s on Madcatz 360 PCB, but i can’t figure what it is exactly,
thanks for your help
(whoops, I changed the earlier post. The diodes need installed on the 360 side, not the ps3 side)
http://www.markallen.com/teaching/images/electronics/diode.jpg
You need to add one diode to each trigger. One end of the diode is anode, one end is cathode.
(RT signal line on 360 pad)-------(anode end of diode ---diode---cathode end of diode)-------+--------------(to pushbutton)
                                                                                             |
                                                                                             +------(to R2 signal line on PS3 pad)
okay, that makes sense, i was looking at the PCB searching for a diode.
any kind is fine ? I still have to let the resistor, right ?
Any kind of diode will work. If you want a part number to look for, N4148 diodes are cheap and easy to find.
You do still need the resistor on the 360 pad. The resistor and 360 signal line need to be on the anode end; do not put the resistor on the cathode end!
yep, the signal must go from 360 signal line to PS3, Roger that !
thank you, i learned something else today 
Does anyone have a schematic for an original xbox “duke” controller?
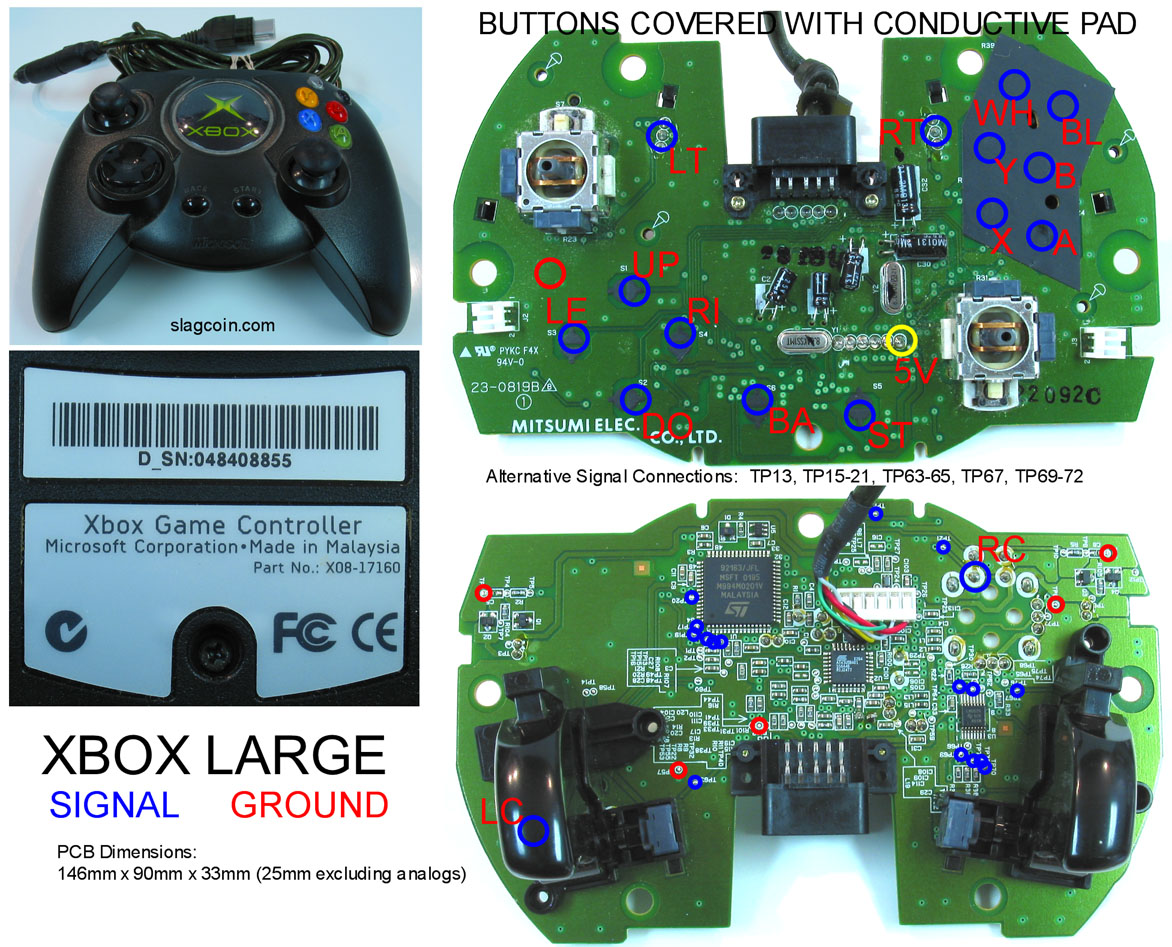
A friend of mine gave me one of those pcb’s with the “conductive pad” pulled off. Is this okay? They’re just metal pads underneath. I’ve read once somewhere that you should drill in from the back of the pcb to wire this. Any advice?
Can I safely remove the analog sticks from the Mad Catz retro arcade by desoldering them?
I still say the MC Cthulhu is the best way to go if you need Gamecube/Wii support, but I know a bunch of folks want to hack pads into sticks for TvC. I just wanted to let folks know that the cheap gamecube pad from monoprice:
http://www.monoprice.com/products/product.asp?c_id=108&cp_id=10830&cs_id=1083001&p_id=5666&seq=1&format=2
Is common ground and can be torn down to a pretty small size without much difficulty. The analog triggers are still inverted (they are high when pressed, low when not pressed) and would need dealt with, but otherwise its all common ground including the ‘click’ digital switches for the triggers. The c stick analog is connected by a four wire ribbon, and can easily be removed and locked in place with two resistors. The left analog stick looks easy to remove unlike most analog sticks; just be carefull not to tear the center wiper pin off from the two surface mount potentiometers it uses because you’ll need it to lock it in place with resistors as well.
Under $5 for a knock off GC pad. Downside? the cord is white and kinda short.