I wouldnt be too sure about that wireless Logitech using common grounds. I know the Xbox one doesn’t, and someone else recently was going to use that pcb until he found out it didnt use common grounds. As always, crack it open and find out, but there’s a good chance you’ll have to run two wires to each button.
After cracking it open, I think the shoulder buttons use common grounds and the rest don’t, but I’m not sure; those traces are tiny. In any case, I can handle running two wires to each button, if necessary.
Should I spring for a Sanwa stick or are Happ sticks good enough? And if so, where can I get one quick? I mean, happcontrols.com will at least ship from the US. I do prefer ball-type sticks over bat-type, but not if it will cost me like forty dollars. Like I said, I’m no competitive player, I just found somebody talking about gutting a controller to make an arcade stick and thought it would be a cool idea.
I’m definitely using Happ buttons; I can’t stand convex buttons on arcade sticks.
where are you located? if your in the us lizardlick can get you your stuff in like 2-3 days but they prices are a bit higher and they carry sanwa and happ sticks.
Ooh, that’s not such a bad price on the Sanwa JLW, only about $6 more than getting a Happ Competition Stick from happcontrols. I don’t think a JLF would work if I don’t have common grounds for the D-pad. What’s the difference between the JLW and JLF anyway? Just that the grounds are pre-daisy-chained on the JLF?
Can’t stand conVEX? I dont know about you, but concave buttons hurt the hell out of my hands.
I’ve got big fingers, I guess. I dunno, I like the feel of concave buttons better.
Ooh, I just realised that there’s this little LED light on the controller next to the Mode/Analog button to show when it’s connected, low on battery, etc. That sounds like a good excuse to use an illuminated button. I wonder if I can find one that will run off of the two AAs?
I have a problem with a PS stick of mine. On some games (VF4) it works fine, but on other games (Raiden X, Capcom Classics Collection 2) it is permanently stuck in the up position, even if I don’t move the stick it’s acting as if it’s being held up.
Umbrellastyle told me that this was because the person who hacked the PCB removed the motors and that it has something to do with digital/analog mode. Could someone give me some beginner-friendly ideas on how to fix this? I know how to solder.
anyone saved the link or image of spiffys solder-free hack?
I’m not sure if the answer you got was correct as I have encountered this problem before. When this happened to me it was because the analog stick was in the up position. Look at the PCB and reset the analog sticks to neutral and see if that fixes the problem.
Thanks, but I already threw out the PCB, I put my SFAC stick PCB inside my new stick and it works perfectly. :tup:
thanks very much kind sir :tup:
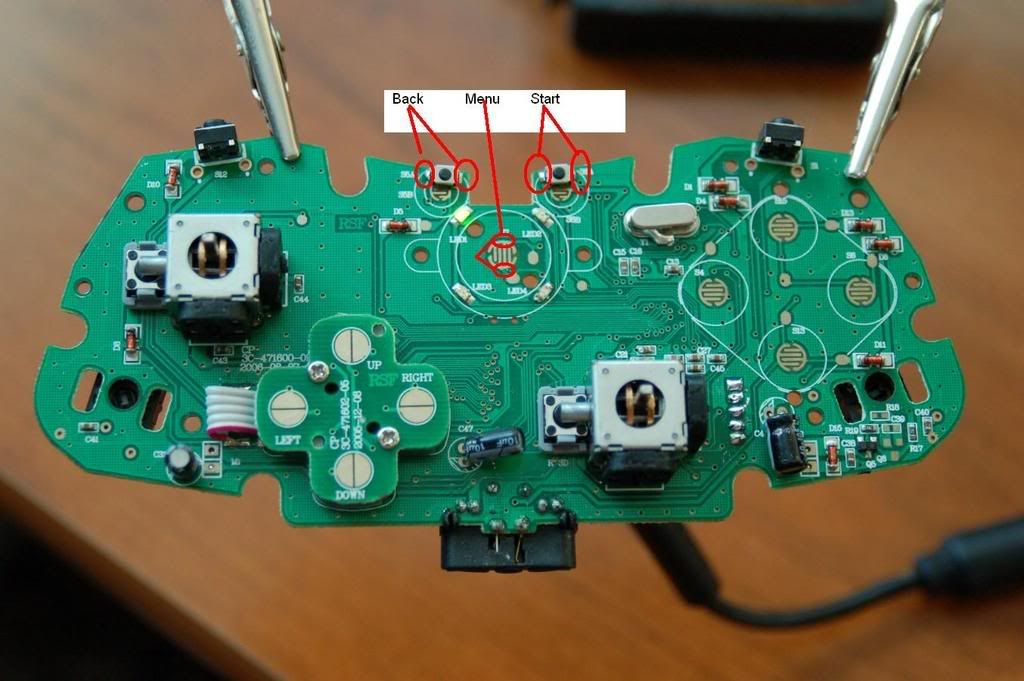
Here are shots of the Mad Catz Xbox 360 PCB.
Thanks to everyone here for all their help.

So I am reading this thread and still wondering If there was a way to have a 1 stick solution. I thought about using a Db-25 but I really wanted a PS1/XB360 solution. Problem is I cant figure a way out of that common ground. The only thing I tought of (which would be messy) is to wire the XB360 PCB to the DB-25 and wiresa PS1 PCB to another. I would use individual wires for each ground to the Buttons/Joystick. For the PS1 PCB I would wire the ground coming off the PCB like this:
One main ground coming off the PCB which would go to a terminal splitting into seperate individual wires to a DB-25 so it can match the serperate grounds to the components. This would create a common ground for the PS1 PCB which would only be activated when its DB-25 was connected.
Anyone (besides being a bit sloppy) see any issue with this?
DB25 wouldn’t work the way you describe for 360 UNLESS you only use 4 directions, 6 action buttons, Xbox button, and EITHER back or start.
The reason being is you only have 25 spots. Which means 24 inputs (ground and signal) meaning 12 total options.
Honestly, there are ways to do the 360 though. Each button DOESN’T have it’s own ground. As many people have stated, it’s a matrix configuration where some of the buttons/directions share grounds.
For example: up, down, and right bumper share the same ground (on the wired controller. Wireless also has A button sharing the same ground).
So you could easily set up a DB25 to use all the buttons and directions if you wired it up correctly with these semi-common grounds in mind. Same goes for the PS3 controller. Then just daisy chain the grounds to the correct buttons. This wouldn’t be particularly pretty since there seems to be no real no rhyme or reason to the inputs that share a ground aside from the convenience of the positions on the controller PCB. But still much easier and versatile than what you’ve described.
~Paik
SOk so I found this:
http://forums.xbox-scene.com/index.php?showtopic=581887
Seems to share some grounds. This works to use the DB-25 however I would have to use what I said in reverse for the 360 connections.
up, down, and right bumper share grounds right? Then on those buttons, I would still need seperate ground runs from each button for the ones that will match up to the shared ground on the 360 db-25 connector. At some point those shared ground need to be married. The right way to do it would be before it hits the DB-25 on the Buttons/joystick side but then it wouldnt work with the PS1 pcb.
Frustrating.
I can avoid all of this however with a DB-37 connector 
That will give me all the connectors I need. It will be hidden anyway.
If you understood my post you wouldn’t be asking more questions, but maybe I didn’t explain it in enough detail for you.
Daisy chain the ones that share a common ground and have that wire lead to the DB25 that is connected to your stick.
With the 360 you know how to wire the project box. For PS pad, wire it up normally except have all the semi-common grounds connected by jumpers with one leading back to the common the PCB. Or you could just have multiple ground wires from the PCB going to all the semi-common grounds. Whichever way you prefer.
EDIT: Note that instead of daisy-chain you can always split the the ground using a terminal like a ground bar kit, but since you’d need one for every shared ground, you would have like 5 of them, making it pretty idiotic to do.
~Paik
I kinda get what your saying, please see next post.
http://i195.photobucket.com/albums/z259/jhferry/Wiremap.jpg
Ok, this is what I came up with. Each ground is individually wired with a disconnect and ground. Going by the common grounds on the 360 hack, I pair each set of common grounds to a different spot on the DB-25. (Example in red)
Once I am done with all the grounds for the 360 I need to match that for the PS1 PCB however I do this from the single ground on the PS1 PCB and split off as many lines as I need to so I can match the Controller DB25 which is setup for the 360.
DO I have it?
- If I wanted to use a DB37 so I could solder to the front of the PCB (more lines I know) I could do this as well right?