No, you can solder to either side. However the solder blob holding it in place already is on the back, so that’s the preferred way generally.
Last one I did I kept the buttons on and just soldered the post/top side of the trace.
No, you can solder to either side. However the solder blob holding it in place already is on the back, so that’s the preferred way generally.
Last one I did I kept the buttons on and just soldered the post/top side of the trace.
Thanks TheFremen. I was thinking about using one of these to Dual Mod but now my hopes are shattered :(.
Just wondering if I use a wireless 360 controller to dual mod a PS3 TE, can I just keep the triggers in place, do I need to mess wiht anything else?
Are resistors needed if I can keep the triggers on?
[quote=“BIGBAGGA, post:3739, topic:16708”]

I had my entire pcb working, than when I went to finish mounting the PCB, I droped it and that little litebulb on in the front panel beside the start button broke off , well bent and it was so frai; it just came off I tried to glue it down before it came off.
Now my PCB wont keep power , I plug it in and the lights only blink once and shut off, Is this due to that Lightbulb? I cant think of anything else, I glued the power cord on the back down before I did anything as I had that part come loose on my last pcb . So I knew this time to glue it down as its next to impossible to get that re-attached…
If this lightbulb is the problem I would recomend glueing it down before starting to work with this pcb. I will be buying another fightpad tomorow and will try againg, I really hopw I can find a way to fix this.
hello there im currently partway through a xbox 360 padhack and have just gotten to the tricky part of wiring the directions up and have a basic (possibly retarded even) question.
so iv wired up all the signal wires to each of the four directions (im padhacking a wireless early version pad btw) using RDC’s tutorialhttp://forums.xbox-scene.com/index.php?showtopic=581887
however im a bit confused as to where and how i should connect the last ground wire that comes from the joystick. ive read the guide several times over now and am uncertain of whether i should be connecting the ground wire to a single solder point or several of them

i know that the points labelled DD2,DU2,DL2, and DR2 are the ground points, but can i solder to just one or does it need to be all of them? and if its all of them how can i do this when i only have a single wire left to solder from my stick?
i apologise if this is a retarded question tis my first time attempting a padhack so i have a lot to learn still. if anyone can help me it would be much appreciated.
thanks
No need to answer guys.
I already did for him on other Thread.
1 small issue with my Fightpad K I got all my pcb wired up, all 8 buttons work , start guide select all work, All I had left was to wire up the stick. When I plug the pad in it will automaticly will go left , I dont have any of the wires connected (so the jlf is not even wired to the pcb when this happens) . I have the fightpad pcb switched to the middle DP (d-pad) Im using a barrier to splt the harness and the pcb , so I did not have to solder the harness to the pcb.
Also when I trigger the guide button, when I release the guide button the cursor will move to the left 3-4 times, I had a similar issue on my 4716 pcb , but I had to play around with the trigger pods to calibrate it to make it stop, so Im kinda stumped on this as its a fightpad so I did not think you had to do anything lik that
Im also using a seimitsu wiring harness on a jlf, not that it makes a diff its doing it witout being hooked up
Tried to PM you but since I just have 2 posts so I couldn’t. However:
I’m going to build a stick with an 8 button layout hacking a 360 mad catz controller. I’m abit confused about the LB and LT buttons, are you able to use them? I’ve googled my ass off and read a few posts on the forums but I can’t find any real info about it.
/Doffward
I’m sorry if this has been asked before…
Do PS3’s take time to detect a custom joystick when it’s first plugged in?
I built a PS3 custom stick for my friend, using a 3rd party d-pad.
http://img405.imageshack.us/img405/1834/cupuistick01a.th.jpg http://img705.imageshack.us/img705/3554/cupui08a.th.jpg http://img268.imageshack.us/img268/304/cupui06a.th.jpg
Well, it works fine…but sometimes when it’s plugged in…it looks like it’s not detected(can’t move). Then later it works again.
I’m still wondering whether it’s just the PS3 occasionally takes time to recognize the custom stick…
or maybe…the PS3 doesn’t know whether it should detect the stick as X/Y axis or the POV hat. :looney:
Ps1 PAD HACK…
the diagrams i followed are these :
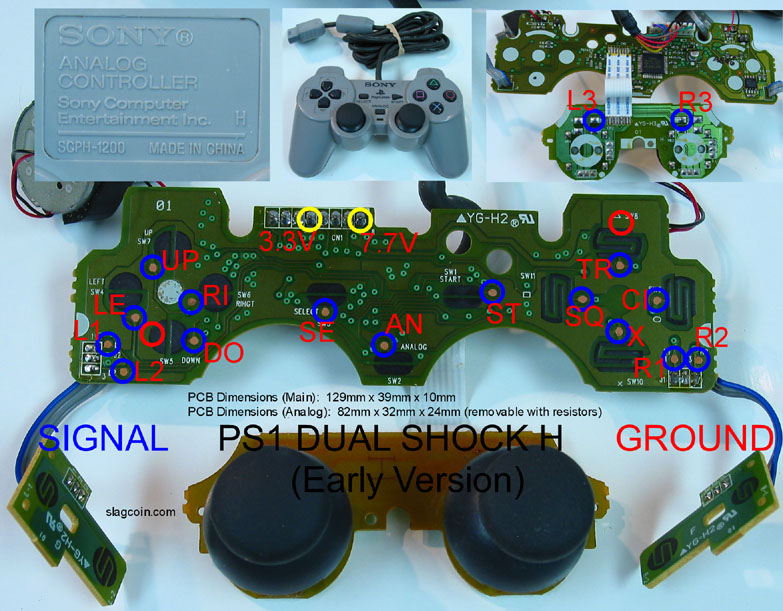
http://arkadesticks.com/hackedpads/PSOneDualShockH.jpg
http://arkadesticks.com/hackedpads/wiredPSOneand3.3volt.jpg
some questions:
this is mine:
http://i526.photobucket.com/albums/cc349/malossi2009/DSCN2403-1.jpg
can i cut the black and red wires? one is already cut off due to the shipment, i just cut the rest or i need them?
since i need just triangle,square,cross,circle, can i leave R1,R2,L1,L2 as they are now?
the analog part is needed? or i just leave it as it is?
I should use 1 ground wire (buttons) or 2 ground wires (1 for the buttons, 1 for the stick)?
If i use 2 ground wires ,for the buttons can i use any ground point i want? bettter choose one of the directions? or the one between L1 and L2? the same question for the stick (between R1 and R2)?
Other things i have to know? for example, in the “wiredpsoneand3.3volt.jpg” what does 3.3 volt mean?I should caer about it?
^
Yes you can just cut off the black and red wires without worrying about anything else, you can also leave the buttons you re not going to use as they are…
also you can use whatever ground you want, i usually used 2 ground points but one would work also…
Now here is my question, im looking for a cheap alternative pcb for a wired PS3 joystick and i was wondering if this would work:
anyone used these pads before? i tried searching but couldnt find much so any information would be highly appreciated guys 
Can those be used for a ps3 joystick?
Happy New Year to everyone!!!
Hey im just finishing up my first arcade stick and I have just 2 more buttons to wire that I cannot figure out. I have a common ground madcatz xbox 360 controller but it turned out to be a bit different than the slag coin diagram. I just cant get the triggers working. Im pretty sure the signal is the middle contact point just like slag coin has shown but i don’t know where to connect the ground. Any help would be greatly appreciated.
Mad Catz #4716 on slagcoin is old.
And Trigger work is not simply done with just wires.
http://www.shoryuken.com/showthread.php?t=197388
has anyone attempted to hack a wii classic controller yet? with tatsunoko vs capcom comin up it would be great if i could get my hrap to also work on my wii. I never took one apart, so far i have just been using a ps2 > GC converter on the wii but my hrap3 is better than my old ps2 stick. I tried searching around for anyone else but couldnt find anything on hacking these wii pads.
any help is appreciated
You are up to it?
muchas gracias, i found pics of the pcb and i get what he is saying, looks like its worth it to stick with my ps2 to gc converter.
if anyone else is interested here are the pics i found
http://wiire.org/Wii/classic
The plastic was a lie.
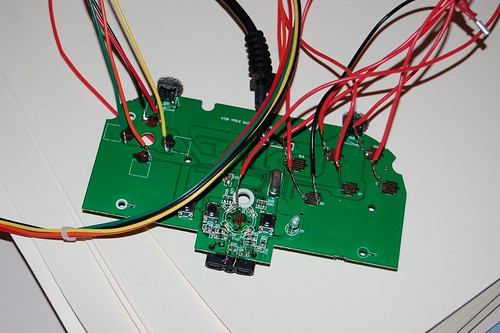
I got a Sony PSX dualshock M series pad. "so i was like W00t, solderless pad hack"
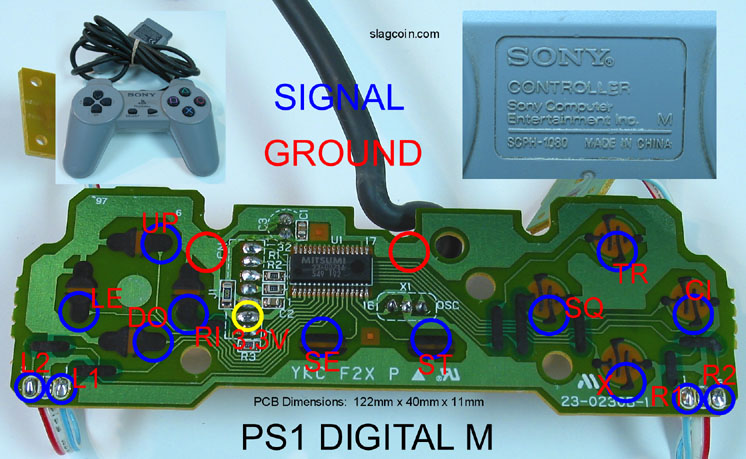
When i opened the pad up, it was not the dual shock M pad pictured on slagcoin, it also doesnt look like any of the Sony PS1 pads on slagcoin. WELL not like any 100%. closest looking to the digital M pad, http://slagcoin.com/joystick/pcb_diagrams/ps1_diagram4.jpg and the dualshock H early version. http://slagcoin.com/joystick/pcb_diagrams/ps1_diagram7.jpg but this pad is a mistumi manufactured PCB board,. Hence the M? Could someone pin point the solder points please and the ground.
http://localhostr.com/files/5384f9/small.JPGhttp://localhostr.com/files/5384f9/small.JPG
Hello.
Wow thanks sweet!
are the v3.3 the same on that pad as the slagcoin links http://slagcoin.com/joystick/pcb_diagrams/ps1_diagram7.jpg
Got a question:
Is it possible for a pads pcb to be dead but have the analog light still be functional?
Yesterday at a tournament my stick didn’t respond at all to the button inputs even though it was working perfectly fine right before I went to sleep 6 hours before. Someone who was modding sticks there said he couldn’t find a problem with it. I got a second opinion from another stick builder and he said the pcb might be fried (even though he didn’t actually look at it).
I opened it up today and looked at it and everything seems glued down/soldered pretty good. Then I pressed the little analog button on the pad while it was plugged in and it still lights up. But none of the buttons are responding to inputs still. The buttons and stick are common ground while the start and select have their own ground wires.
I just want to know if this pad is can still be salvaged before I go look for a replacement pad and have to rewire everything again (I’m pretty bad at keeping everything in place when I wire it).
Extra Detail: I plugged in the controller during the 3S training mode and the game doesn’t recognize it as being there (Please reconnect controller message). The analog light still lights up when I press the analog button.