now my questions are: am i correct in assuming that all the buttons and the two triggers share the same ground? and then on the terminal strip he has all those buttons ground and the stick ground bridged to make one circuit?
sorry for the double post but… so i figured out my questions from the post above but i have another about the triggers. if i’m not going to need one and i remove the pot from the unused one do i still need to a a resistor to prevent it from being always activated?
I been thinking about picking up a SF4 fighting pad for my 360/pc. Doest anyone know what the inside of it look like and is it easy to hack, before I waste money on a pcb I can’t use.
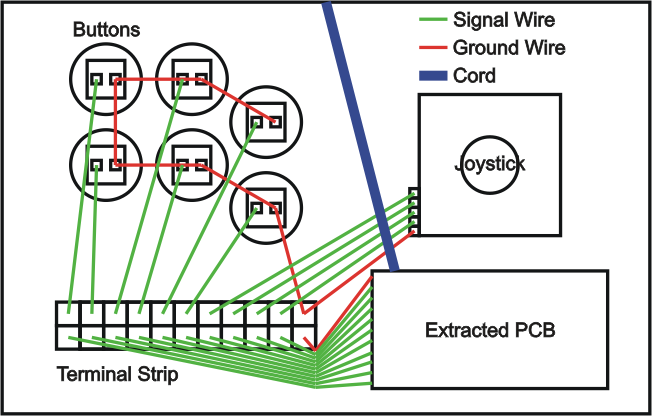
I realize this is going to be a very dumb question but i’ve been looking all these pics and notes over and I want to make sure, on a common ground PCB, I don’t need to pull a ground wire from each individual ground correct? I can just solder a cable onto one ground and then daisy chain it onto the buttons / switches? I’m doing a iL mod.
I looked all over and I couldn’t find a PCB diagram of the above board untill now. I traced out the signals just by looking at the board, and it appeared to be CG as well…
The only think I don’t know is if it is compatible to be dual modded with a Cthulhu. I would assume yes… but you know what they say about assuming :rolleyes:
all the madcatz pcb’s will work for dual modding. the only problem is the difference on how a trigger is modded to work. '07 pads have a simple fix using resistors or modding the pot. '08+ pads require an inverter chip. IC’s are way over my head, so i chose not to use triggers.
thanks for the answer. unfortunately i figured that out the hard way after i wired everything up so i disconnected everything and went back 'a soldering.
NOW the problem i’m having is that the B and X buttons and the right direction are being constantly pressed and i can’t figure out why. at first i figured i had some of the ground wires mixed up so i went and soldered up the ground just the directions with just the directions and i used the button ground by “right click” for just the buttons but i’m still having the same problem.
can you post pictures? check your solder points and make sure it’s not touching signal & ground at the same time. don’t do anything with right click. you should be using an easy ground point such the dpad.
i’m pretty sure that’s what it was even though i couldn’t see exactly which spots were being bridged so i broke out some solder paste and spread it over the both pads and heated it with my iron then after it cooled broke out the alcohol and gave it a good rubbing. everything works great now thanks.
now the only thing i really need to do is find someplace in the atlanta area the can machine a top panel for me. i’m pretty sure i can handle the rest of the box but i don’t have any routing tools. and the p.o.s. box i have it in now isn’t going to last too long.
Anyone ever tried hacking a Pelican XSZ? It’s model PL-3601. I’m curious as I’ve had one sitting here for awhile, and if it’s feasible then I may just try using that in my hrap2: sa so it works on the x360 as well.
So I messed up real bad, I’m trying to do a dual mod for my SFAC, my first time ever doing a mod, though I already somehow messed up I’m still going to try to finish it up, What I’ve done so far is I opened up a mad cats PCB, it’s the one posted here http://forums.shoryuken.com/showpost.php?p=6024869&postcount=2043.
All I did so far was open it up, out of the case.
And it worked fine, I tested it with a multi meter just because I wanted to familiarize myself with the stuff I’d be using.
Worked fine, pc recognized it. and it reacted on the controllers screen.
Next step I removed the triggers, and the plastic part of the analog sticks, the plastic parts nothing else no wired etc.
The square parts with three prongs going into the PCB are still there I literally only removed the plastic parts, after I did this, the pc stopped picking up the controller.
It’s not that it stopped working completely it still lights up and then the PC says unrecognized device and then it powers off. Someone said to me that it might be due to removing the triggers and not putting in resistors yet which I have to do apparently.
I’m going to have to read up more on that it sounds complicated but I’m sure if I read it enough I’ll do it fine, I’m just more worried that I killed a pcb by removing the parts and have to buy a new one.
Another thing I might try is since I don’t have resistors and can’t buy them until this weekend, is piece the controller back together completely and then see if it works fine once it has it all as it was stock.
I will be taking pics of what I do eventually, since it’s my first mod I kinda want to document what I do so I can learn from it, but so far I did not take any since it’s only the controller that I’ve opened up. The solution might be simple, but I’m still learning and trying not to worry about the pcb being shot first, though I kinda assume it wouldn’t turn on and the pc wouldn’t recognize it at all that a connection was being made if the pcb was shot. Also when I plug it into the xbox, all the lights on the ring go on and then turn off after a bit and don’t respond. Any tips would be great again tonight I’m going to piece it together to check.
Basically all buttons except triggers work perfectly. Toodles & zombie’s resistor and NPN transistor methods do not work.
Left trigger (VR2) Grd/Signal/Voltage (looking at rear of PCB)
Right trigger (VR1) Voltage/Signal/Grd (looking at rear of PCB)
When all buttons except triggers are released (open state), a large amount of resistance (30K Ohms) and voltage (3.5V) is across said buttons. If a button is pushed down, it seems a short occurs; voltage drops to (0V). There is no problem with this. One would think the same for the triggers, but no.
In an open state, this is what I get for the triggers:
[Variable resistors (POTS) are removed from PCB; analog sticks are intact]
VR1 (RT) 3.5V
VR2 (LT) 0.65V
Application test: SF IV - Zangief - Normal & Quick Lariet
Normal Lariet is executed fine.
Can not execute a Quick Lariat; LK & MK execute 1.5secs or so before HK executes. Training input displays LK & MK executing before HK. Basically there is lag when executing a “HK” hence not being able to perform a Quick Lariat.
Am I overlooking something; I guess the inverter is the way to go for this “new” model.
I finally started soldering my 360 arcadestick. I started off by setting up my daisy chain and then testing buttons As theory served I tested my farthest button, and something weird happened. It showed in vista as the button was being pressed, then when I pressed it that it was being depressed. all I soldered to the board was the ground (It’s common, so I used the up button) , and I’m using this PCB:
what did I do wrong and how do I fix it so I can get to wiring the actual buttons?
when soldering to the buttons (A,B,X,Y) points on the madcatz retro board, do you solder to the point (small circle on edge of big circle) only, or anywhere on the big circle?
if you are supposed to go to the smaller circle, does it hurt if some solder gets to the bigger part?
I would think it wouldn’t matter as your actual button will complete the circuit… but I wasn’t sure…


