I’m working on a DC hack right now actually. I’ve done two already.
The entire controller is common ground, so you can daisy chain everything together. I usually chain the buttons and the joystick separately anyways.
About the triggers: All you need to do is add a bit of solder to what’s already there, then wire up to it. Because of the small solder/copper pads, a little hot glue helps a lot.
I’m not sure why your stick is registering left instead of neutral, you might wanna check your soldering and make sure you don’t have it ‘always on’, ie. you soldered the common and the signal together on the left pad.
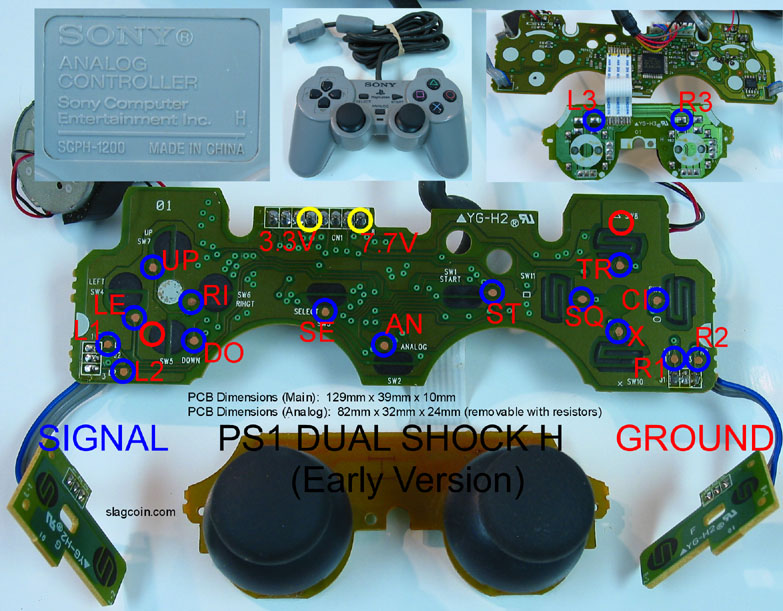
Can someone point out the ground on this psx ds h model controller diagram, so i can use it do daisy chain thanks.http://www.slagcoin.com/joystick/pcb_diagrams/ps1_diagram7.jpg i am modding this pcb with happ buttons and joystick, i know this pad is hackable but can’t seem to find the ground to daisy chain with. There is only ground for each buttons.
Having problems with a dual mod setup…trying to dual mod a PS3 Madcatz SE with a new Madcatz 4716 360 pad (2009 i believe…board says version E). Weird thing is that when the game is on and I change the controller settings to Controller Type A - My A, B, and RT do not work and my LT is only LK and MK when it should be 3xK. But when I switch it to Arcade Type A , my A, B, and RT function fine but my LB registers as a LK instead of 3xK. What did i do wrong and how do I fix this? I need the Arcade Type A to work right.
Anyone have any advice on what to do if u accidentally ripped off the metal pad your suppose to solder to? Its my start button so i can still get by without it but would be nice if i could fix it.
I’ll pay you if you can solder or wire a working psx/ps2/ps3 pcb for me. Too frustrating to solder it. If you’re interested, please pm me & we can go from there!
it’s really easy here is what you do, first put solder onto your soldering iron make sure you put like about a blob, then place your wire on the blob and it will stick to the wire.Then only left to do is to place your iron on the soldering spot then the solder should turn into liquid, after that just place the wire in to the liquid, remeber you need to blow on the spot like 3 times to quicken the solder state ( liquid to solid ) there you go hope it helps. Oh yea where you from, i might can soldering for you. Just finished my 2 player x-arcade psx PCB turned out great i also got the l3 r3 just incase i need it ( Dragon Ball Z Budakai Tenkaichi 3 ) it works great only left to do is to get the analog stick placed on the top and i am done.
Nice! thanks for the tip. I was tinned my soldering iron, barely any solder on it. Now i know what i was doing wrong. Thanks, this helps alot, going to try this tonight. I live in canada!
Also how do you which terminal in the buttons are ground & signal? I have the sanwa 30 mm ones, the snap in. Both terminals look identical to each other, does it make a difference?
