I tried grinding these off and it was a hassle. It’s easier to hot glue them in place. Put the tip of the hot glue gun at the tip of the analog peg and squeeze the trigger. It should glue down in a form resembling a Hershey’s kiss. It looks clean and they’re definitely not going anywhere.
alright, got another noob question… I’ve wired everything up, mounted my pcb and all that, all the buttons work in the dashboard of the 360, but when i load up SF4 the ‘A’ and ‘B’ ‘RB’ buttons d’ont work, the A and B buttons work in SF4 throughout all the menus, to go back and forward and such, but as soon as i load a fight they wont register…
so, buttons work in menus but not when actual fight loads… even when i pick my characters i do it with the button I’ve wired as ‘A’
I’m sure it’s something completely obvious but hell if i know
anyways thanks much ^^
(its a wired xbox 360 controller) oh and I’ve tried pulling the wires off (its all quick disconnect) and touching them together, and I’ve tried wiring different buttons to the actual mounted button, so its not the joystick buttons
okay this is crazy, first of all. you were completely right it was the triggers… after i changed them to no input everything worked great, mind you my skills not so much.
anyways, i get everything together play for a bit then head out, gone for a couple hours and when i get back my direction ‘right’ doesn’t work, so, pull it all apart, nothing’s changed, yet when i try to make a short connection between ‘right’ and its ‘ground’ nothing happens, after a bit of fiddling, when i connect the two wires for ‘right’ i get an UP motion occasionally but if i leave ‘right’ disconnected all other buttons work fine.
but i digress, this is my luck with stuff like this, i’ll attempt to make better connections tomorrow as being tired and soldering doesnt seem a good idea.
and if anyone has any ideas… figure i dropped solder and crossed lines somehow? i dunno, but thanks in advance for any help
hey, since nobody answered my questions before i went ahead and made some makeshift problem solvers, (fit one strand of a wire into the tiny hole etc.) and now my pcb is almost done… and working great for the most part…
i’ve gone one last problem though, it’s a bit like swartzers first problem - the A button just isn’t working. when i make a connection between A and ground nothing happens at all. every other button works but this one and i havent ripped off any connections here or anything, so I don’t know how to solve this problem. I’ve tried exposing copper at parts of the trace and this doesnt work either, so I’m kinda stumped, and any help at all would be amazing.
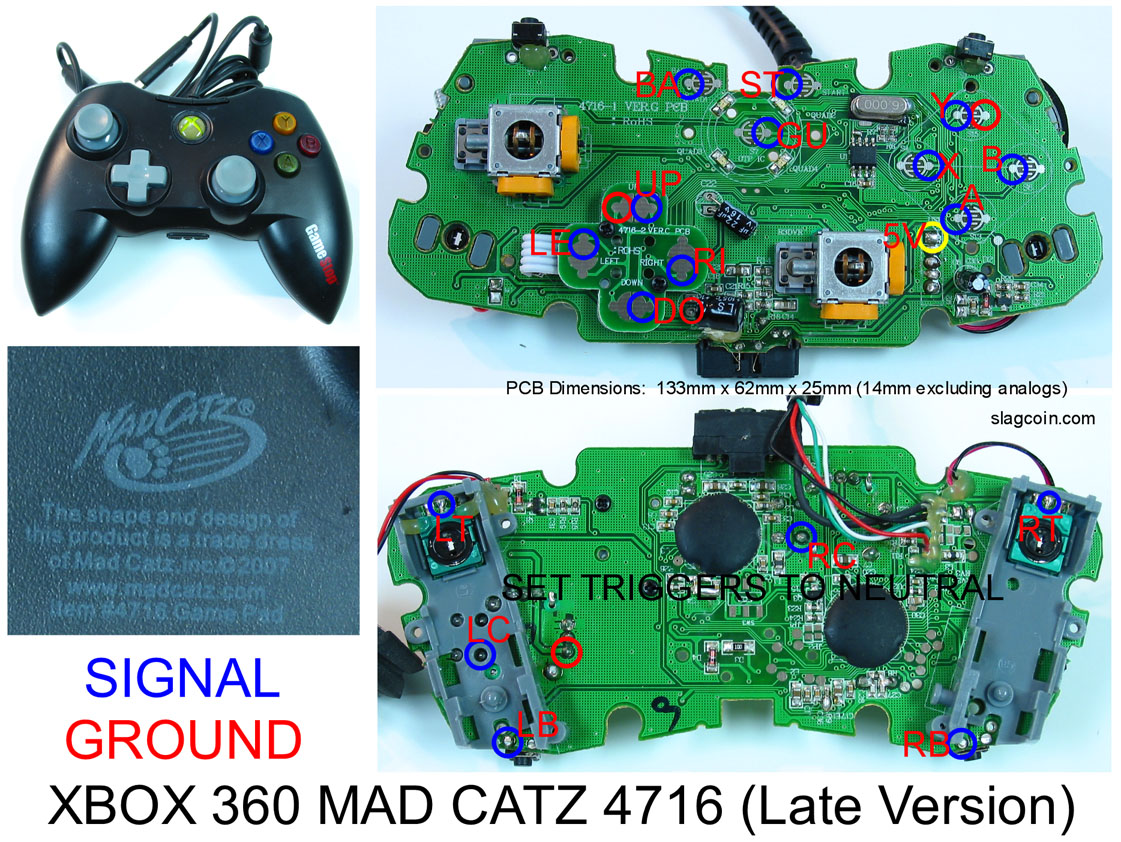
At first I thought I had to connect all the buttons and the stick to one of those ‘common’ points, but now I’m confused. I don’t understand what the commons do and what the ground do.
dont worry about the ground there unless you want to use the triggers.
that’s the PCB im using and it confused me aswell at first. you can daisy chain the buttons and connect them up to one of the common (in red) connections shown in that diagram, you only need to use one of em and that’ll be fine.
Having the same problem except wheb i map a kck button it doesnt work a b and rb work when i map it as a punch but nothing works if i map any type of kick button if i map them all punches they work im using a older madcatz pcb
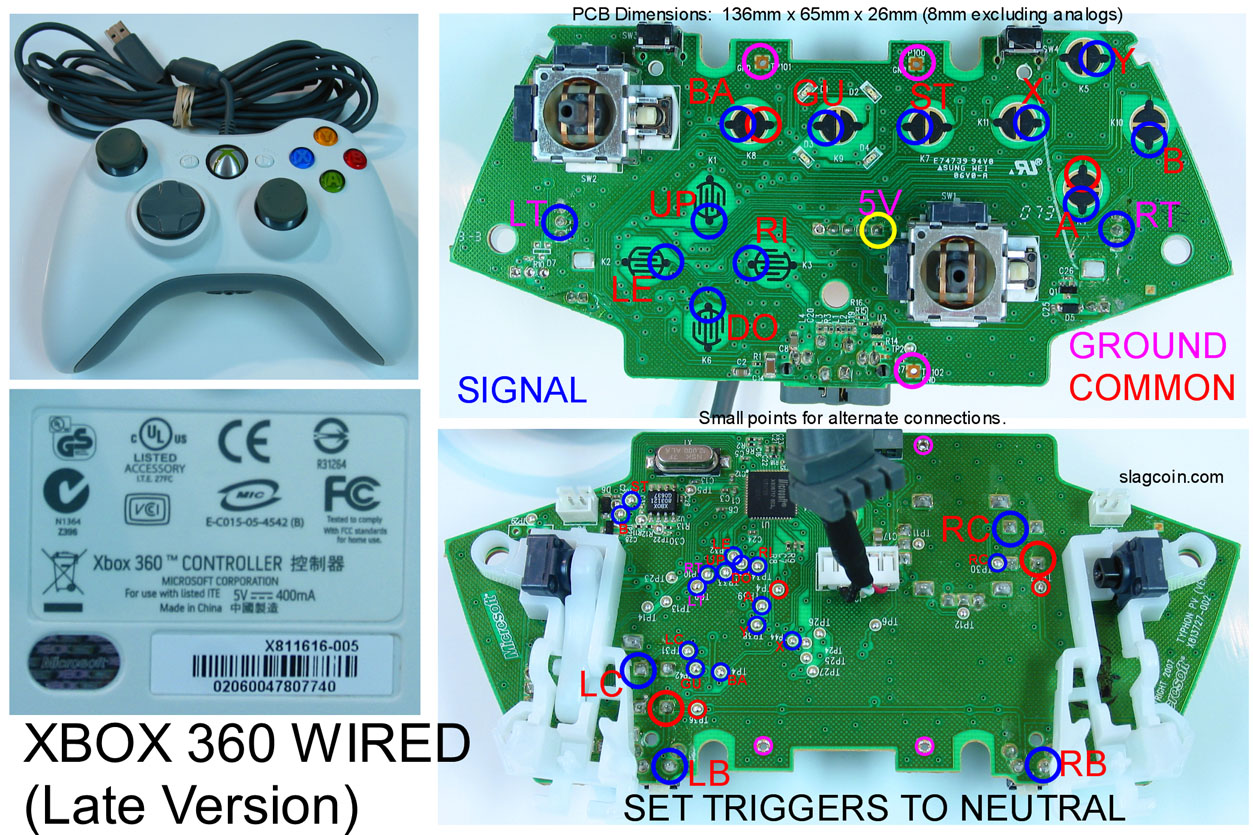
Hey guys, im having trouble working out where to ground a/b/x/y and Home/start/back. Im probably being dense but i just cant see it so if someone can help or maybe mark the jpg,
that way helping others who have this pcb that would be cool, thanks guys:tup:
Quick question- Ive done alot of psx hacks but this is my first 360 hack. Looking at the contact points they already look copper. I assume i still need to scrape the points.
I see that in the two digrams that some of the grounds and signals were changed. Is this accurate or did they really change some of them. Wonder why if they did. Just wanna know if this diagram is legit cause I am buying one that says 2009 on it and I don’t wanna mess it up.
Im currently wiring a madcatz 360 pad and I have a button thats doing two inputs, maybe this has been covered here somewhere or someone could save me the hassle of waiting 300 seconds in between guesses on search keywords.
A few other problems I’m having, I have one button that doesn’t work the solder hit its spot and the wires are all secure, this (and I’m guessing here) affects the bump button putting from putting in the 3 punch buttons instead it just inputs heavy and medium punch. the light punch button isn’t working for some odd reason.
There’s nothing to scrape on the Mad Catz 360 pads. The points usually take solder without too much fuss. You may have to heat up the point a little with the iron if it’s being disagreeable.
I made that one and it it’s accurate for the 2008 pads. Things really did move around. I bought another one of these last week and it was still the 2008 version. I wouldn’t be surprised if they changed it for the 2009.