Yep, they’re actually a rebadged madcatz, they share the same model number (4716) as the gamestop CG controllers. The pcb is slightly different, as is the case, but it’s very easy to work with and very easy to figure out. The LT/RT triggers do require two resistors and a transistor each if you want to use them, but it’s not a big problem at all.
does anyone know where the 5v or 3.3v is located on the pcb for the capcom fighting jam hrap and the agetec Green goblin? Gotta a friend i need to dual mod it for.
THanks
I’m attempting to Piggyback a X360 PCB onto a UPCB. Does anyone know which X360 controller has a common ground? [I’ve heard that the Mad Catz Gamepad/Live Arcade Sticks have them, but I’m confused as far as what model to go after, and a good place to buy them.
Also, is there a “good” Dreamcast PCB that’s easy to find? I’ve been having problems looking for some Agetec PCBs.
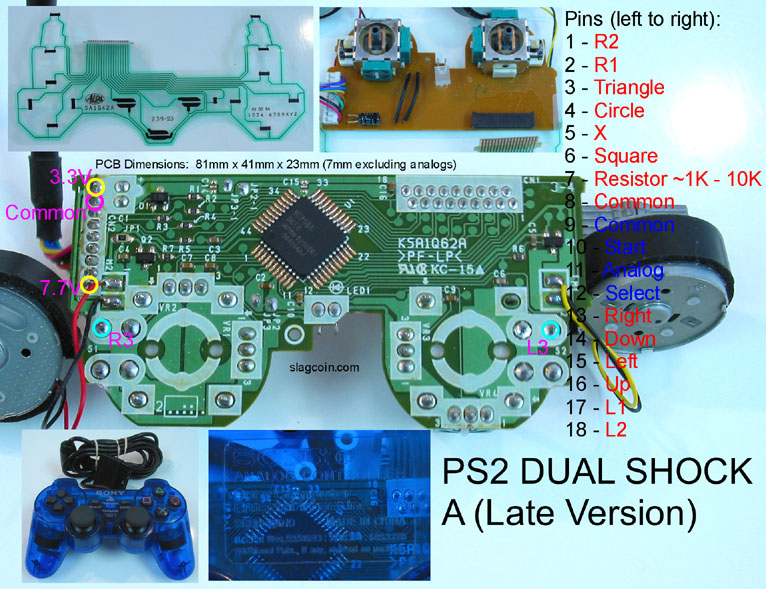
I too have this controller. I can figure out all the wiring except the triggers. i have seen many threads on using an NPN and resisters on some PCBs and some that only need resisters. I think I have figured out the low side of the trigger pot but am leary to go any further. Any advice on this board would be greatly apreciated.
You can grab a Mad Catz Dreampad for $10 shipped off ebay; some are common ground and some are not, but from what I’ve read you can turn the non-common ground ones into common ground with a resistor somehow.
does anyone have a diagram for a mad catz fightpad? they look easy and i have one pcb to use and i want to be absolutely sure how to solder hack this thing so i dont mess it up.
hello i dont know where to post this question. Im working on my first box and the box is finished and now it seems the hardest part (wiring a pcb to sanwa buttons) is next. What is the easiest pad to hack to work with a 360? and does anyone have really good pictures that i could just follow? im looking into a wired pad… any help would be really appreciated.
thanks for the pic. I understand the d-pad and 6 button locations and their grounds, but i’m slightly confused on the triggers, start/back, and the guide button.
i hate to sound like a complete moron on the subject about that but this is my first build and i don’t want this pcb to go to waste so please excuse my lack of knowledge.
any input on the guide, triggers and start/back buttons are appreciated.
It looks like the triggers and start/back buttons are just like the bumper buttons on a typical 360 pad; there are two little terminals coming out of them that you can see on the bottom of the PCB. One is ground, the other is the signal. The guide is just like the face buttons. Scrape the carbon off the contact points until you see the copper, solder your wires to the signal points (be sure to read a “How to solder” guide beforehand), solder one wire to a ground point, and you’re done. I like to apply hot glue to the bottom of the PCB, away from the solder points, to hold the wires flat against the board securely and make sure that a tugged wire won’t pull off the solder point. Some people apply the hot glue directly onto the solder points, but that makes it almost impossible to fix should something go wrong down the road.
 :wasted: