got a question. im adding a ps1 pcb to my te stick and i wanna know if i can just attach the ps1 ground wire to any ground wire on the madcatz pcb or do i have to put it somewhere specific. ind if i have to put it somewhere specific then where?
Here’s a couple of warnings for anybody in a jam and needing to quickly PS3-ify their arcade stick (don’t have time to order a Cthulhu).
Pelican Afterglow PS3: It’s not a common ground board. So it’s doable, but only if you have your joystick wired up with a separate ground for the joystick, the main buttons, and the start/select/ps buttons. I haven’t checked the grounds on the L1/L2/R1/R2 buttons yet, but it doesn’t really matter. Also, all those LEDs are freakin’ obnoxious.
Newer Dualshock 3 controller: Forget it. There doesn’t seem to be any good places to lay down any solder. The new film connector (without the ribbon terminal) just lays across some carbon pads over whisper thin traces. I’ve heard it’s difficult, I’ll go one further and say these new boards are impossible.
In conclusion: just make sure you have time to order a Cthulhu board.
Not impossible, but definitely avoid, the ds3 have even smaller margin of error and would say too difficult to bother with at all. Sony are trying to do something about unlicensed adapters or something I heard, hopefully nothing will come out of that.
Hey Toodles,
I looked in the thread and the most obvious problem of mine is that I am not wiring the power supplies together. So I’ll go home and do that.
But I couldn’t find the exact post where it says that there are two cardinal rules – can you point me there so I know what they are?
Does it matter if you scratch the copper when scraping off the black stuff? I’m using a razor blade to scrape it off, scared of scraping lines into the copper with the blade =\
Below in this tutorial for buttons LB and RB it says, has anyone just soldered onto those points without cutting back the plastic?
The only 2 buttons you do not need to scrape any rubber away from are the Right/Left bumper buttons. They have metal exposed already you can solder directly to, and you can see that from the picture.
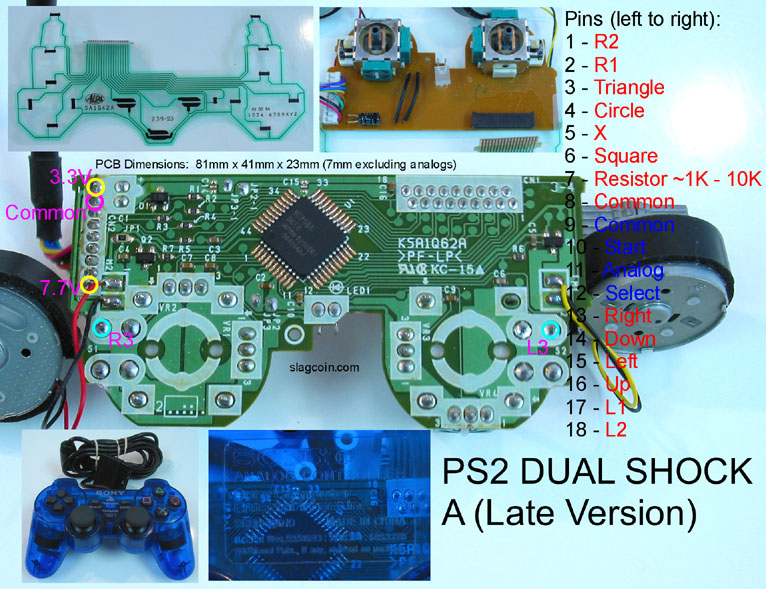
ok im sure this has already been answer in one of the pages but ive surfed through like 25 and cant do anymore (sorry if i come off as lazy), but im trying to see if my dualshock2 controllers can do the spiffyshoes solderless hack. the issue im having is that all the guides have this version of the type A
while the one i have is more like this one, which slagcoin says is recommended but im not sure how to do the hack on it.
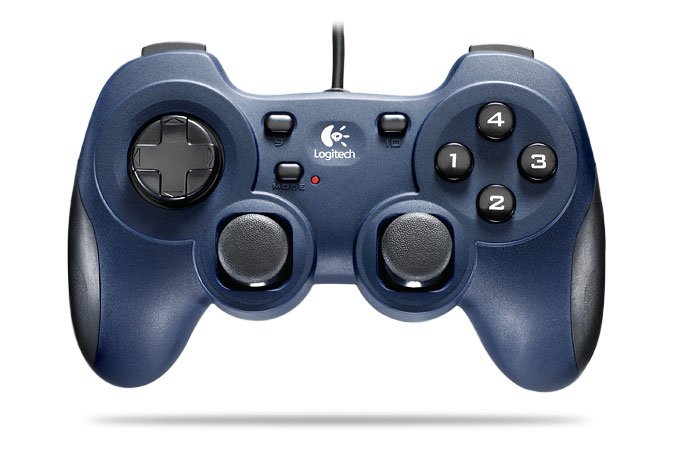
can anyone help me find what to solder on a logitech Dual Action controller
. i found that it works perfect on a ps3. and would like to make it a stick… for 20$ i think it would be well worth it. to use for a ps3 stick mod. instead of wasting a 50 controller.
Well, while I was in the process of putting in a Mad Catz Xbox 360 PCB (the latest version where you have to add transistors and stuff to the triggers to use them as buttons) into my HRAP2:SA, I had to desolder the USB cable in order to run it into my HRAP2:SA and I stupidly didn’t write down the order of the colors. If anybody happens to know the order, that’d be awesome.
I’m looking in at it from the front where the analog sticks are facing out. They’re in a row of five points and I know the far left one is the 5V line and the far left is that thick black wire. What goes in between?
first of all, thanks to everyone who contributed to this thread… i motivated me to make my first stick… i just finished wiring up a late version madcatz controller that i luckily found at fry’s (it was the last one, black 4716)… i tested it on my pc and eveything works EXCEPT the guide button…
do i need to scape that signal contact down?
thanks in advance!!!
EDIT: i’m only using the one ground from the dpad UP contact for all the buttons if that makes a difference…
Nope, it doesn’t register as a button in control panel/game controllers. It took me hours to realize that I hadn’t made a mistake wiring it up because of that. You have to plug into an Xbox 360 to see if the guide button works.
Theres a certain driver (official microsoft) which enables the guide button to work in windows. I tried it on a brand new install some time ago, worked fine, but doesn’t seem to work if you have xbcd and then remove it from the system.
 (sorry if i come off as lazy), but im trying to see if my dualshock2 controllers can do the spiffyshoes solderless hack. the issue im having is that all the guides have this version of the type A
