Yea, they are. Its sad how the holes on the plastic are the right size but on the metal panel (Which I replaced mine with plexi any way) Is just plain annoying.:arazz:
Don’t use your soldering iron, you’re going to kill the tip.
Ran into a similar issue, I used a razor to loosen up the glue, then peeled it off. Then, since a few of the ends of the wire were stick stuck in the PCB, I used the soldering iron on the other end to push the wire out and grab it with pliers.
Dunno if that is a good method, but hey, I’m as new as you are.
edit edit edit - Actually Barky, you are using something like an American Hori stick (like the t5 bundle one) ? In that case, there is no shared ground, which leads to my question :
If the PCB doesn’t have a common ground for the stick (t5 PCB is like this and so are a few Pelican PCBs I have laying around), would I have to wire a JLF using the method seen here? http://forums.shoryuken.com/showthread.php?t=131221
Is there a special brand of paint one needs to use to get that smooth glossy look?
I always apply at least 2 layers of paint but after it dries it looks rough and bubbly and it can easily be scratched off
Is there something I’m not doing which i should?
I know absolutely nothing about painting
yeah, according to the himura games mod guide (the one I’ve been looking at), there is a ground wire for each direction.
I really don’t know if I need to solder onto the pcb or not… The himura games one made it seem like you just solder the wires from the pcb onto the sanwa no problem. Maybe I bought the wrong kind of stick? The one I bought, as mentioned earlier, has the pin connector coming from it… pictures coming soon
anyone?
First sand it smooth, I use 600 grit paper.
Then prime it with two or three coatings, sand between coatings and after the last layer of primer. Now it should be smooth and the paint will have a surface to grip on.
Paint it with at least 2 layers of paint, if its needed sand between coatings… BUT let the paint dry completely before sanding… depending on the paint it can take several days.
When its dry apply gloss. As many coatings as you like.
And don’t be impatient, for me that is the number one reason for a potential fuckup!
Hope it makes some kind of sense
Absolutely that’s exactly what i wanted to know
thanks!!!
pics for my hori t5 prob

bottom of the sanwa I’m soldering

this is the wires glued onto the pcb. The wires I have desoldered from the old stick are in the background.
Yea, your Sanwa should’ve come with a harness. Just peel off the glue, desolder the wires, then solder the new ones on. Which way to solder them, I dunno =P. Good luck to you with that.
Prime, prime, sand, paint, sand, paint, sand, ad nauseum
my sanwa does have a harness… now I’m really confused
It is possible to buy them without the harness. So instead of plugging in the wiring harness to the header pins, you will just have to solder directly onto them.
I know somewhere on this forum there is a picture that tells you which pin is which, but if I can remember correctly, in your picture the pins from left to right are: ground, up, down, left, right.
This one?
solder onto the pins? WTFFFF?
couldn’t I do something like splice the two wires together? possible? seems like it might work in theory. that way, I would have the wires coming out of the stick connected to the wires coming out of the pcb
Wires coming from the stick? I thought you said you didnt have the wiring harness, or maybe its just that you dont know what the harness is refering to.
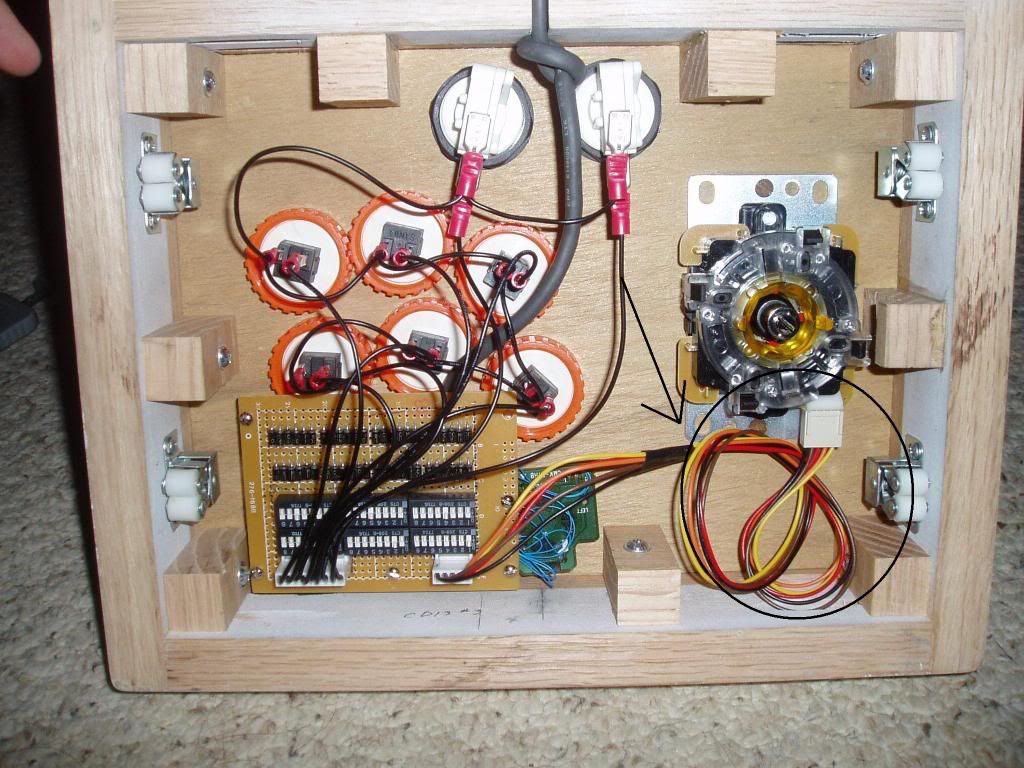
http://i182.photobucket.com/albums/x277/Chaosdragon13/th_harness.jpg
Thats the wiring harness, the thing in the big circle with the arrow pointing to it. If you have that then yeah, you can splice the wires together, or just solder those wires onto the PCB.
yeah, I think I’ll try splicing… my soldering skills are weak to say the least.
edit: I’m going to try butt soldering them together, seems like a happy medium. Anybody have experience with this?
What kind of bit do I need to unscrew the metal plate from the DC Agetec stick, does anyone know? I don’t have a bit like that… I have plans for taking it off and then going to some metal shop and replacing it with a metal plate that’s either midnight black or gunmetal.
You need a star bit (*) You can also used a small ‘flat tip’ screwdriver, but with the star bit you won’t end up stripping it.
Can someone help me? I’m at a lack of direction because I don’t know how to generate backgrounds. All I have is this: http://img399.imageshack.us/img399/2993/newonejr4.jpg