ok i got my jlf in now i just need buttons its easier than i thought

ok i got my jlf in now i just need buttons its easier than i thought
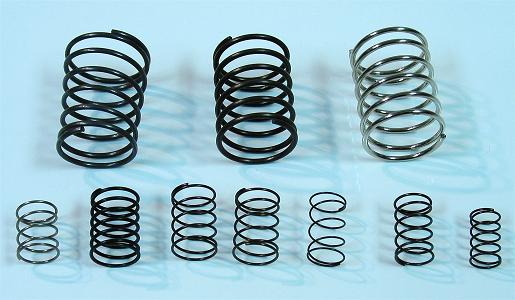
Here is a picture of the springs from slagcoin. The JLF spring is the bottom left. He of course does not have the MadCatz spring on there, but the one that does not look like the JLF spring would be it.
i appreciat that man, also already found that pic.
Pictures are too risky though. A difference in flash or lighting would show different shininess on the spring.
they are sooooo similar, my only difference is about 1/32 in height, and one is slightly brighter…
I think i found it, but want confirmation before i slap it all together lol.
seems to be the darker, shorter of the 2…
I’m not going to completely remove mine but these pics should answer any questions you have.
After removing the old joystick, place the ls-32-01 into the position you are going to mount it. There should only be 2 ways possible based on the mounting plate for the ls-32-01 so pick one. The 5 pin connector on the ls-32 PCB will NOT be facing to the nearest side of the box in either of these positions, which is what needs to be changed. DO NOT mount the joystick at this time.
Remove the blue gate by removing these screws:
http://img139.imageshack.us/img139/1521/step2.jpg
http://img232.imageshack.us/img232/3519/step3p.jpg
http://img232.imageshack.us/img232/8600/step4k.jpg
http://img50.imageshack.us/img50/4637/step5h.jpg
BEFORE putting everything back together, mount the joystick to the mounting plate on the case since all the mounting holes are now accessble.
Put everything back as it was. You can leave off the dark blue gate if you want, the light blue is being used in the default setup. I left it on mine simply for storage purposes
Thanks for the walkthrough. few questions though. are the required number of screws included with the joystick? id assume i’ll mount 4 on the 4 corners of the mounting plate? also. is the dark blue gate even necessary to be attached if the light blue allows it to already be 8 way square?
Reuse the screws that were holding the stock stick in. The corners should work and I’ve also seen people who just used the 2 side spots as well.
No, the dark blue gate does not need to be attached. I put it back on mine simply as a place to store it.
thanks! now im well prepared for the mod as soon as all my parts arrive.
Anyone having issues with the madcatz wiring harness getting shook loose on the jlf?
The original joystick had a clip that kept it in place. After a few hours of play my JLF wasn’t registering down. Opened it up to see that it wiggled out.
Any suggestions? Tape? hot glue? I may have answered my own question. Just wanted to throw this out there that there is a possibility of this happening.
I think that is a new one, but when I install my JLF I am going to tape it up real nice…thanks
certainly not having that problem or any of my buddies with jlf/se, maybe a very very small dab of silicone or hot glue would do the trick, you dont want anything permanent obviously…
I just wanted to chip in on the topic of using the stock mounting plate with a JLF-8Y-TP, especially for those in the UK, since I’ll be mentioing a couple of british stores that potentially offer solutions.
My first three screws came out like butter. No issues. The last one just wouldn’t play nice. I was using the perfect driver and, since I was aware of the issues surrounding this plate, I was being as careful as I could. I sincerely believe that that screwhead wasn’t going to do anything but strip.
I have practically zero tools at my house for dealing with this, so I ended up taking to a Machine Mart and going around to the back where they had a Services And Spares Workshop. I asked some guy if he wanted to make an easy 10 and spend 5 minutes drilling this rogue screw out and he smilingly accepted. Refused to take payment too. Awesome chap.
Needing a replacement screw, I headed back into town and found myself in a Maplins. Here I bought a bag of THESE (clicky), which have the correct thread and nut size (the JLF doesn’t come with nuts and, since one of mine was fucked from that guy drilling through the stripped screw, I needed at least one replacement - I actually ended up using these nuts instead anyway for all four screws, rather than fishing the remaining three gummy ones out of the stock housing).
http://images.maplin.co.uk/300/a22gf.jpg
These are not ideal, but they do work. Washer obviously not relevant.
I held one of these in a hobby vice and just hacksawed my way through so it was the correct length, filing off the end so it was neat. Worked a treat.
Note that the heads on these screws are not flat-sunken, like they should ideally be. I was worried this would be an issue when it came to reattaching the plate to the controller case. Happily this wasn’t a problem though due to the way the mounting plate sits 5mm or so beneath the top of the controller (ie. the top of the mounting plate doesn’t actually rest flat against the underside of the casing top plate).
In hindsight, opting for the mounting-plateless JLF-TP-8Y model is truely a pain in the arse though. :lol: Not that I had any choice, what with current stock levels and store accessibility.
Parts I ordered from Laugh arrived today. Sanwa JLF-TP-8Y-SK and Sanwa OBSF-30mm.
http://img22.imageshack.us/img22/4976/sv102208as6.jpg
http://img60.imageshack.us/img60/7554/sv102218nu0.jpg
Installing the buttons was cake, as for the JLF… like everyone else… I manage to unscrew 3 screws but the 4th one breaks in half lol…
Anyways… I put the SE fightstick mounting plate on the new sanwa JLF and tried to use the 3 screws but the screws was just too small for the sanwa JLF. I didn’t want to go out and buy new screws… so I look around my house and I end up finding these http://mystagedlife.com/wp-content/uploads/2008/03/light-switch.jpg
I can’t believe those screw from the wall lightswitch worked… I went around my house hunting for 4 and voila! hahahha post pics of my fightsticks soon!.
Yeah, but now you’ve got a bunch of loose lightswitch plates in your house . . :razzy:
New 5 Pin Harness
Im may or may not have to get a new 5 pin harness for my SE stick. It was super glued in pretty good and I had to use some elbow grease to take it out. Anyway, I’ve noticed that the harness has a connector for the stick, but the other en is just wires. How do you connect the other ends to the other connection (lets say worse case scenario the plastic connector is gone, although I still have it). Any help would be appreciated!!!
If you are talking about the wires that came with the new joystick, you don’t use those, you use the existing SE connector that you removed from the stock joystick. You remove it from the 5 pin connector on the stock stick, put in the new stick, then plug it back into the 5 pin connector on the new stick.
Unless I’m misunderstanding something here. .
Edit: If you mean you think you broke the SE’s connector and want to use the one that came with the joystick, then you would have to fit the bare end with a connector, solder those wires to the points they should connect to on the PCB, or fix the broke one. As long as you didn’t yank the connector out by the wires though, I would think it would be okay. . .
How do you screw in the sanwa jlf to the mounting plate?
Can I just super glue the two together or something?
Thank you…yesI think all I need to do is clean the glue off more from one of the connections. It was completely loaded with glue. I really cant test it on a JLF until I get a new one, so heres hoping!
Question, guys, will the Sanwa bat top work on an LS-32? LL’s website only mentions it working on Sanwa’s sticks. I’ve grown to love the ball top, but i kinda miss that American arcade feel of the bat. I wanna try it out. Thanks.
I just did this yesterday. You use the screws and nuts that came with the crappy SE stick. Look under the original (SE) stick and you should find the nuts to use with the machine screws that came with it. To find them, pull off the pcb board with the 4 microswitches (again, on the original stick). You will have to push the nuts out with a small flathead like an eyeglass screwdriver or similar because they are glued in. Once they pop out, push them into the sanwa plate (I used a larger philips head for this) and use the screws that came with the original stick. Then, place the mounting plate and screw it in.
Viola.
If anyone is in the NYC area, I found a store stocked with JLFs and Sanwa push-ins.
http://revver.com/video/813854/video-games-new-york-tour/
It’s on 6th street just north of Houston.