BUMPin back to the front
It looks like, based on tracing the paths that the ground (on the buttons mind you) is the right side solder point. However, since it is common ground you only need to solder a ground wire in one location for the buttons and one location on the joystick then just daisy chain it to all the other buttons. At least, that is how I interpret the information on slagcoin.
So I have the fightpad and have it opened up, now im just not sure about where to solder the ground wires.
Since this is going inside a x-arcade there are like 3 different ground wires split between the buttons, and 1 gound wire for the jlf, so could i just solder the ends of the 3 button ground wires to the same solder point?
umm…im getting the ps3 fightpad for free cause i won round2 at gamestop. my stick goes to the dc,gc,360 and ps1 but i cant find a good converter for my ps1 pcb but that pelican,there hard to get. so i want to solder the ps3 fight pad into my stick so i dont have to worry about working converters. so my stick will go to everything
so does anyone know where the ground points are? I can’t figure it out.
couldn’t the fightpads be a bit more useful if you want 8 buttons? it looks like you wouldn’t need to do any crazy work to the shoulder buttons.
I have (with the help of friends) finished my custom arcade stick this weekend using the Fightpad PCB as the padhack. The only thing that does not work is the guide button. That button is just damn hard to solder. We also think we killed the guide button circuit path trying. I will post a picture in here later today that shows where the soldering was done on it. We also daisy chained the ground so you will only see 2 ground wires soldered to the board.
As promised here is pictures of the soldering job. This is when we had the guide button working but the solder failed and now the PCB around the guide button is scorched and the button does not appear to work at all no matter what we do.
Here is the front:
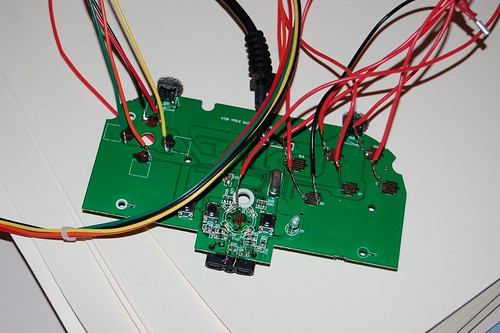
Here is the back:

You do not have to desolder the microswitches as this hack demonstrates. However if you want the cleanest pad possible, you probably want to remove them.
That PCB is beautiful. I might buy one to solder.
I am still trying to come up with a solution for the guide button issue because I don’t like having the button in the stick doing nothing. I am currently attempting to figure out if there is an alternative solder point on the back of the PCB that I could solder to. Unfortunately, no one has mapped out this PCB yet so I am kind of in the dark.
I wouldn’t mind having a map for this one because my d-pad snapped off and it’s useless now and i doubt madcatz will fix it. i basically have a pcb i can use but i dont want to risk scorching it.
was the LB and LT a bitch to work with or was that easy?
How did you get the connections to stick? I was thinking to drill 1/16 holes where you soldered and put the wires through the holes and solder. Wll this work? brcause i cant get the colder to stick to the board. Also after doing some testing it doesnt look like the start/select/ps3 button is on the same ground. They all seem to be on seperate ground. How do you over come this. SOrry if these seem like noob questions.
If it’s like the other Mad Catz pads then the solder should eventually stick. You may have to heat up the copper pad a second or two (but not longer) to remove the coating/residue/whatever the heck it is. You can apparently also prep the copper pads with flux or rubbing alcohol. I’ve soldered a few Mad Catz (Gamestop) pads and there’s always one or two copper points that want to be difficult. It’s just a matter of being patient with it.
You may be able to get away with drill (I do this on Saturn pads), but I wouldn’t recommend it before trying the above.
Thanks for hte response. Actually the pads i have are are silver in color. Not sure if thats tin or some other matierial. Would the same methods apply?
I agree.
u got larger pictures
Yes I have larger pictures, the originals are enormous (3000x2000 resolution). If you want them send me a PM with your e-mail address and I will e-mail them to you.
Where’s the 5 volt and how do/did/will you solder the start button?
Bump
Love to see progress. I found this thread at the top of a google search because I’m trying to do the exact same thing.:bgrin:
Modding one of these today. I thought this might be helpful
http://judecca.shackspace.com/arcade/fightpad/fightpad_front.jpg
http://judecca.shackspace.com/arcade/fightpad/fightpad_back.jpg