it’s hard to say because the only image i can find is the one on the first page of this thread, from that image it looks like there are wires coming from the 2 places, the one’s coming from the main pcb don’t appear to contain the ground, figure out which is the ground and trace the circuit on the board where it’s soldered to, that’ll let u know, but i’m assuming it is a common ground…but shouldn’t be hard for you to figure out, if you posted a high res close up it’d be easier to tell
hey guys, i have some questions about the v3/vx. i’m studying abroad in tokyo right now and all i have are madcatz sticks at home and my laptop has the weird usb issue with detecting them. so i’m planning on buying either a vx or v3 at tgs if they’re selling them along with some sanwa /seimitsu parts. but here’s the thing, since i’m studying abroad here i have nothing-- no tools or anything so would modding this stick require anything other than wire crimpers/wires/qds/screwdriver? if it needs a soldering iron i’ll still buy the stick but i’ll probably just keep it stock till i get home or something.
thanks in advance for the help guys!
Yea u need to desolder the horizontal buttons that are already in there, unless u figure out a way to get them out of there
Not necessarily. You can cut the solder point under the PCB. You’ll kinda destroy the PCB and you can’t use the stock buttons anymore but that’s not the point. You may need some stronger cutters though.
Hi, this is my first arcade stick and I would like to mod it. Could someone plz make a video on how to do it or explain how to do it in detail, cause i’m a noob at this. thx!
Yeah… so if someone could posed a detailed video, it would be epic. I’m sure you would be helping a ton of people, I see a lot of people in forums that will mod it.
Does anyone have a clue if someone has successfully dual modded the VX (360 version)? I’m thinking to use a ChimpSMD but I’m a little confused with the wiring from the 2 separate PCB’s to the Chimp. If anyone knows of a blog or has a diagram it’d be really be appreciated.
http://img703.imageshack.us/img703/4489/70965243.jpg
all done…sorta, i had some silly issues with the JLF, however i’ll post up more pix later
I bought a V3 yesterday for 55 euros incl. shipping.
Personally i think the white VX case is more appealing but i guess i can always spray paint it.
Original could you explain what to buy and how to do it  i dont know anything about modding…
working on that…the buttons are easy to explain but the joystick is a totally different story, i couldn’t find a way to mount it properly quite frankly, i know “how” to do it but i couldn’t find the proper screws needed to do it (that’s the silly part), i ended up just swapping with the sanwa microswitches and spring. i think it might have to do with the model i bought tho but i’m not sure “JLF -TM” version (no PCB, just microswitches). all in all tho i’m not sweatin it because really the microswitches pretty much make the JLF what it is, there are height differences but this way was cleaner. i’ll mess around with it more when i have free time tho
Ahh, so I finally got my sanwas and opened the case, ready to mod the parts only to realize that I have no idea wtf to do lol. My first stick was a madcatz SE and modding it was a lot more intuitive as all I had to do was plug/unplug QDs and there was one cable that hooked on directly to joystick… but now @_@
anyways, my first question: are the buttons soldered to the PCB or can I just remove the buttons without harming it?
edit: found this in another thread
Hey guys! Got my VX stick for a couple of days ago, and I am thinking of buying parts to attempt my first mod. So far on my shopping list I have:
[LIST]
[]1 x Seimitsu LS-56-01
[]1 x Seimitsu LB-39 Bubble Top
[*]6 x Seimitsu PS-14-G 30mm Pushbutton
[/LIST]
Do I need to buy anything else? Wire, micro-switches, etc.? Also, are there any detailed guides that are easy to follow for someone who has never modded a stick before? Thanks!
Edit: Maybe I should get a couple of these?
Edit2: Do I need to get a restrictor plate as well?
@Shraft - well i mean u have everything you need there really, but yes ur probably going to need more wire, and you don’t “need” a restrictor gate, the stick should come with everything you need outside of the extra wiring and QD’s, everything else is optional
BTW, the JLF-TM-8T-SK fits pretty much at the “exact” clearance needed without the grinding previous ppl have spoke of, even with the mounting plate. only time i feel it grinding against the housing is when i put pressure on the stick…like if i’m playing with the box on my lap and i lean on the box or if your the type that pushes the joystick down when you play then yes it will grind, but when if i put the stick on a flat surface or if u learn to play with more finesse than you should be fine lol
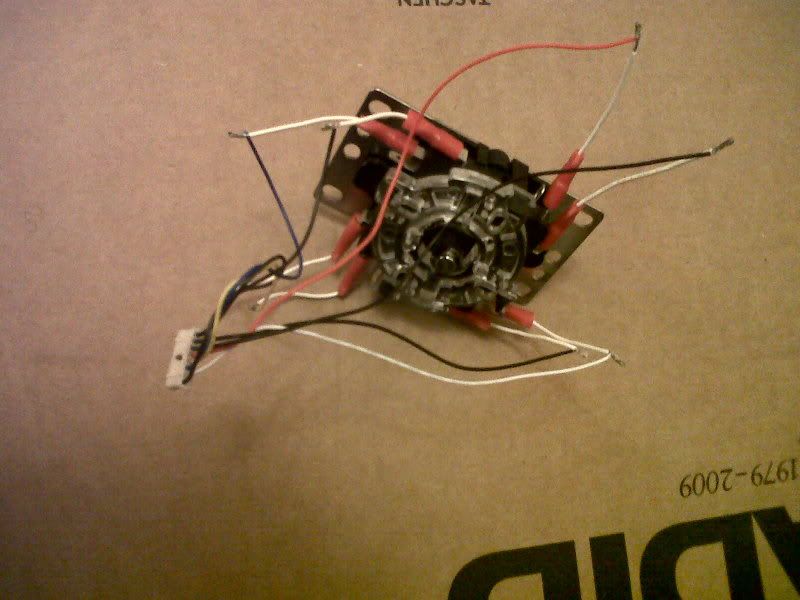
So as per the example quoted above, I went ahead and did the same thing; got rid of the circuit board unto which the buttons were soldered, bought some wire, butt connectors and quick disconnects and made this:
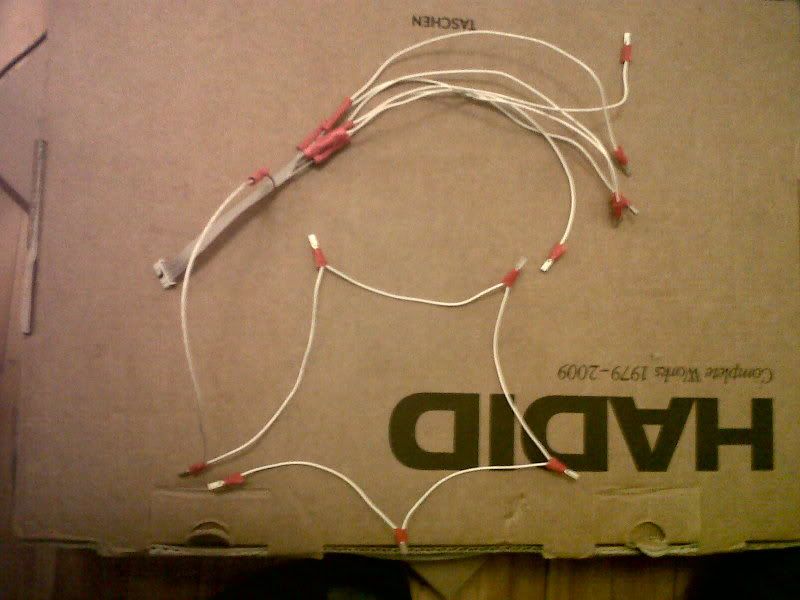
(You have to daisy chain the ground wire)
I bought a jlf-tm-8t-sk, which doesn’t come with a PCB like the 8yt which is found in the SE/TE sticks… (I wish I had known that before ordering lol), so I had to set-up more QDs:
Will post pics of the full stick later
I’d really have to recommend either getting one without the mounting plate, or removing the mounting plate if you do get one. Those spots to screw down the mounting plate are nice, but with the mounting plate, it WILL make contact with the plastic on the bottom. Mounting without the plate should be about the same difficulty, and prevent that contact.
see that was my initial problem with it, i tried to drill thru the holes on the gate but the screws don’t clear the assembly to get to the case, i tried to buy new screws from home depot but the thread sizes wouldn’t work right…i’m sure ymmv with that but using the mounting plate was easier imo, either way it’s not like ur “stuck” doing it one way or the other, i’d agree if you can get it on without the mounting plate the clearance is much better, but the stick will obviously mount slightly higher (probably not an issue in practice but good to note), i think the stick mounts at the original Hori stick mount height if you use the mounting plate tho…honestly tho i have Zero problems with the mounting plate and mine isn’t constantly grinding so again ymmv.
i guess in the end it is really personal preference, if using the mount plate grinds then don’t use it, if it doesn’t then great


To print the artwork, do you print it as a Letter size or as a different size?
Also this too will be my first stick mod with soldering involved (And first ever time soldering period…) I got spoiled and pampered dealing with SE/TE/HRAP 3 and their already installed QDs, so I expect this to be a really messy job… This will be fun…
I used the template quoted below. Printing it true to size actually won’t fit on an 8.5 x 11 so you’ll need something slightly bigger. I personally got it printed at a local business on glossy paper, got it laminated and used spray adhesive to glue it onto the metal plate.
Also, I didn’t have to solder anything at all. I would simply strip the wires a tad longer than I’d need to normally, folded the excess so as to get a thicker end, slide it in the QDs/BCs and crimped them in with pliers.
Also, I do get a bit of a grinding with the stick… the bottom plate is about 5mm thick so I might just grind out 2-3mms and see how it feels. edit: yup, works just fine now.