If you by chance have access to a router, thinning that area down is the best solution if you don’t want to use the plexi or sheet metal mounting mod.
I’m thoroughly confused by your question.
Have you tried thinning yourself? Just curious; if you have tried it, let us know if its sturdy.
I figured it would be. 
I’ll provide a diagram to what I mean, using the PS2 connector to the final end.
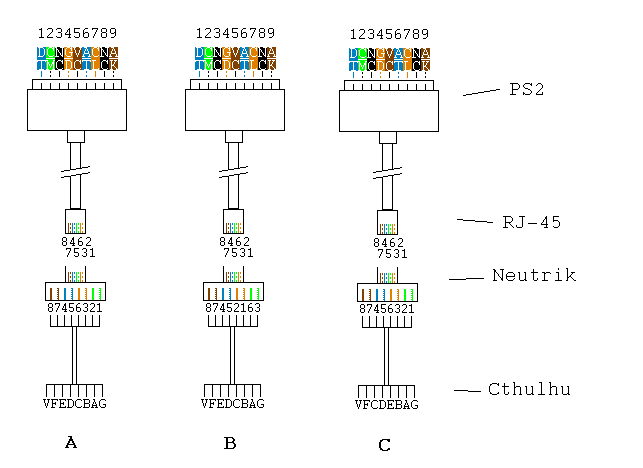
Ultimately, I’m thinking diagram A is the one. But it could be C. I’d be amazed if it were B, but according to the adapter’s color coding, I’d think it was this. Which makes no sense at all. Note in B the difference between it and A is at the adapter point, where 6/3 and 2/1 swap.
Of course, it could be wrong on all 3.
First lets establish what pin1 is. By networking standards it looks like this:

We want to use the 568B network standard because then we can make sure the orange/white wire from the RJ45 jack is actually connecting to the wired part of the orange/white connection for the neutrik - and same with the other colors.
The corresponding pin out look likes this:

I guess what I should ultimately do is completely wipe away all discussion of wire/label coloring from my thought process.
If the RJ-45 is
87654321
connecting into the adapter which is also
87654321
then the inside where the IDC connection resides should be also treated as
87654321
basically saying “fuck all the color/number labeling and just use the pinouts as you would expect to use them.” Am I right?

Ultimately, it’s this color coding thing that’s gotten me all confused. I’m much better with just having been told which pin is which number and be done with it. The color coding and numbering on the label has me believe the adapter’s jumbling the connections around when that would neither make sense nor work without something in between doing this jumble. I’m assuming that the label on the adapter is for the CAT6 standards, when all we’re really using it for is to pass the circuit through. Not actually meeting a standard.
The reason why you are confused is because the neutrik punchdown, like all punch down, is not in the order of the pin alignment of the RJ45. But if you are better with numbers here is the solution:

Although the numbers don’t align from the RJ45 side to the neutrik punch down side, the wires actually match pin1 to punchdown 1 and so on.

Yes I have.
Depending on the wood selection, it can be pretty sturdy. I have used maple and it proved to be strong enough. Other woods I’m no so sure of. I guess a better question now is what wood is being used?
What is the measurement of the thickness of the wood where you have thinned the wood for the neutrik? Can you post up some pics if possible?
thanks
So, if I’m to understand it correctly, somewhere in that Neutrik jack, the pinout is jumbled to match the schematic on the label, swapping pins 4 and 6 around. That sound about right?
About 5mm. Although Ethercon says 4mm, you can get away with 5. I’ll have to post up pics when I can.
exactly. 
how very odd.
Alright then. The reason I ask is mostly 'cause I was planning on just using a ribbon cable in my setup, as I have an 8-pin header connector in place on the Cthulhu and figured it’d be easy enough to just feed the ribbon cable in place as is instead of ripping apart a CAT5 cable, but it doesn’t sound like it’ll make a difference if I have to swap pins 4 and 6 around before going to the Cthulhu.
So, I finally got it all together (though I need to do some finishing work, so no pics yet), but I discovered something the hard way about this CAT6 adapter.
This method is not only more expensive in the adapter, but the CAT5 cable assemblies do not fit in this adapter. They instead require a special, DRASTICALLY more expensive CAT6 cable, which Neutrik only seems to offer as a 3 meter cable (Neutrik’s site says you can get 1, 5, and 10m cables as well… not sure where). When I say expensive, we’re talking $40+. For one.
It would seem that the best course of action regarding this idea would be to buy one cable and do a sort of universal split slicing job on the opposing end of how many other connectors you plan on using, though this might not be the best looking option when it comes down to it. I mean, you could totally go the route everyone’s going for the CAT5 variant and have one cord for each type… if you don’t mind blowing $40 a pop on ‘em. I think I will have no choice now but to go this route myself, but I probably will buy just one and have it split at the end for PS2/GC instead of my original idea of having one cord for each. Guess it’ll save me on buyin’ PS2/GC extension cables.
You guys are doing it the hard way.
Well now that I’m building my wood stick, and didn’t want to pay markertek $30 total to mount a neutrik in the wood case i’m making, I used a JLF plate to mount my Neutrik.

By default he mounting plate fits in quite nice, but the black plastic part needs a little room. While at this step you want to put the mounting plate and draw in the corner mounting holes and drill into the JLF plate. This will be harder to do once you widen the hole.
Next you need to dremel the JLF plates joystick hole to about 1mm wider. Then when you can put in the back black part in you can screw it together.
Have yet to do this but next I will put the plate in a vise and hack away the extra metal and use the 2 holes close to the adaptor to mount with wood screws.
Now all I have to do is cut a rectangle notch on the back of my stick, just like they do with controller cords then round out the counter sink recess. I might try to counter sink in from the inside as well with a dremel and chisel.
Bro, you found out the hard way. If you have read my previous post it does mention you need special CAT 6 neutrik if you want to use the special neutrik connector. However, if you want to use regular cables, as mentioned before, you can buy CAT5 and use same pin outs.
Can you show us the picture of how this would be mounted on a case? I just have a hard time imagining how this would fit, or better yet, how to prepare the case for this setup.
thanks
Yeah… I just now noticed in the post where you confirmed it’d just slip right in (it did, had to sand out the hole a little, but it did), that I basically read that and completely ignored the post beyond that.
I had already bought the CAT5 adapter and connectors well before. I wasn’t that big on every solution to get that thing into a wood case, so CAT6 worked a hell of a lot better. Just a damn shame they don’t sell the CAT6 assembly like they do the CAT5.
Even if I did catch that ahead of time, I probably still would have gone this route, just ‘cause it was far and away the best looking option. I already bought two different types of the CAT5 adapters in experiments on how best to go about it, neither of which really worked. And I REALLY dislike the idea of putting a mounting plate on it, steel or plexi. I don’t mind blowin’ the extra dough to just get the adapter to work as intended right now, as I’ve already wasted plenty in experiments.
I will definitely turn the opposing end of the $40 cable into a cat-o-nine-tails, though.
Sure, I’ve been logging my work on my stick so I’ll upload pics to this thread when I get to work on this either today or tomorrow.
How to mount Neutrik RJ-45 in wood
Continued…
Cutting up the mounting plate. If you have a big ass case you don’t need to do this.
So for prepping I made measurements for the notch and mounting plate recess.
Drills holes for radius of Neutrik plate.
Cut. I’m using a coping saw. Make sure you cut the notch hole slightly smaller. You can take away but cannot put back.
Chisel
Carve shape and refine with various dremel attachments and then Flush mount. I counter sunk the mounting plate from the inside. Carefully drill mounting holes for JLF mounting plate into wood. You want to avoid blow out of the wood so make sure that the drill holes are proper size and angled away from adaptor.
Mounted. If you use Neutrik Ruggedized connectors you might want to install upside down, but in my case I used standard Cat 5e boots. It is easier to push in from bottom.
DryFit
holy shit… awesome work…
I do have one concern. How easy/hard is it to push the little tab on top of the neutrik?
thanks