Any progress?
I just updated my site again. Mostly, I really expanded the panel layout section with many different layouts. I also made a lot of the photos in the site look a lot better, especially the PCB diagrams, as well as some other tweaks.
But I still have a huge to-do list, including reworking the tools section and some of the decoration section, as well as new example controllers which keep getting put off, and several other things.
http://www.slagcoin.com/joystick/layout.html

I have done a huge update that is an attempt to get myself comfortable with working on a controller instead of my website. It includes among many other things:
Expansion on the buttons subsection including a chart of button models (not quite complete)
Tools section refined with more and better information and a layout thats easier to read
Expanded choices for utilizing a wire harness joystick with a multi-ground-pad PCB
Finishing subsection expanded to give reference to a lot of different finishing substances
Brand controllers section expanded to give more attention to custom builders
My to-do’s list is pretty short right now, mostly depending on trying some things like controller builds and illuminating devices and some things I’ll reveal later on. Again, suggestions are welcome.

I just built my first custom and I used for site for reference a lot. Thanks!
Suggestions:
-
In that PCB wiring diagram about daisy chaining you only show 6 buttons, the directions, and the ground. When I went out and bought a terminal I thought hey I only need one since I saw in the pic that there was only one terminal… but I had 8 buttons and a start and select so then when I got home I realized it in the middle of wiring. Maybe its just my own oversight but even just adding the start and select buttons to it would help people from doing the same mistake as I did.
-
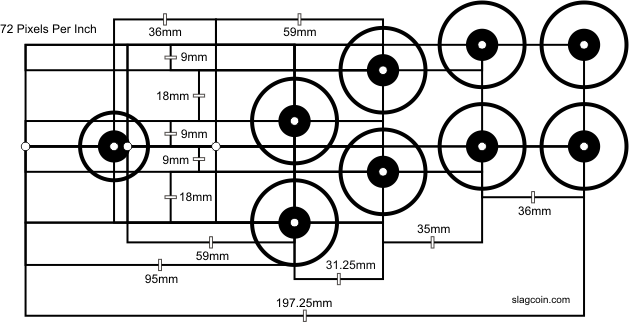
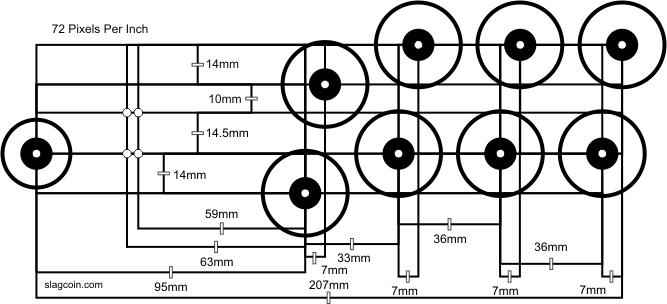
Measurements in CMs or MMs also! Especially in the area where you show how to make your own controller. There are some people who are not used to inches (like me) and would find it handy to have the measurements in the measuring system that the rest of the world uses lol. I did notice the conversions thing on the introduction… but it would be nice if they were next to the inches and stuff.
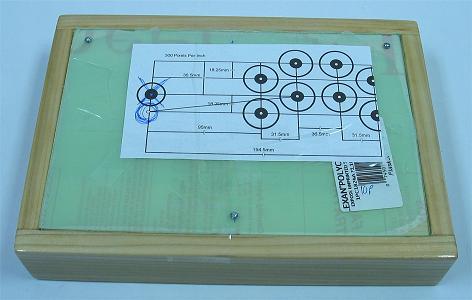
I used your site mainly in buying the materials, printing out the layout (though I printed it out wrong lol), and the pad diagram. Very awesome site and these are just a few suggestions.
First of all great work on your templates. I have also created templates using visio and know the time you have put in.
-
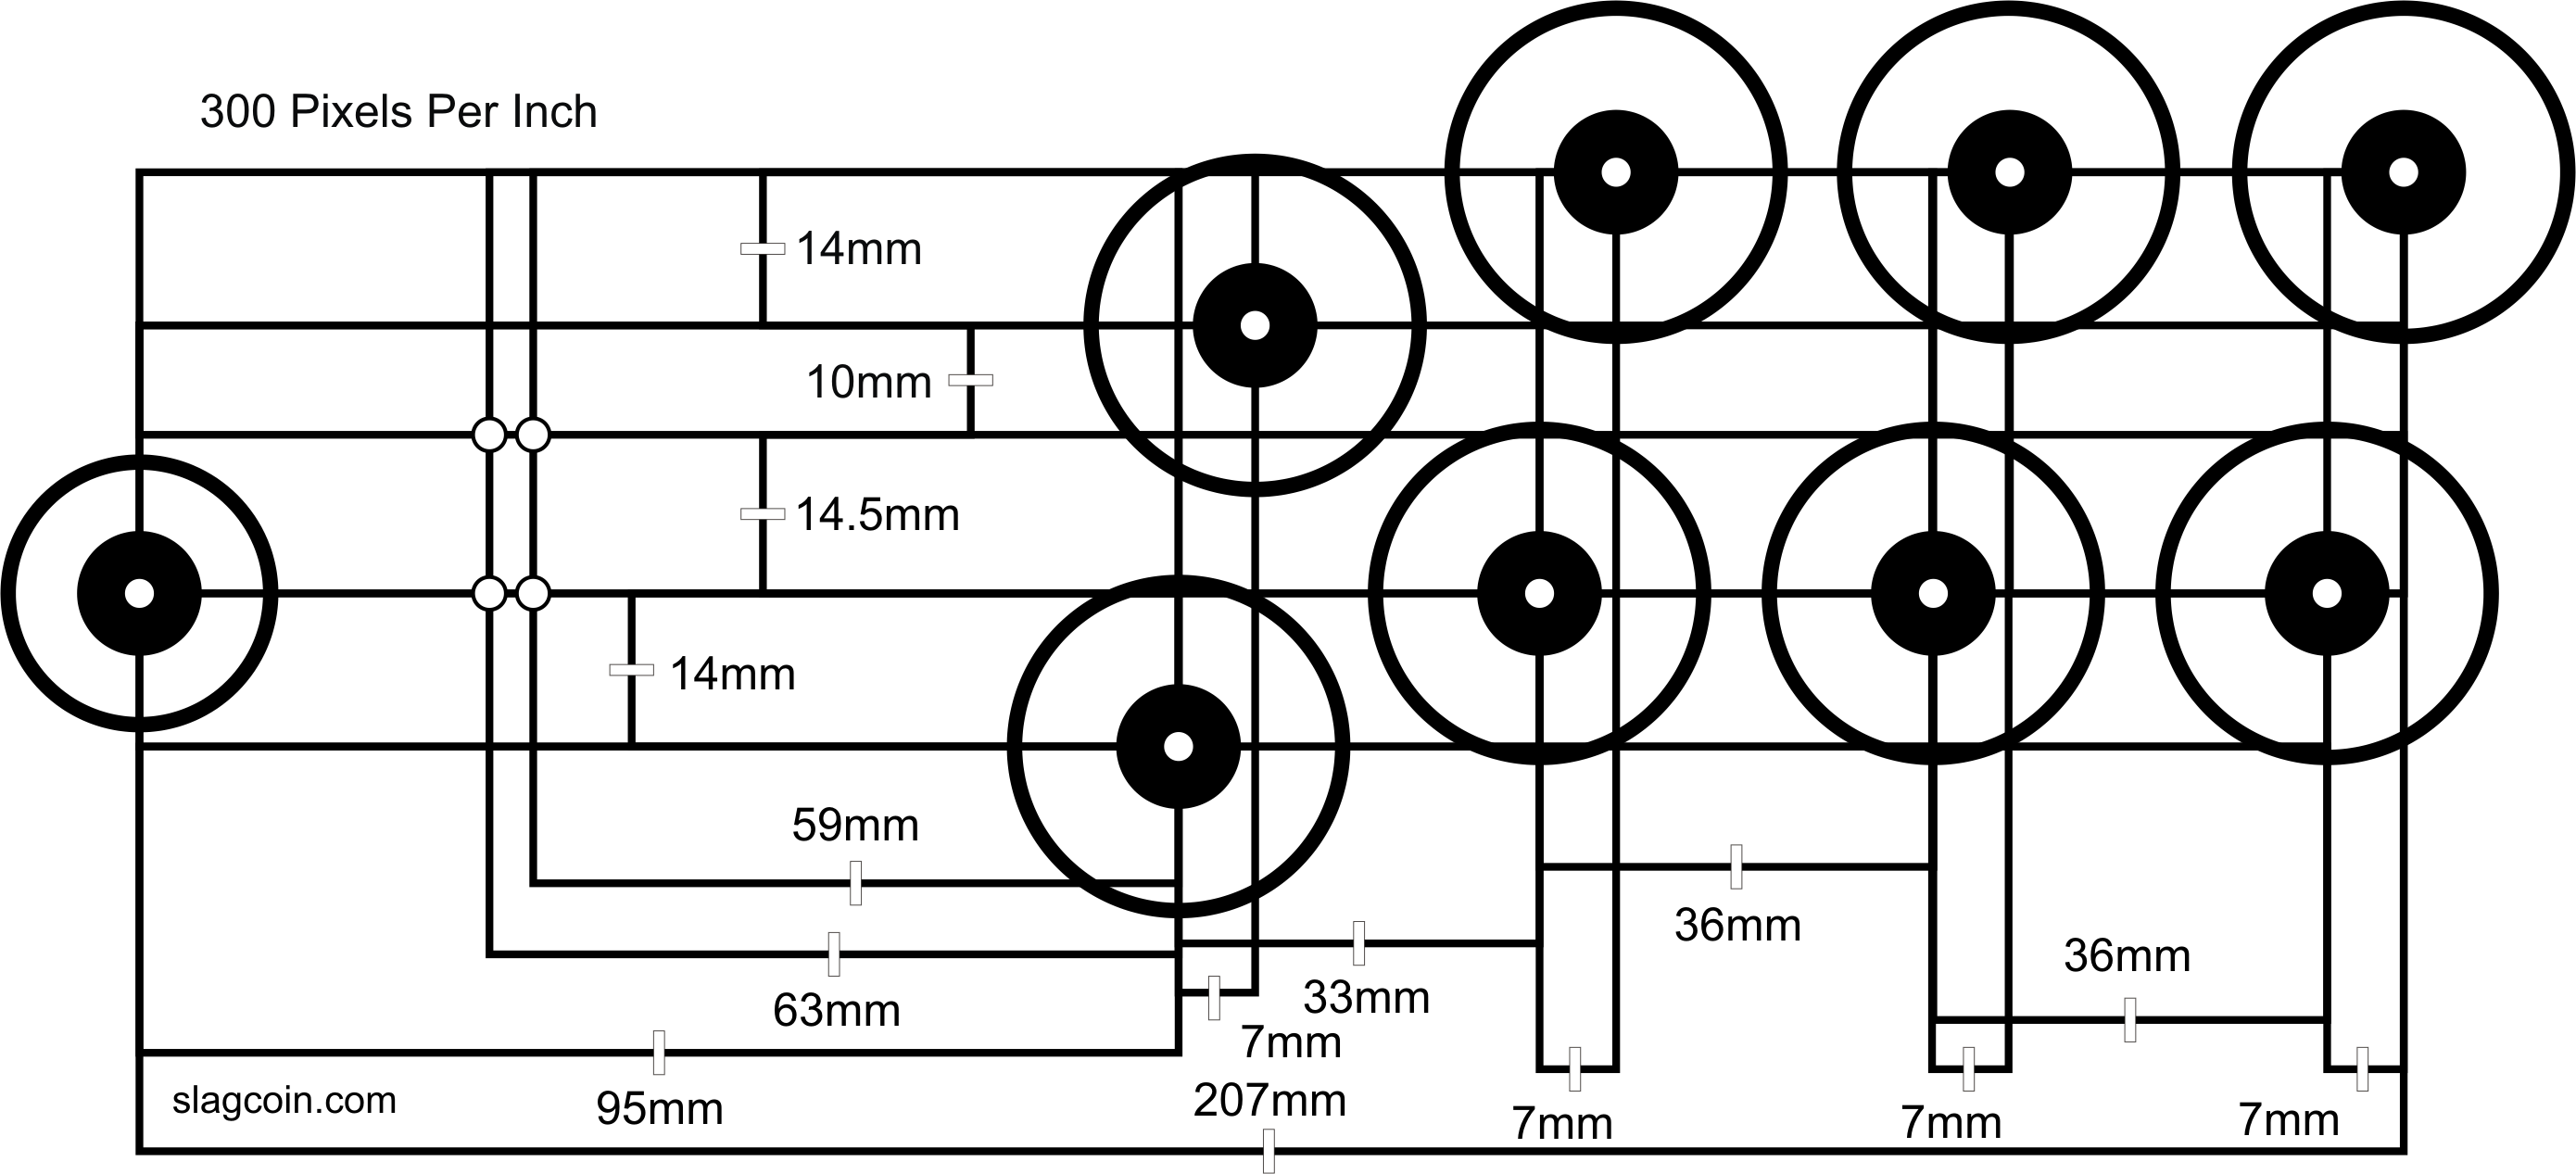
You have various joystick placements on each template (95mm, 63mm, 59mm), in regards to Sega Layout what is the official distance for Astro City and Blast City etc. It would be good to know (say with coloured centres) what is the default placement and then diferent alternatives (like when using 6 buttons only).
-
Another idea is placing a centring point on the template (even if its just horizontal)
so that regardless of what size box people use they can mesure dead centre and dont have to work out how far from one side to place the template/joystick point.
What spacing would you recomend on a Astro City 8 Button templte either side of the joystick and right most button ?
I was surprised to notice it had been almost two months since my last update. I have been busy with a lot of things, including controller builds.
http://www.slagcoin.com/joystick.html
I have a huge, detailed list of things to update. But I thought Id do a quicker update centering on higher priority things, and do the other things not too much longer after that. This update features completion (for now I guess) of my buttons chart and information, the precise Vewlix layout (thanks to TheRealNeoGeo), 15 new PCB diagrams making my 43 diagram set cover most official control pad PCBs, and a writeup for my new controller.
In response to the posts above, I will probably change some of my controller build sections to show millimeters a bit better when I get time. I also noted adding 2 buttons to the example wiring. For the layout diagrams, I did move the big joystick points to the official locations in official layouts. There isnt really anything definitive about centering the layout, especially with more options for joystick and button placements. I noted and plan on doing a subsection that talks more about placing the layout because that does determine a lot of how the box and panels come together.
I’ve got to say that your site is an awesome resource for building a stick, from beginning to end. Thanks for putting it up. It’ll save me a lot of trial-and-error once I get around to slapping something together.
Just a quick heads-up… The links to the “XBox 360 wireless (Early Version)” and “XBox 360 wireless (Late Version)” PCB seem to be pointing to the same image (the Early version one).
-=The Jesster: Gatchaba Goose=-
Just wanted to drop in and say thanks for the site Slagcoin! It has tons of invaluable info compiled in a clean manner. Keep it up, thanks again!
Thanks for pointing out the error. I changed a 5 to a 7 and now each diagram is linked.
Thanks guys, especially cpt because it’s good to hear this from a veteran.
I’ve been away for a while, but I finally finished updating all the things Ive been meaning to update for a couple months. I proofread the whole site again and fixed a lot of typos.
I added note links throughout the html in my sections so subsections can be referenced using a #SUBSECTION_NAME addition. Example for PCB Diagrams:
http://www.slagcoin.com/joystick/pcb_wiring.html#PCB_DIAGRAMS
I made the numbers in the joystick and button charts more exact using a precision instrument. I also added a lot of information on using some tools. I expanded on some of the processes of centering the layout, sizing the panel and box, and mounting devices so they are more understanding.
Since my time has been very limited lately, I decided to at least start many of the subsections I was waiting to try personally before writing about. I made sections for tweaking PCBs (like analogs sticks and similar things; I did actually get a lot of experience for this), using multiple PCBs, lighting devices, and working metal.
I have had some metal panels sitting around for a bit over a month now. Ive come to think for a little while now that metal panels are probably a lot better than wood panels for controllers. I just have not had much time to get things done using them.
I updated many other things as well as noted in the front page.
Hey Slagcoin, great to hear that. Your site is number 1 on my bookmarks list.
Sorry if i haven’t contacted you before for the translation, but I’m preparing for my exam at the end of the year, for University admission. Please don’t think that I’ve forgotten about what I’ve talked to you, it’s just that I haven’t got much time, maybe at 2009 I’ll be 100% focused on translating this golden site.
About your updates, I would love to read something about making metal CPs, hope you have luck with that.
also one more thing, the Shift36 panel layout
there is no reference to it or link to it in your panel layout section. just thought i would point this out. great site though! i am using it as reference for my first build.
No problem. It is probably good because the site has been a bit short up until about now. And it is a huge undertaking.
Yeah, that was kind of an estimate before getting it exact. I’m not sure if I want to put it back or not. I should maybe put a generic version of the Vewlix up.
Hey slagcoin i have a question for you:
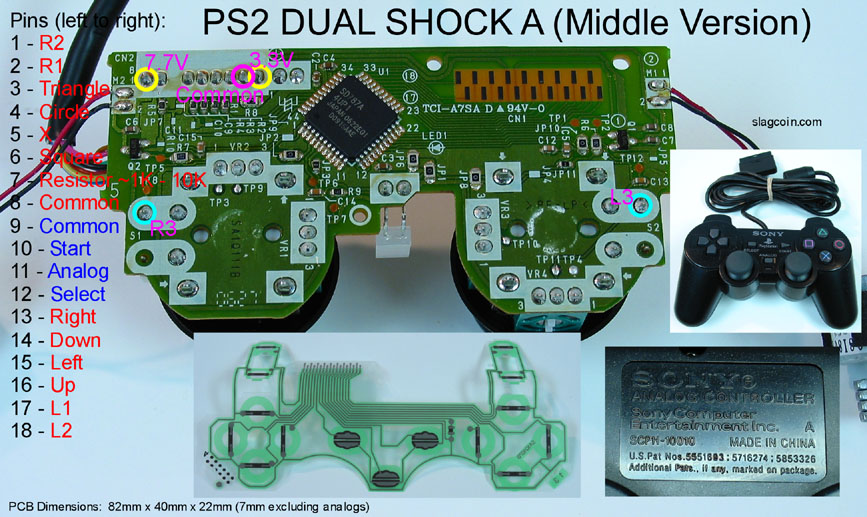
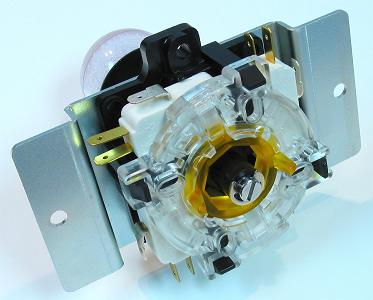
I have one of those gamepads and i need to know where to coneect the other side of the resistor :S
Well that’s all for now 
I would just like to thank Slagcoin for his amazing guide on how to make a custom arcade stick. I am extremely happy with mine and will be making more in the near future.
Well, first I have to say I think those pads are tough because the area to which to solder is very thin under the rubbery spots. But if you can get it to work, you need to branch between the main common (red) and the resistor point; you can see the resistor set this way in the membrane switch (I just found out these films/ribbons are called membrane switches watching HIM the other night).
Thanks a lot. It is great to get encouragement.
Thanks for the unbelievably excellent resource!!
Thanks!, i will try for that for sure (i only need to buy some resistors :P).
So, if isnt work i can blame you…
xD (just kidding).
Anyway, i have another dualshock gamepad (psx-dual shock) earlier “H” series i think… so it will be more simple to work on that (but i will gonna take the “A” series to get started).
I just did a quick update to the site to tweak a few things as noted in the update on the front page. I mainly just wanted quickly to make sure the information on removing variable resistors was more accurate. Many thanks to Toodles.
Thanks. 