alright so the osbf ones are the one i need to get right? and how would do i dremel them out
haha… with a dremel. just use the a grinding/sanding bit to clean up the area.
Jimmy,
it seems like you will have to gut out the hori pcb(top and bottom) and use only the PS2 pcb. connect the start and select buttons to the PS2 pcb with solder. you will lose turbo function (but you dont need that anyway  )
)
Hey nin-jay
That’s the thing, I’m not sure what area to solder to. Looking at the top portion of the PCB it looks like the buttons push directly onto the top PCB, if I take that out there will be no connection? I believe I saw the picture in an earlier post.
I’m assuming I’ll have to connect the PS2 PCB onto the the wires that are attached to the Top Portion of the PCB but I’m not sure which one though and I’m not even sure it it will even work either.
Thanks for the reply
try taking just the pcb off and leaving the wires on… from there you can toy around and see what you can get to work on the PS2 pcb.
here is what I would do. take all those buttons off on top and fill in the holes with bondo. after that dries i would drill holes and put in new buttons. that would be more fun for me.
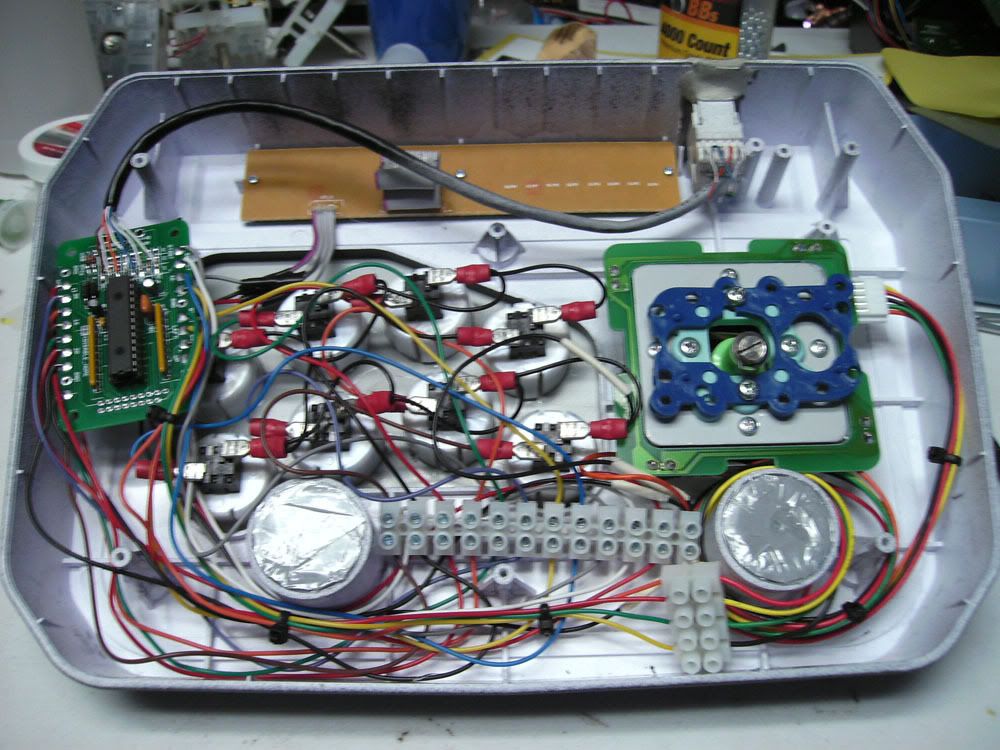
I’d like to minimize the original design as much as possible. Here is an image of everything taken apart.
You can see the buttons need to be pushed onto the PCB to work.
you are going to have to experiment or give a tech guy a pm. toodles is a wiz and bomberman has amazing builds and it looks like they know a thing or two about a thing or two.
i would take the slct and start wires off of the lower pcb and solder them to the ps2 pcb, and leave the top pcb in. then, finish your mod. if the start and select buttons dont work, then you know what you have to do. it sound like shitty advice, but to learn you need trial and error.
Does anyone have step by step pics or a video?
so im about to order all my parts for the fs3, is this ALL that i need?
Sanwa JLF
JLF GT-Y (Octogate)
Wiring Harness (Fits Sanwa and Seimitsu Sticks)
JLF-P1 Mounting Plate ( Not sure if I need this or not? )
Thanks in advance
You do not need Mounting Plate.
You do not need Wire Harness.
Thanks for the info guys… if i order from lizard lick i just order the joystick and the buttons?
also is there a video of someone installing the buttons on the board of a ps3 fs3?
I am sure you do not need Wire Harness.
You can just solder directly to the JLF PCB.
But if you insist on getting Wire Harness, then you can.
Do what I did with my Namco.
http://photos-e.ll.facebook.com/photos-ll-sf2p/v253/236/106/720471515/n720471515_604468_766.jpg
What I did was take all the Ground wires from the PCB and connect to Terminal Strip.
Then I took the Ground from 5-pin Cable and connect that to Terminal Strip.
On another Terminal Strip, I connected the four Directional wires from PCB.
Then took the other four wires from the 5-pin Cable and connect to the Strip.
So I guess my PCB for my L2 button decided to be worthless and lose it’s holding on the copper. Any ideas on how to recover? I tried soldering on the line after trying to super glue the dead piece back on but I guess it needs metal contact to stick. Can I scrape it off or try to solder it to that end point where the 4 copper contacts are?
Does the LS-33 spring fit the stock hori stick?
Follow the trace from the contact point. Scrape of fthe green and solder to the trace material.
Hey Kramor, do you have more detiailed pics on what you did with the PS3 controller? did you place wires directly into the flat cable socket? Do IDE cables fit into the socket?
Thanks.
I just read trough 20 pages of people asking if it’s possible to put a Seimitsu ls-32 in that stick but couldn’t find the answer.
So…
How hard is it to put a ls-32 on the hori fs3?
Yes an LS32 fits. it just needs to either be grounded on the bottom or you completely top mount it like one of the guys here.
Regardless of how you mount it you’ll have to cut out the bottom for it.
-Take off the S plate.
-Use it as a guide and line it up on the top.
-Drill 4 holes for the screws and countersink.
-Cut out the plastic enough to allow the Ls-32 to fit through
-Cut out a hole on the bottom for stick clearance
-Mount the LS-32 directly to the metal top plate.
-Cover with Artwork
-Cover the hole in the bottom with something.
I wish I’d taken more in between step pictures, but I can’t remove the stick now without removing the artwork.