i meant the 360pcb from the ex2. sorry.
Just wanted to say this is a great thread with very help info. Got my stick all finished up and wanted to share. :wgrin:
http://lh3.ggpht.com/_2tFQV9ji_VY/SfJKDcybcuI/AAAAAAAACQA/2tp0xDSbJwg/s800/CIMG3878.JPG
http://lh5.ggpht.com/_2tFQV9ji_VY/SfJKD54rB1I/AAAAAAAACQI/YbVKSW_feDY/s800/CIMG3879.JPG
JLF and sanwa buttons. Pretty straight forward mod. Oh yea big thanks to MIVLives for all his great artwork, so many it was hard for me to choose one.
^nice finish +artwork.
i’d like to know if a p360 on the FS3 is possible? i saw them on the shelves at my local game store for 40 dollars. not bad. im thinking about modding it too and i was wondering how far can i take it.
btw,anyone willing to help with artwork i am willing to pay of course.
thanks for the help guys, finished modding my HFS3 yesterday

seimitsu buttons and sanwa 8 gate, stick still original hori 
@ronaldhw
Nice chun li!! and nice link to website also
lol, didnt mean to advertise… it’s because i put the picture in my blog too 
Hi all, just ordered a HFS3 off ebay and I’m looking to change the gate on it since im not used to square gate. I need an octagon gate, anyone know if its possible to use the Sanwa GT-Y Octagonal Restrictor Plate from Lizardlick.com?
Thanks in advance.
yes, but you will need dremel / drill to put a hole for the screws.
thanks man.
How long did it take you to mod that?
if you could also take a pic of the other side of the pcb board, that would help a lot. thanks
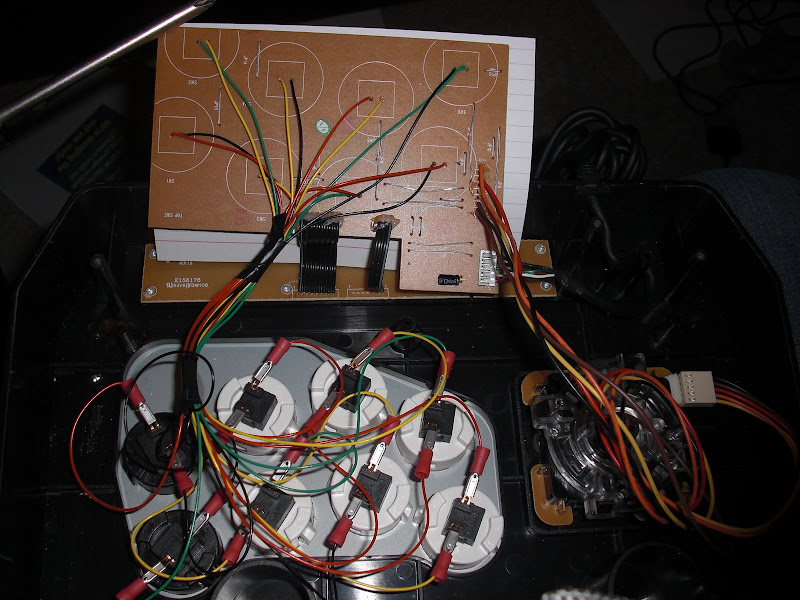
It didn’t take very long to install the parts. I ordered the stick and buttons from different places so I installed them at different times, but if i had everything at once it might take an hour or so. I’m pretty good with a soldering iron and dremel though. Also, I couldn’t really find a clear how to wire up the joystick so here’s what I did, with the pins on the joystick facing right: (like mine in the pic)
Pins top to bottom A-B-C-D-E (cause of different color harnesses)
Soldering points on PCB board top to bottom 1-2-3-4-5-6-7-8 (looking at the green side of the board)
I wired it: A to 1, B to 2, C to 6, D to 8, E to 4, 3 blank, 5 blank, 7 blank.
If thats why you were asking for a pic of the other side hope that helps.
very nice guys
Sanwa OBSF-30 or Seimitsu PS-14-KN 30mm?
Has anyone tried both of these types of buttons? Are the Sanwa buttons more responsive and smoother than the Seimitsu? Or are they about the same? I personally like the Seimitsu better because of the transparent looks.
they are about the same, i tested both (i got seimitsu, but my friend who mod the stick with me got sanwa)
does anyone happen to have a diagram of the mini pcbs on the ex2?
Turns out this is actually a really good solution for weighing down the stick. go to Wal-Mart photo center and ask for some empty film containers. Apparently they just recycle them so you should be able to get as many as you need. Then run back and grab a bottle of BB’s from sporting goods. I got like 4000 for $5 or something like that.
The film containers diameter fits the circular area in the FS3/Wii perfectly. Stick one in there and use an x-acto knife to cut it off to the right height. Cut off the rim of the cap, fill the bottle with BB’s, then tape the cap on with some thin tape and you’re good to go.
I’ll post pics tomorrow , possibly.
Finally finished the two Fighting Stick Wii’s that I got.
Here’s the pics.
Stick 1
1-Seimitsu LS-32-01
1-Seimitsu LB-39 Clear bubble top
1-Multi console Cthulhu
8-Seimitsu PS-14-KN Clear Buttons
First the Ugly.
I went with RJ-45 jacks for these sticks. If i ever do a built from scratch stick I may get some nice fancy connectors as opposed to the wall jacks. I cut out for the jack, then set it into place with JB Weld then filled with modeling epoxy. I would have been more aggressive when sanding then gone in with Bondo surface putty, butby that point I just wanted to be playing on these things.
http://i143.photobucket.com/albums/r158/Ragnorok64/BILD0197-3.jpg
To fit the LS-32 I had to cut out a hole in the bottom plate, even though I mounted directly to the metal top plate. I covered over the hole with an old used gift card I shimmed up with cut up other gift cards. I’m so glad I save those things, they also came in handy for fixing a friend’s 360.
http://i143.photobucket.com/albums/r158/Ragnorok64/BILD0202-1.jpg
Here’s the stick with template
http://i143.photobucket.com/albums/r158/Ragnorok64/BILD0200-1.jpg
And the insides.
http://i143.photobucket.com/albums/r158/Ragnorok64/BILD0205.jpg
Stick 2
1-Seimitsu LS-32-01
1-Seimitsu LB-39 Clear bubble top
1-Multi console Cthulhu
8-Seimitsu PS-14-P White Pearl buttons (I love these things!)
Another Wii stick except I sprayed this one down with Gloss Black Duplicolor Vinyl & Fabric paint. It adheres very well and doesn’t seem to chip.
Again the ugly first.
http://i143.photobucket.com/albums/r158/Ragnorok64/BILD0207.jpg
http://i143.photobucket.com/albums/r158/Ragnorok64/BILD0208-1.jpg
No one responded to my request for a black marble template in the template thread so I had to mess around with layes and filters in Photoshop to get this. I’m not sure it looks like marble at all, but it goes with the buttons so oh well.
http://i143.photobucket.com/albums/r158/Ragnorok64/BILD0209.jpg
Did I mention I love these Pearl buttons:bgrin:
http://i143.photobucket.com/albums/r158/Ragnorok64/BILD0210-1.jpg
And the insides.
http://i143.photobucket.com/albums/r158/Ragnorok64/BILD0213.jpg
As mentioned above I weighed these down with BB’s in cut off film containers.
http://i143.photobucket.com/albums/r158/Ragnorok64/BILD0206-1.jpg
There’s light at the end of the tunnel. I still have my Fightstick 3 to finish setting up for PS3/360dual mod, and put in the Sanwa buttons and stick I have on order. I have my SF:IV SE already dual modded I just need to drop the Sanwa buttons and stick in. Lizardlick is approaching March 6th so hopefully my order will get shipped out soon. (I order from them on March 6th. I ordered my Seimitsu stuff from Akihabarashop on April 4th and received it the 16th, from Japan).
Excellent idea.
Hi everyone. So I just tried desoldering the buttons and it seems like the solder doesn’t melt at all. I got a 15W soldering iron & desoldering braid from Radio Shack. I’m pressing the iron against the braid on top of the soldered connection and nothing happens. Any tips?