So I’m added the LS-32-1 to a Fighting stick 3 shell. I cut out the plastic an mounted directly to the metal top plate. I tried grinding down the bottom plate for stick clearance. Several grinding stones and sanding drums later I’ve decided I’ll just have to cut a hole for it.
My next Wii stick is getting its bottom hole sawed out from the get go.
Metal Gear Solid 4 Hori Fighting Stick 3 with all Seimitsu parts. LS-32-01, Bat top, and Snap-in buttons. ( Everything that looks orange is actually red).
Reading this thread in anticipation of my FS3 which I ordered yesterday due to Gootecks code. I must say that the build range is from completely ruining the stick to simply sublime.
When you remove that top sheet as with any other kind of adhesive you should use a heat gun to melt the glue that holds the sheet on the metal or else of course you will bend the sheet and it won’t be flat anymore and it will look like an amateur hackjob.
Also to the best adhesive remover is 3m Adhesive, wax and silicone remover. It comes in a blue topped spray can and is available in the car parts section of a Walmart near you or a local car parts store. It will remove anything and I mean anything also makes a great prep for anything you are painting as well as waxing your snowboard/skis…
My adventuring into modding is over. Managed to get the stick ready, art finished, and buttons mounted. However, the board got fried, and I spent way too much money on this already. I want to go solderless next time for sure!
Anyone seen a Viewlix artwork template for the FS3? If they have, can I request the link please? Cheers. Been trawling through post after post but can’t seem to find it.
Wow looks like I’m not the only one who fried their PCB. Luckily for me I had spare dosh to grab a Cthulhu PCB. Now I just need artwork ): Vewlix template!!! pl0x
lol i used duct tape for mine XD
i keep forgetting to upload the pic
i’ve painted it all white with six sanwas and two seimitsus with a jlf and seimitsu ball top and custom art
i’ll try and have a pic loaded up by tomr night
Finally finished modding my FS3, got all my parts in and lamilabeled some art although printing issues though made it a tad to small, will fix it later.
Yes, for 2 reasons actually. 1, is that the left 6 are spaced further from the stick itself and w/ my long lanky fingers feels more comfortable w/ the extra room. and 2, and most important to me is that the left 6 are aligned much straighter than if you use the right 6, which have an arch to them.
I was thinking that getting containers like what film comes in, cut it to size, filling it with BBs, then taping it shut would be the most economical solution.
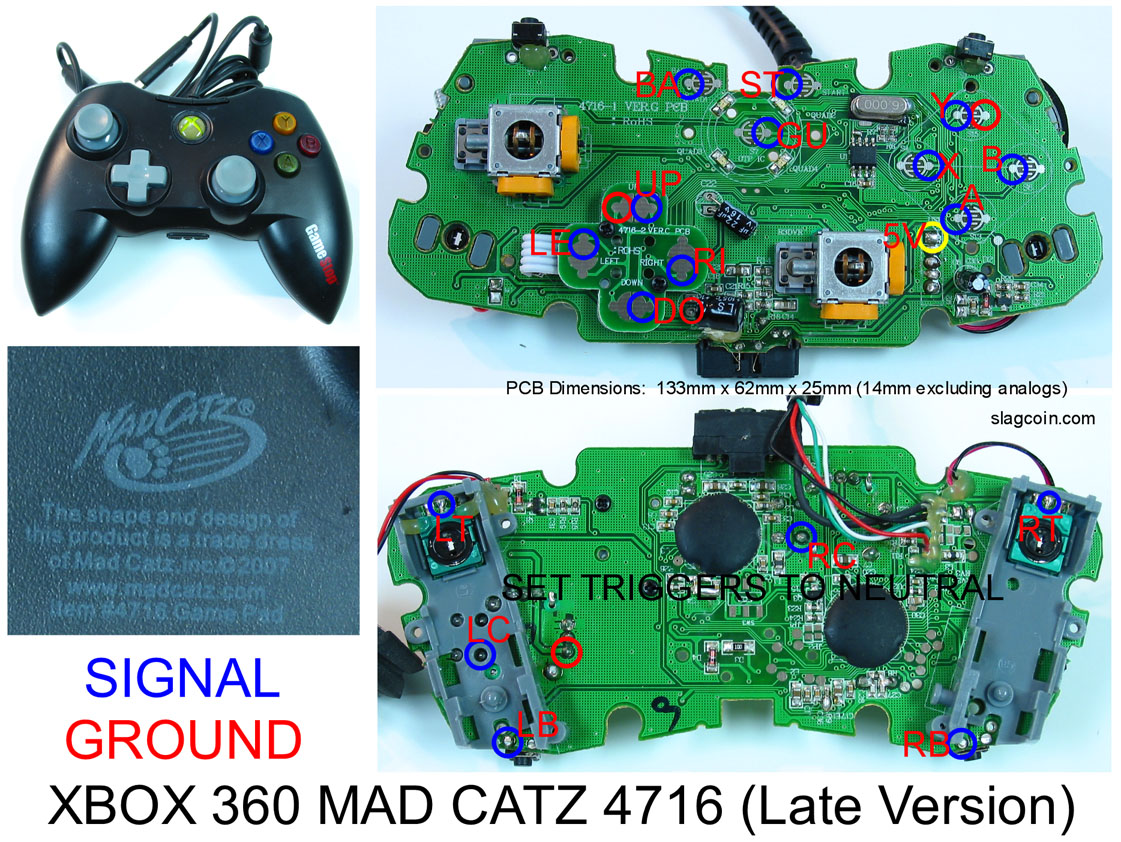
Can someone please guide me to the page that has the diagram for the 360 pcb. Need to do a dual mod. Also, that o-connector thats on the power cord, where does it go? thanks