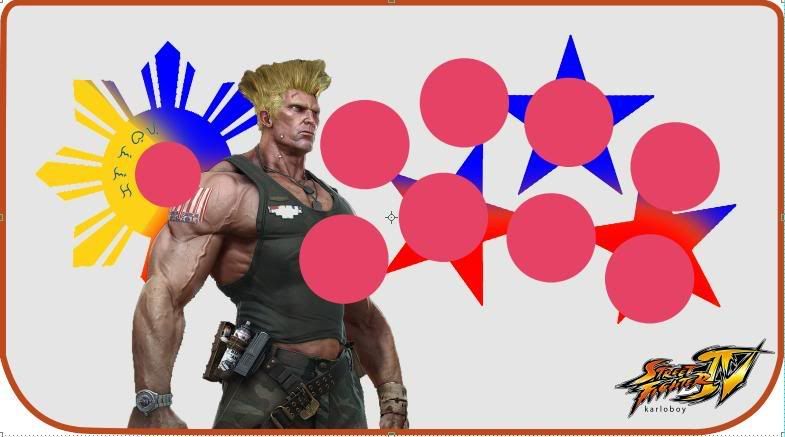
Thanks for the template!!
Which one is better?

or

I’m a fan of both. Just can’t decide.
well only one way of finding out, but i have two more diff versions of the ps1 dualshocks as back up just in case it doesnt work so in the end i’ll have it working,
although i am stuck right now with where i can mount a start and select button on such a tiny case, i may have to use the four gc slots on the side, but i have a feeling i may have to glue everything shut in the end to keep everything in place properly =[
it may seem cheaper but akihabarashop is coming in from japan, so you may or may not have to pay extra for import taxes or w/e LL is local so no import tax, unless you live in canada like me, but i dont think it’s much or it may be non existant
when i got a gc controller shipped from asia the import tax only cost me about $8 so my guess is that it’ll be around the same amount coming from akihabara
edit: whoops just realized i doubleposted, sry
Yes, a new thread with all the info would be nice. JLF and LS install info pics would be really really nice. Get with a mod so nobody can comment until all the useful info has be posted. Also be nice to make a subthread for artwork help and pics of completed fs3 mods. Just so it doesnt get as cluttered.
Also, if you grind the bottom of the shaft too much and cant use the screw slot its ok. Another method is using pliers to hold the shaft and unscrew the ball. Dont even have to open the case up for that.
If you guys are gonna be ordering you JLFs off akihabarashop please dont forget to order the 5pin cable, isnt included with the stick like LLs.
In all honesty those both look horrible, to me. The top one is a little less terrible though.
Hey guys, tell me if this looks nice:
http://img48.imageshack.us/img48/48/hfs3ironmang.th.jpg
Thanks
Its good to know someone printed it and it fit perfectly. Also, in the images you’re posting,feel free to change the color of the button holes, lol. Thats just some temporary shit I had there . Make sure the layer is locked in the layers pallette (small padlock icon under the area that lets you change the opacity) and then you can press Alt+Backspace (on a pc) to fill it with whatever your foreground color is. Ctrl+Backspace fills it w/ the background color and its the reverse on Mac OSX I believe. Same with the layer for the stick color and the border around the image area. I just picked random distinct colors so I could tell everything apart while I was working on it.
But yeah, that Iron man one looks pretty dope, good quality image.
Also, yeah, I think it’d be good to have a thread for FS3 Stick art and completed mods kinda like the TE/SE threadthat they have going on. And then that thread can just be linked whenever a new FS3 Modding Thread gets created
tried to find a thread about it but couldn’t find one… but is the Wii Fight Stick identical to this one?
Speaking of the Wii Fighting Stick - I’ve been working on modifying one with a Sanwa JLF stick and Seimitsu buttons. This the second one I’ve modded - the first was all Sanwa. I wanted to mix it up a bit with the second try, this was my first time using Seimitsu buttons. I had a lot of fun with it, and I thought I’d share a few images of the work. I thought the pink colors would work well with the light blue aesthetic of the stock art (not gay). I’m not a big fan of character/game imagery on sticks so I like to leave the stock art as is. I’d love to hear what you guys think.
I’d like to get my hands on FS3 now, just to give it another go, since they are pretty much carbon copies of one another - the work would largely be the same.
Here’s my work:

^ looking good dude. Wiring is really clean. Is there a noticable difference between the screw-in buttons and the snap-in ones? I’m still holding off on ordering my parts because I want my colors to match my art and I haven’t decided on that yet 
I think for the mod I’m planning I’ll need to remove the middle bottom screw, and part of that round thing. I’m assuming the other 5 screws should hold everything together just fine, right?
Thanks for the compliment - I worked hard on making the wiring nice and clean.
As for the button differences - I believe that the snap-ins have a flatter button-top than the screw-ins. The screw-ins are closer in construction to the Sanwa than the snap-ins, which have a slightly different feel and look to them.
As for installation differences, the screw-in Seimitsu buttons were much easier to install than the snap-in Sanwas - the Sanwas needed the holes to be widened a bit with a rotary tool, whereas the screw-in Seimitsus only needed the metal tab to be ground down, nothing else.
I need help
Yo
Im gettin the FS3 in about a week and i want to mod it
can anyone post a link to a video or step by step instructions
thnx
peace
Just curious, I looked at the tutorial in the beginning of the thread and it mentioned you need a soldering iron? If you just wanna replace the buttons and restrictor gate don’t you just unscrew the bottom plate and plastic plate, lift up the top cover where the buttons and joystick are, unplug and replace the buttons and finally pop out the restrictor gate and snap in the new one?
The buttons are soldered in, bud. You need to desolder them to remove them. You then need to decide how you’re going to install the new buttons. Depending on your skill and resources, soldering may be the best way to do that.
And there is no typical gate on the stock Hori joystick - it’s part of the stick. You’ll need to get creative to put a new gate in there, or, better yet, just replace the stick altogether with a Sanwa JLF and a new gate on that.
CRAP! I was soldering up my PCB in preparation. After looking at Bomberman’s pCB pic http://i65.photobucket.com/albums/h201/eastx/PS3/horifightingstick3pcb.jpg I just realized I’ve soldered dignal wires to the ground side of the button connections Somehow I just kept thinging the left side was the signal side.
Indigentia, incredible wire work !!!
What gauge wiring should I get? I ordered my buttons, balltop, gate and quick disconnects.