My first custom stick - thanks to everyone who posted tutorials on modding the hori sticks, and thanks to Jim for lending me his fancy soldering iron!
Seimitsu screw in buttons (these are hard to fit, see the build guide below), standard hori joystick with 4-way gate but with a shaft-cover and new balltop.
Hi guys, I’ve got some problems. I soldered in some new buttons today and everything worked fine until I forced the bottom plate on (horrible wiring). Then some buttons were constantly activated. I thought it was because I had wired on the top of the PCB and that the ends of the wires were making contact with the QDs underneath, and I started working on that.
Now it seems I’ve mistreated the wiring and half of the buttons only work at times. Desoldering went horrible the first time and now it seems nearly impossible without some of the rings on the PCB comming off.
I guess what I’m asking is - am I completely screwed? I think I read that you could solder to common ground if you messed up, could someone talk me through that?
Vokkan - the first time I put on the bottom plate on my stick there wasn’t really enough room, and it ended up bending the top plate, which caused the buttons to jam. Make sure you have plenty of room in there before fully tightening the screws on the bottom plate. Also, cover the inside of bottom plate with tape so it doesn’t conduct.
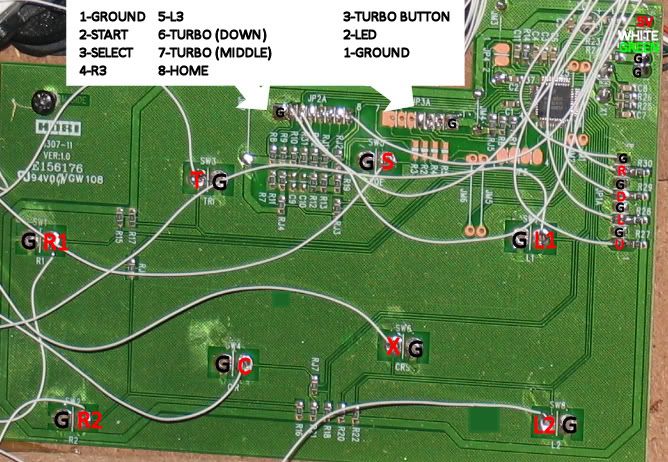
If you’ve messed up one of the PCB rings don’t worry, you can still solder directly to the main board. Follow the tracks from the rings along the circuit board and wire your button directly to that connector. This happened to my X button but I got it working by wiring it directly to the endpoint. You’ll need a very finely pointed soldering iron to make this connection.
Also, after you’ve soldered each button, take the stick over to your PC and test it in the control panel/game controllers. If the button lights up you’re good to move on to the next button. Test it regularly while it’s open, you don’t want to wire up a load of buttons and close the case only to find the first one you wired isn’t working.
Thanks for the replies.
Everything works properly except the circle button, and I’m sure it’s because the ring you solder onto has sepparated from the board.
The one marked with C on this picture:
Could you point out where I would have to solder instead? Oh, and my soldering iron is pretty crappy and blunt, so I’ll have to do something about that too.
**Edit: Solved it by screwing the ring and solder directly to the copperwire running underneath the track.
I’m a complete noob at this and after reading through some of the post i was wondering what would be the easiest method of changing the ball stick to a bat one? I have an older arcade pad for the ps2 that I never use and i’m thinking of switching the sticks. Any help would be much appreciated.
I was wondering if i could stick some Quick Disconnects to the stock hori buttons. I wanna to do a pcb swap and soldering the wire to the button is almost imposible.
also which quick disconnects would i get for the stock hori stick.
Do you want to change the ball top to a bat top, or change the stick itself? If just the top, just unscrew it. You may have to take off the bottom plate and use a screwdriver, and depending on the stick and what bat top you want, you may need to buy some sort of converter to make them fit.
Sticking disconnects to the pins on the HFS3 stock buttons seem impossible (my pins even broke while desoldering). Why would you want to swap a fine PCB while keeping the crappy buttons?
After some wear and tear they become awful, and if you’re already desoldering them from the pcb, you’d be doing yourself a huge favor by getting some quality buttons.
Oh, and I fixed my problem with the non working button. I soldered directly to the copperwire running underneath the track. It took alot of solder, and it’s probably very fragile, but it works.
Finaly I can play shooters (/and) on the computer again :woot:
hey guys first post here and I’m rdy to order some parts for my first mod and i have one question, do sanwa switches work on seimitsu pushbuttons and vice versa?
also whats the difference between the JLF-TP-8T and JLF-TP-8YT ? thanks in advance.
I’m planning on buying a FS3 really soon and I just want to switch out the joystick and the buttons…will i have to solder anything? i have ZERO experience with soldering.
not very hard,just usually wires for usb are small. Re connecting the connections would be a bitch
my best suggestion is to buy a cheap mouse with a long cord. remove the current usb on your current joystick, cut off the usb cord on the mouse, and just solder
i dunno if the board already labels which parts on the usb is which. If it doesn’t then if possible can someone test the points. Just take a multimeter put one point on 1 of the 4 points in the usb, and the other point on one of the 4 on the board side. Test for coninuity and mark down which part is which part. ChaiThai won’t be able to do this cause his usb is broken and testing this way would be dangerous.
btw howie, what did you do to your bottom, did it increase the room space(give enough clearence for the stick)?
Will doing this ruin the GT-Y gate for use with say the upcoming SF4 TE stick from Madcatz? Or could I still it pull the gate out of the FS3 and use it in that as well?