Hi SRK members. I would like to start off thanking the community for the help I’ve got from all the tutorials and guides that can be found on SRK forum.
I would like to thank Toodles help, rtdzign’s tutorials, info from one of Phreakazoid187 post and TRNG padhacking thread.
I would like to thank purplearms for his ArcEye 2s
I would like to thank Art Hong for his great plexi and custom art cut outs.
These are some of the tutorials and threads I got info from
http://shoryuken.com/f177/rj-45-mc-cthulhu-imp-xbox-360-dual-mod-tutorial-diagram-225565/
http://shoryuken.com/f177/rj-45-multi-console-cthulhu-arcade-stick-tutorial-ver-2-a-231734/
http://shoryuken.com/f177/switch-less-usb-selector-ps3-360-imp-re-design-underway-input-appreciated-179629/
http://shoryuken.com/f177/-padhacking-thread-113675/
Post #73 by Phreakazoid187 for soldering Guide button on the fightpad.
http://shoryuken.com/f177/soldering-madcatz-sfiv-fightpad-179270/index3.html
Also additional infomation I got from slagcoin.
slagcoin Joystick Controller page
I would like to thank these two shops I’ve got my parts from.
Lizard Lick Amusements
AkihabaraShop.jp
This is my first custom built arcade stick that will be multi-console. It’s still under construction as I still haven’t have my box finished yet but the internals been put together and tested.
NOTE: UDATE the MC Cthulhu firmware before soldering the Imp v2 to it or you’ll have problems!
Wiring diagram hope this helps a bit (corrected)

Let’s start with the PCBs. Here I’ve got the MC Cthulhu and Imp v2
http://tapatalk.com/mu/ad319e4f-e281-d138.jpg
I’ve soldered the RJ45 pin connector to the Imp v2
http://tapatalk.com/mu/ad319e4f-e2f2-feba.jpg
http://tapatalk.com/mu/ad319e4f-e329-2b5e.jpg
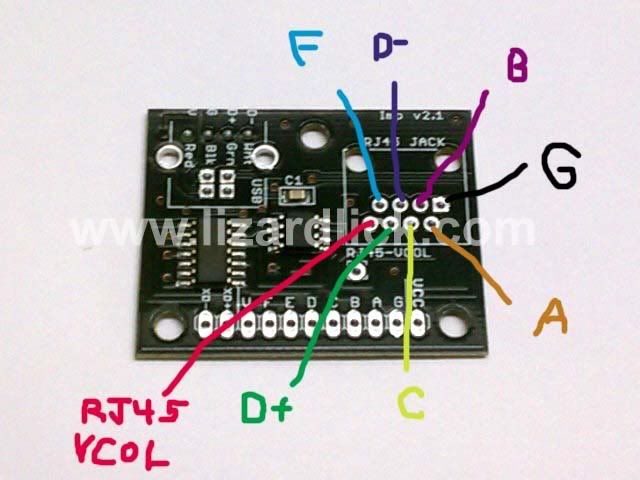
For those who dont want to solder a RJ45 pin connector this is a diagram of the board for direct wire solder. I borrowed the pic of the Imp v2 from LizardLicks photo since I dont have one without the pin connector and photoshopped each spot.

Here I soldered the wires on the underside of the MC Cthulhu row 1 G,A,B,C,D,E,F,V and one wire to the 2nd row V
http://tapatalk.com/mu/ad319e4f-e3ca-fb5e.jpg
http://tapatalk.com/mu/ad319e4f-e3e2-9859.jpg
I then soldered the corresponding wires to the Imp v2
http://tapatalk.com/mu/ad319e4f-e43b-afdc.jpg
I’ve also soldered a wire to the VCC point on the Imp v2 and connected the other end to the VCC screw terminal on the MC Cthulhu
http://tapatalk.com/mu/ad319e4f-e452-1261.jpg
http://tapatalk.com/mu/ad319e4f-e4cb-2c2d.jpg
Then I prepped the Madcatz Xbox 360 PCB that I took out of a Brawl pad.
I cut the USB cable at a decent length so I could just use the wires off that to solder instead of soldering new wires.
http://tapatalk.com/mu/ad319e4f-e560-4883.jpg
http://tapatalk.com/mu/ad319e4f-e5ac-be8b.jpg
http://tapatalk.com/mu/ad319e4f-e5bf-d71b.jpg
http://tapatalk.com/mu/ad319e4f-e5d4-c4d5.jpg
Now soldering the xbox PCB to the MC Cthulhu. I soldered all the corresponding wires to row A-H and 1-9.
http://tapatalk.com/mu/ad319e4f-e644-39e5.jpg
http://tapatalk.com/mu/ad319e4f-e672-e83a.jpg
I’ve put everything together to test out if everything is working and it’s working on PC/360/PS3 so far with no problems. I haven’t made the other cables yet.
http://tapatalk.com/mu/ad319e4f-e6ea-86d6.jpg
I promise it won’t look so messy like that once it’s in the box lol.
http://tapatalk.com/mu/ad319e4f-e6d1-0125.jpg
Hot glued the 360 PCB wires
http://tapatalk.com/mu/ad319e4f-579e-070f.jpg
http://tapatalk.com/mu/ad319e4f-57ae-8477.jpg
These are the sides for the case
http://tapatalk.com/mu/ad319e4f-50c9-84bb.jpg
http://tapatalk.com/mu/ad319e4f-50dc-399b.jpg
http://tapatalk.com/mu/ad319e4f-50ec-72e5.jpg
http://tapatalk.com/mu/ad319e4f-50fa-a6c6.jpg
Case almost done.
http://tapatalk.com/mu/c6e4c3f8-f1c6-192f.jpg
http://tapatalk.com/mu/c6e4c3f8-f1df-99b0.jpg
http://tapatalk.com/mu/c6e4c3f8-f1ef-49da.jpg
Case together and running. Just need a finishing touch. Buttons are Seimitsu PS-14-K-N Clear on top six buttons. PS-14-D-N-K Smoke for Home/Select/Start buttons. PS-14-D-N-K Clear for P4/K4 buttons on the side. Seimitsu LS-56-1 stick with double spring, Clear bubble ball top and Octagonal gate.
http://tapatalk.com/mu/ad319e4f-a9a3-c8d8.jpg
http://tapatalk.com/mu/ad319e4f-a9b2-92d1.jpg
http://tapatalk.com/mu/ad319e4f-a9c1-152c.jpg
http://tapatalk.com/mu/ad319e4f-a9d1-fa81.jpg
http://tapatalk.com/mu/ad319e4f-a9e0-c7be.jpg
http://tapatalk.com/mu/ad319e4f-a9f5-61d3.jpg
Artwork and plexi
http://tapatalk.com/mu/ad319e4f-cb9a-c66a.jpg
http://tapatalk.com/mu/ad319e4f-dc03-2ca2.jpg
This is how far I got.
I have finally finished my custom stick with the installation of Toodles FGwidget LED control board and purplearms ArcEye2s. Here is a video of my stick.
[media=youtube]xL7plFWzgro[/media]
Hitbox build.
http://tapatalk.com/mu/ad319e4f-dc62-e794.jpg
http://tapatalk.com/mu/ad319e4f-dc74-bcd9.jpg
http://tapatalk.com/mu/ad319e4f-dc83-84f6.jpg
Pad hacking.
http://tapatalk.com/mu/ad319e4f-263e-eeab.jpg
http://tapatalk.com/mu/ad319e4f-9aba-d78e.jpg
Hitbox finished.
http://tapatalk.com/mu/ad319e4f-99c3-0972.jpg

