Hori Tekken 6 Wireless Fightstick modding (Serious Thread)

I recently bought a Hori Tekken 6 Wireless stick for my 360. After a lot of research, and after wading through a lot of “that stick sucks”, and considering it’s the only stick I could find locally for $40, I decided to just go for it.

Truth be told I’m actually very pleased with it. The stick is as responsive as I could care for it to be, albeit I’m terrible on a square gate, and the buttons (I’m going to get flamed so hard for this, I know) actually feel nicer to touch than the Sanwas on the Mad Catz TE. Also noting, anybody who says there is lag needs to have their brain checked, my stick performs lag-free.

However I have some issues I’m hoping to work out by modding the stick, so I’m going to address them here and I’m hoping some people can help me figure them out.

  1. Replacing the restrictor plate.
    I’m planning on replacing the square gate on the stick itself with a round one (GT-Y plate with a GT-C insert). I’ve noticed the holes are on the plate, but I’ve also read a lot about having to drill holes. Can I use the existing holes on the plate, or will I have to make them wider or drill new holes altogether?

  2. Stiffening the stick up a little.
    I’ve been having a lot of fun playing Hakan lately, but I think the 225° rotations are loosening the stick. In particular, I’ve noticed an increase in how slack/jank the stick feels in the dead zone. I can actually shake the controller around and the stick will flail wildly. Is there any way to reduce the amount of slack in the center of the stick, or am I just going to have to deal with it? It doesn’t affect my play performance too much, it’s just an annoyance.

  3. Button replacements
    While I do like the buttons already on the stick, I may replace them at some point with Seimitsus, which just feel genuinely clickier and nicer to me. The main thing I’m wondering is if I’ll have to re-solder onto the new buttons, or would I be able to just crimp on some quick disconnects and go from there?

  4. Dual modding
    This is sort of an out-there kind of idea, and more of a down-the-road project, but I’m just wondering if there would even begin to be any hope of dual modding one of these? What I’m really hoping for here is the ability to keep using the wireless on my 360 (I don’t see anything stopping this from working), but I want to be able to use a USB cable for PC/PC3. What I’m wondering is if this would even work, and if so, would it get power over USB, or would it still use the batteries for power?

I’ll post here with any other mods I can think of wanting to do down the line, and thanks in advance for any help.

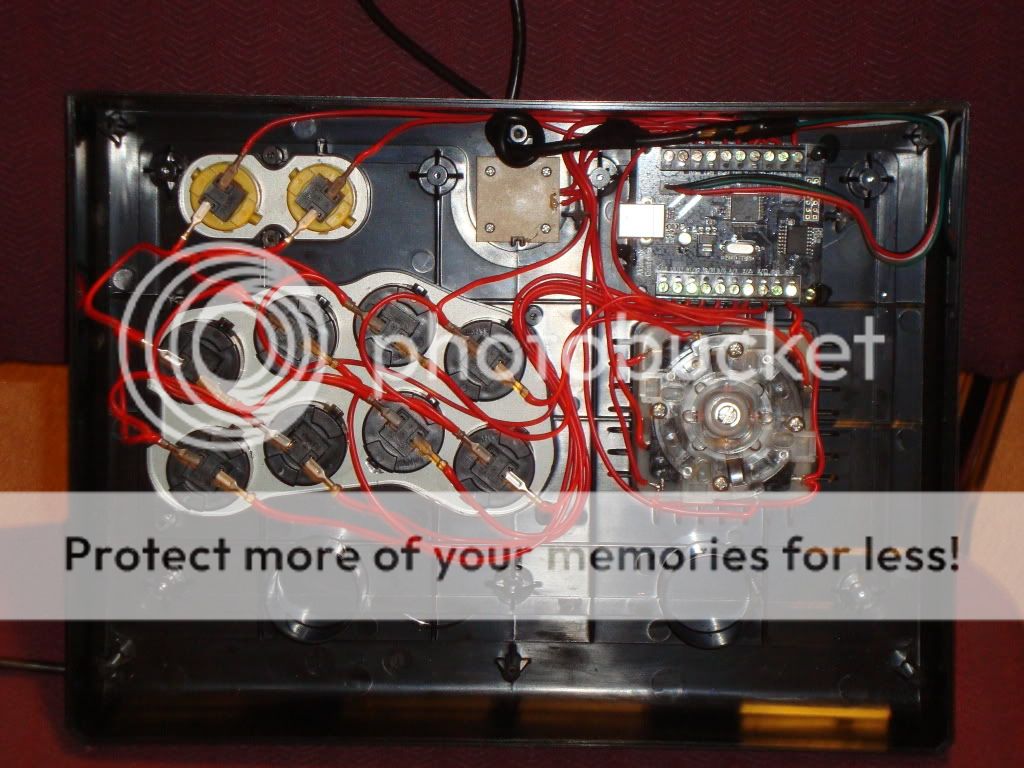
Here’s the “official thread” which should help you with some of your questions, in the mean time while you wait for answers.

I’ve never used the stick before so I can’t really help.

http://shoryuken.com/f177/hori-tekken-6-stick-213492/

I’m no hardcore tournament pro or anything, but I love my Tekken 6 wireless stick so much… after modifications of course. Here’s my answers to your questions, based on my preferences, which may be similar…

  1. Try the octagonal restrictor plate, it made a world of difference in my execution. You can feel all 8 directions as they rest in the little notches, theres no second guessing on whether or not you’re hitting forward or diagonals. Installing it required drilling out the little plastic tabs that are already in the right places (that other thread has pics), an 1/8" drill bit worked perfectly.

  2. I used an LS-32 spring, which is much firmer, yet still loose and smooth. You can try combining the Hori spring with it too if you want more stiffness. I replaced the pivot with a Sanwa JLF one, which cut down on the stick wobbling around loosely in the dead zone, its not perfect but its better.

  3. Button replacement is the hardest part of this mod. First you have to desolder the original button PCB, which can be thrown away. Then solder wires to the old wires that you cut away from the pcb, and do yourself a favor by adding quick disconnects to the ends. You need to dremel off the metal Hori button tabs, then any 30mm buttons should fit. I used Seimitsu screw-ins, and they just barely fit, after bending the connector tabs down.

  4. No need for dual modding for me, so no comment. I just use it on 360 and PC (with wireless xbox 360 receiver for windows).

Everything I bought came from lizardlick.com, and this is what it looks like now…

i just replaced the pcb with a ps360 and its dual modded, also swapped out parts with sanwas.
also added in $2.50 in pennies to solve the light weight problem

You know, I was thinking about doing something like this. Might I ask how you went about installing your pennies? I don’t see any in the pic.

My other idea was to stick some sort of anti-slip mat on the bottom, to keep it from sliding on my pants.

Installed it in after i took this photo. Rolled the pennies into 5 sticks of 50 cents each. There’s 1 stick of 50 cents on the right and left and 3 sticks of 50 cents on the bottom

it added about 1.3 pounds extra to the stick

I’m just used to round gates, truthfully. I’ve been playing games in local arcades for years, and it’s all Happs with round gates, so I’m pretty confident in my ability to hit the directions I mean to. In other news, looks like I’m going to have to dig out my old drill.

Will definitely look into getting the LS-32 spring, and will look into the JLF pivot as well. Thanks for the info.

Thankfully replacing buttons is pretty much on the bottom of my mod list, since I’m perfectly fine with the stock buttons on it. :X

Any info on how to go about doing this particular mod? Would be much appreciated!

Firstly you’re going to need a dremel for this mod, no exceptions. This mod was pretty much an adaptation of the mod from pineconeattack for the EX2
How to Mod the Hori Fighting Stick EX2 with Authentic Arcade Parts (Xbox 360 Version) ? Pineconeattack!

Parts used for the mod
-15 ft usb
-ps360 PCB
-20-24 AWG wire (this one used 20 gauge)
-8 OBSF 30’s
-2 OBSF 24’s
-.110 quick disconnects
-4 JLF microswitches
-1 JLF square gate.
-1 JLF spring

Tools used
-dremel with grinding bit and cutting bit
-18v cordless drill with a 1/8 drill bit (i think it was 1/8) for the usb.
-soldering iron + solder and desoldering bulb/braid
-pliers
-torx screwdriver
-hot glue gun

First off unscrew the bottom of the stick. Its a pain in the ass because the stick is held together via torx screws. Unscrewed them and replaced them.

Second, desolder all of your buttons. Whip out your trusty soldering iron and desoldering braid and suck up all the solder around those shitty hori buttons.

Third, disconnect the stick, the battery compartment and the start/select/home button harnesses from the pcb. At this point you should have a big hunk of pcb that you can then take out of the stick.

Fourth, whip out that dremel and take out those tabs. The main 8 buttons have annoying little tabs in the way. Do away with them and grind them into dust with your dremel. The start/select button tabs are outside of the 24 mm hole so no need to do anything there :3

Fifth, with the dremel still out, get rid of the plastic housing holding the battery compartment in place and drill out your USB hole. Okay, this is done to house the ps360 pcb. Where the ps360 is, there was a hive of plastic that helped support the battery compartment when the stick is assembled. We need to get rid of that to neatly house the ps360. Try as much as you can to dremel that area flat. After that, drill out a hole for your USB. Cut out one end of the long usb wire, preferably near one end and not the end you intend to plug into your system/pc. Drill your hole and see if the wire will fit through.

Sixthly, get rid of the stock switches, spring and insert your new gate. I replaced these switches with jlf switches and a jlf spring. Ordered the switches that went with the pcb so had to go through the fun of taking metal cutting pliers and snipping them even. The gate however is tricky. You’ve gotta drill some holes in the gate so it can use the existing screws to hold the joystick in place.

Seventh step, put your parts into place and wire up. It helps to run an exacto knife over the tabs on teh side of the buttons as it helps keep it in place. If using quick disconnect terminals, you will have to bend the metal connectors in the switches so they can fit, otherwise there’s no need. Wire up the joystick by soldering wires to the switches and daisy chaining the grounds together. Remember when doing these joysticks, the top switch is down, the bottom switch is up and left and right are the same. For the home button, use the existing daughter pcb and solder from there. At this point you just have to wire it up to the PS360 pcb. Select is also the same button as turbo on the ps360 which is essential for console switching. Otherwise, wire it up as normal.

Eighth step, glue the parts in place. After wiring the ps360, and TESTING ON A PC TO MAKE SURE YOUR INPUTS ARE CORRECT, hot glue gun the pcb to the specially carved compartment in your stick. Also hot glue gun the batter compartment to the bottom plastic panel of the stick. With that area gone, there are no screws to keep the battery compartment in place, so just hot glue gun it. At this point, insert and wire up your usb using the harness given to you in the PS360 order. Red to red, white to white, black to black, green to green. Afterwards, tie a knot in your USB cable to make sure you don’t tug on the pcb if you accidentally tug on the usb cable.

Optional step, putting in weights. Took 5 rolls of 50 pennies and taped them to the sides and the bottom of the stick to add more weight.

Take a look at pineconeattack’s tutorial for that EX2. It helps quite a bit.

Any more questions on how I did that mod, feel free to ask. I’m running most of this off of memory as I don’t have that stick, but just modded it for a friend.

Edit: oh durr, i just realized you wanted to try to salvage your wireless capabilities for your 360. Afraid that isn’t/can’t fly as the pcb for the 360 version makes it [S]improbable as it isn’t [/S] (it is common ground) a common ground board. Best you can do is have it wired. Dual wireless is tight for space since its such a small case

That’s a good amount of info, and I will be sure to check back here when I get around to doing that particular mod. Thanks for the help. :slight_smile:

Also I have no problems with using the stick wired, so that’s cool.

Hey i was wondering how to do similar things to this also, but the link above does not work… could someone possibly update the link?


Check these out. The first one is really long, but if you are new to modding, try reading the whole thing and reading some of the stickies in Tech Talk before you start doing things or asking questions that have been answered. I have a T6 that I recently finished modding, so PM me if you have questions you can’t find the answers to. It was my first stick and first mod, so I can probably tell you about some stupid things not to do. Good luck with yours. You will learn a lot about modding if you stick with it (because this stick is a BITCH to mod), but now that I’m done, I wouldn’t trade mine for a new TE.

Thank you for the links and the info… I really have no intention of replacing the stick, just the buttons and the artwork… is the artwork able to be replaced without removing the buttons/joystick???

Not really. Read those threads and that stuff will be pretty obvious.

alright thanx, I just didnt know if you had any quick tip since u already modded one

I think Mr. Mortified covered this, but when swapping out the microswitches, do the original switches have to be desoldered? I know he used the jlf switches from the pcb and have to desolder those, but if I were to just purchase some switches alone, what are the connections like at the end of the wires going to the stock switches? Are the connected via quick disconnects? I just want to make sure I have everything I need before I open “her” up. Thanks in advance.

from everything ive read, im pretty sure you have to desolder the original buttons…

For the buttons, yeah, but what about the microswitches for the joystick?

If you want to switch the joystick or the stick switches, you don’t have to actually desolder anything. I clipped the wires on the existing switches and wired up to the JLF. I discovered that, though Hori wired each switch with ground and signal, the ground wires go to the same ground plane on the PCB, therefore: common ground. I soldered the four ground wires from the t6 pcb together and wired that to the ground wire on the JLF PCB harness, then connected the signal wires to the other four wires on the JLF wiring harness. I wanted to do the most “soft” mod I could, so I tried to make it where I could just switch the original switches back in without soldering, but it just wasn’t practical. Hope this helps. PM me if you want pics, though mine’s a rat’s nest inside.

not common ground
the ground for all inputs are common but that ground isn’t the same as the ground for the power.

You could have just gone and spliced out the harness on the T6 to the JLF harness instead of cutting
There is however no space at all in the T6 to put in that JLF without it not being mounted at the proper height
And there is no way you can put in a JLF microswitch housing with the harness without doing some serious modification/dremeling to the original joystick housing to make it sit nicely in that stock joystick housing.

I’m using the terminology wrong, I guess. My point for this application was just that it isn’t necessary for each switch to have it’s own ground wire, so there’s no need to modify the jlf pcb, as I’ve seen others do. I used the only harness on the t6 stick, the one on the main pcb and connected to the jlf pcb. The wires were pretty short and there isn’t much space, so preserving an easy swap back would have been a lot of work and not very practical. Fitting the jlf wasn’t that hard. You have to cut off a couple bits of the main body and drill 4 holes and you are done. The part that holds the switches doesnt come in contact with the case. The t6 case isn’t modified a bit to fit the jlf. It does sit high, but that doesn’t bother me too much. This could be fixed by adding a piece of thick plexi on top but I haven’t felt the need yet.