I made my first attempt at soldering the wires to my wired xbox360 pcb. I did ok on the button contacts but it wasn’t that great a job. My biggest obstacle was when I got to the directional button contacts. They are so tiny that I burned them pretty badly. I was just wondering if you guys have any tips on how to avoid this, or even if there is a way to salvage the damaged PCB. Any advice is greatly appreciated. Thanks in advance.
u shouldnt be using a soldering iron more then 5watts. Also… where exactly are you soldering the wires to? I only ask this because there might be another connection point if you screwed your 1st attempt.
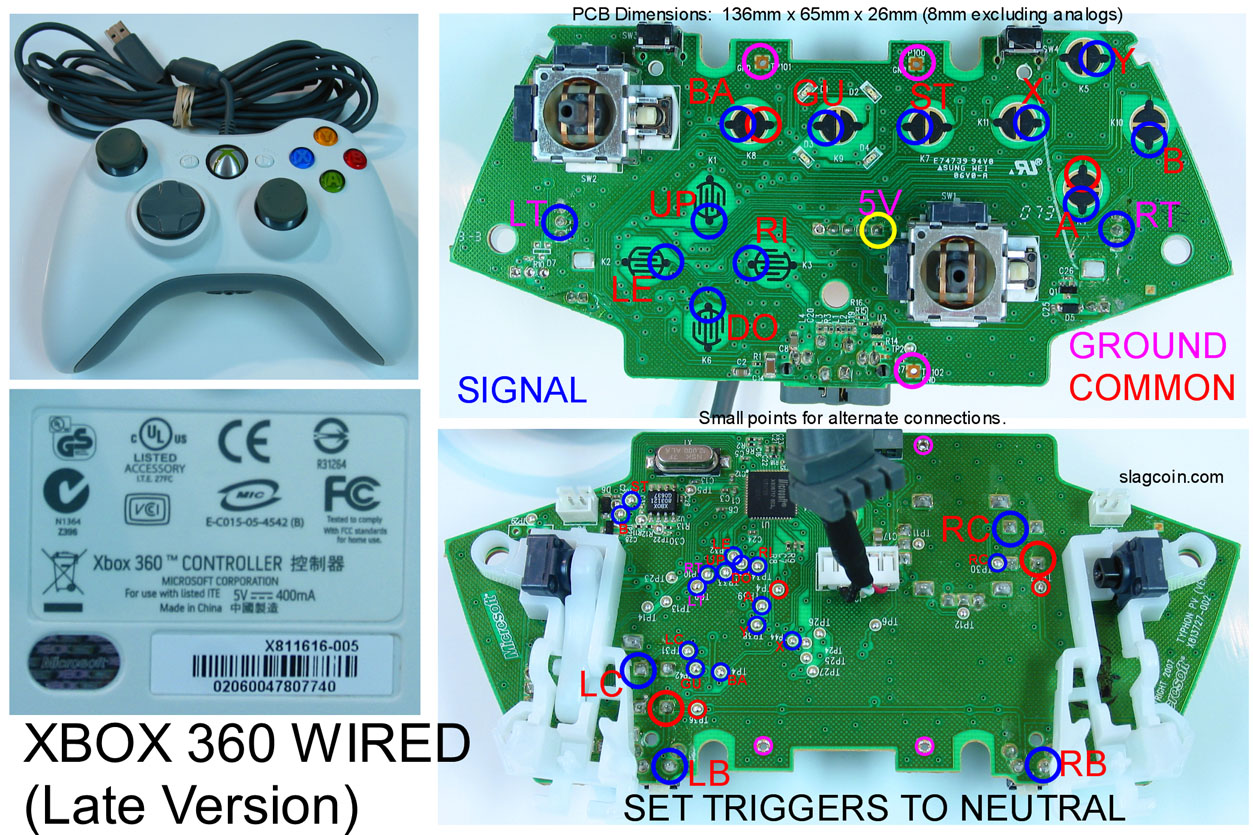
Wowza, I didnt’ know the wattage had to be so low. No wonder i burnt it out… I only tried to solder to the points detailed in this picture:
http://www.gamersreports.com/grimages/738/1141402402/3/1/gr.image.jpg
Fairly sure I damaged most of the directional button contacts and 1 or 2 of the buttons.
Any ideas?
same thing pretty much happened to me. im no expert but if you follow the connection point for the signal on any direction theres should be other connection points (little circles on pcb) if they arent exposed you can use an exacto knife to scrape some of the green stuff off, but be careful.
in my case i fucked up one connection on my ps1 pcb and it worked out for me. it is very hard for me to tell based on the picture you gave, and also my unfamiliarity with the 360 pcb
Thanks, I’ll try giving that a shot. Hopefully i can figure something out.
I burnt quite a few of them with a 45 before knowing that was my problem, so I bought a 15 watt one. Is that still to much? I havn’t opened it yet and could probally go back and exchange it
The lowest wattage i have is a 6 watt battery powered soldering iron. I’m guessing the 1 watt won’t make that big a difference.
I started soldering with a 15 watt iron on pcbs. Never had any problems.
15 Watts is what I use.
Just right for pcb’s
15 will work… as a matter of fact I just looked at my piece of shit radio shack iron and its 15 lol
Blackblurr… these should help in finding a new solder point
http://forums.xbox-scene.com/index.php?showtopic=581799
http://forums.xbox-scene.com/index.php?showtopic=635462
http://forums.xbox-scene.com/index.php?showtopic=581887
http://forums.xbox-scene.com/index.php?showtopic=618909
Ah thanks everybody, glad to hear that.
Thanks Domz, hopefully i can try to work something out of these pics. (Though they are a little confusing) It seems that Microsoft made two versions of the same controller, as if it weren’t hard enough for me already… About this one http://forums.xbox-scene.com/index.php?act=ST&f=132&t=581799&st=0#entry3867534
Each button has a 1 and a 2. So i attach one wire to each of these spots and connect them to my Arcade stick button? Does it matter which wire goes where?
And about this one http://forums.xbox-scene.com/index.php?showtopic=635462
For the D-pad buttons it only shows one connection point for each one. Is the other one the ground? And if so where should I attach the wire for it?
I know these might be kinda dumb questions but this is my first experience with these things. Need all the help i can get really.
Bump for hopeful clarification.
The old wired PCB’s had a matrix setup, which means you have to connect a wire to each side of a button. The new wired PCB’s have a common signal setup, which is the opposite of a common ground setup (as used in the wireless pad).
I haven’t tested this, but you should still be able to use a joystick like the JLF, but solder the black wire to the common signal connection between the four directions. You can work out what it is by using a multimeter.
The buttons should be wired the same and daisy chain the common wire between the buttons.
Or check out slagcoins’s site or see another diagram of the 360 PCB.
I got another xbox 360 pcb and succesfully wired nearly everything. The only one is screwed up on so far is the D-pad Down button. I’ve looked at the diagrams given to me by Domz, but they seem to be for another version of this PCB. If someone had another diagram displaying an alternate soldering point for the D-pad Down direction I could finally complete my first stick.
If you messed up the little dot closest to where the rubber part of the down button goes, just follow the little line leading from that dot to the next dot and solder there.
Finish that stick and post already.
alright i think i can get the top one to work, but what should i attach the ground wire to?
I hate to keep bringing this post back up, but I just can’t figure it out. Ive retraced all the contacts and have the signal points all wired up. I just need to know how to ground them properly. For all the buttons and half the directions i successfully wired the normal contact points so theres no problem there. But for D-pad Left and D-pad Right i could only get the Signal contact attached. The ground contacts for these two are damaged. If someone could explain to me in the simplest terms what to do about these two points, I could finally let this thread die. Thanks again.
Bump
is it a microsoft 360 controller? if it is you cant pull a ground from anywhere else on the controller. it has to be with that set of signal and ground. may i have a pic of the controllers problem area?