I was wondering if someone knows how to hack into a sixaxis ds3 ps3 controller to make an arcade stick. NOW, don’t think Im an ordinary thread starter noob type of person. Ive been looking around the forums for an answer but had no luck.
So i registered and decided to make this thread because i need help.
Basically what i have is:
a brain
wood for the joystick box
competition joysticks and buttons from HAPP
sixaxis dualshock3 ps3 controller pcb
soldering iron
copper wire
wood glue
wood screews
power drill and
hole drill brakets
im ready…
all i need is someone to show me where to solder the cables, PLEASE. Ive been breaking my head trying to figure this out and find a diagram. unfortunately i haven’t.
Can someone map me a way?, just like someone did on this next picture, BUT instead for a sixaxis ds3 ps3 controller.
Thanks for the info:wgrin:. but that adapter looks confusing to me. and i would really like to not spend any more money on this project.
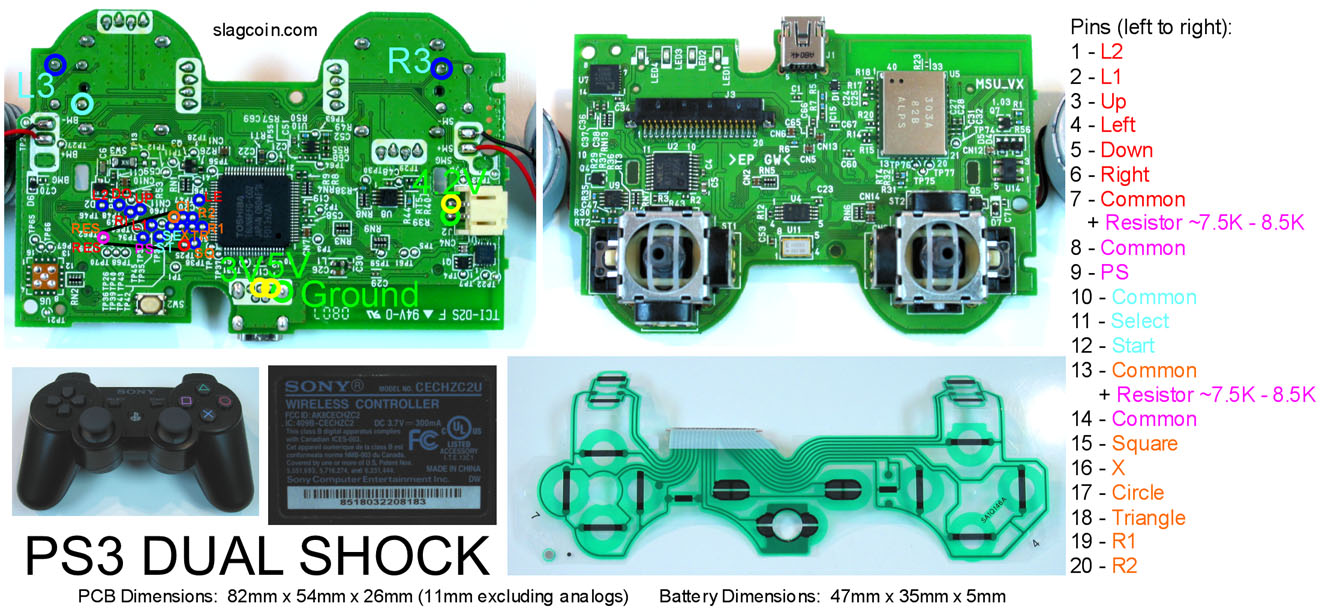
i was hoping for a diagram of the wiring that needs to be done and what it corresponds too. that slagcoin image is kinda what im looking for but i don’t understand it (Its different than mine.Look closely),
and i would like to use a straight pcb to buttons configuration.
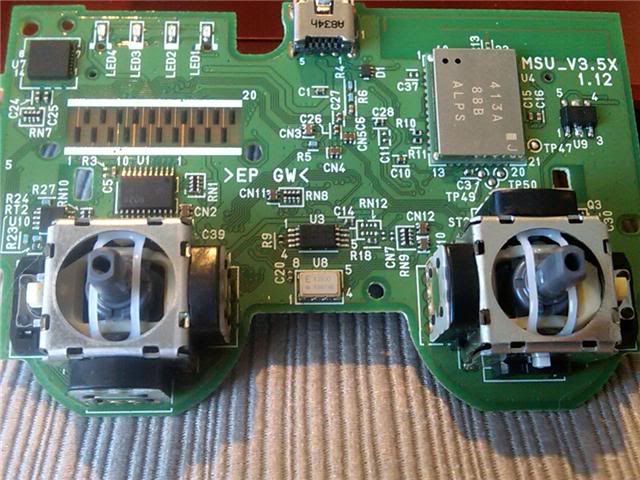
This my actual one im planning on using. like i said i would like to go for the installation method from pcb to arcade buttons directly.
I believe that on the new Dualshock 3s pins 1 - 20 are here in red. Left to right. Ignore height. Have not done it myself so double check. Remember seeing a post on it.
Where is says common, you hook up the other end to the common line by daisy chaining. For instance start and select one of the button terminals goes to common. Where it say resistor, you have to get a resistor of that value on that point then attach a wire.
Lots a soldering work. The axis adaptor makes this hack convenient if you used a sixaxis. Doesn’t matter if you are stuck using that pcb though.
Highly recommend that you get two of these to put between the pcb and the buttons incase you fuck up, re-wiring won’t be so bad.
This makes all the sense in the world. Thanks for the explanation about the pins! :DD
this is my first time making an electronic device, wish me luck. i will post a progress thread if yall would like one? with plenty pictures. coming soon.
Take the pieces of the pad, and try to assemble back to a working DS3. Then sell it if you have to, but either get a cthulhu (wired PS3) or AXISdapter for wireless PS3 and a sixaxis for it to go with.
With nothing but love, you don’t know what you’re doing. Padhacking a DS3 is hard as hell for PROS to do. You will end up destroying the pad, frustrating the hell out of yourself, and have to buy something else to use anyways because you destroyed the pad in a way that makes it useless for about anything.
There are easier and cheaper ways of doing this. You can either look into them now while you can still salvage a usable pad out of the DS3, or later after the DS3 is irreparable.
ok, so the deal is that i don’t want to spend more money on this project.
I believe i have a full understanding of how to go about soldering the wires to those pins.
do i REALLY need to go with a different PCB? or can this be done?
I guess the main reason why im being so stubborn about using this pcb is because i want to have a wireless arcade stick that is rechargeable… Now the only question i have is why do those pins say they have 5 ground channels, but people say that the ds3 has no common ground… when i clearly see it. am i looking at the wrong thing?
thanks for the advice tho toodles. i just feel the need to challenge myself when people say that this pcb is too hard to hack. im new to soldering and electronics. but im not toooo clueless.(hopefully) :]]
With your skill level (or lack of), getting a different pcb would be wise. Sure, it can be done, but this isn’t something that is recommended to do as your first project.
The sixaxis has common lines, not common grounds. That’s what is confusing you. They are not the same.
I feel ya on the need to challenging yourself. However, you need to learn the basics first. I suggest taking an obsolete/broken electronic like a vcr and just practice soldering wires to it and desoldering components off the board.
If you really want a wireless stick, get a sixaxis that does have the ribbon connector and also get an axisadaptor.
The guys are right on this one. Absolutely no need to reinvent the wheel on this. I started my project last month and went here. For $10 ($15 is you could shipping) I got what I needed to pull off a wireless PS3 stick. Even if you didn’t want to get the axisadaptor you could use the ‘spiffyshoes hack’ that slagcoin shows in detail which would still be easier than working with the DS3.
I don’t think anyone that’s responded so far is saying it can’t be done or shouldn’t be done. But there’s a much MUCH easier way to to it that won’t break the bank and is guaranteed to work (and did I mention it is much easier?)
off topic:
thanks for the concern, but at this point my ego is pushing me to this the hardest way possible… call me crazy… call me determined to learn something allot more advanced.
I’m a hardcore DIYer, and this route challenges me in ways i have never imagined… specially with so many people saying “take the easy route”.
on subject:
do i need to have resistors between the arcade buttons and the pcb? or will there be a problem for wiring it up directly to those buttons?
Heh, do you always take the hardest route when you start new things XD.
Honestly though, imo the contact pads on the DS3 are easier to solder to than the pins of the ribbon connector on a sixaxis. Although you will need to scrape the black stuff on the pads (there are versions of the DS3 that don’t have the black stuff and just have exposed copper pads)
as pull-up resistors if im not mistaken. Just know that they are absolutely needed for this controller to work.
Just remember, everyone warned you that you shouldn’t be doing this and should take the easier options. Don’t get upset if you end up destroying your controller.


 (thanks for the tut)