ARC-EYE LEDs: The ultimate button LED mod!
NOTICE: **Arc-eye v1.0 is sold out! Bencao74 might have a little bit of stock left.
ArcEye2 is arriving! Click here for the new thread!**
Thank you for your interest! Everything you need to know about ArcEye v1 will be in this first post, if you don’t want to read the thread =)
http://i579.photobucket.com/albums/ss240/purplearms/ArcEye-1.jpg
Setups using Arc-Eye:
32Teeth: Arduino madness Part 1 | Part 2 | Part 3a | Part3b | Part4 | Part5 | Part6
32Teeth: Combination button press light up Part 1 | Part 2| Part 3
32Teeth: Button press lightup Part 1 | Part 2 | Part 3
32Teeth: Programable button press light up | Part 2
Gummowned: button press to increase brightness
Gummowned: button press lightup & rumble LED activation
Gummowned: another button press lightup
Bencao74: Button press lightup demo
Toshinu: Arc-Eye and Masterstrike
My own joystick setup:
[media=youtube]ySfBtmmkXtI[/media]
FAQ:
Q: What is Arc-eye and why do i need it?
A: Arc-Eye is an inexpensive custom LED circuit board designed to make LED modding easier and cleaner. They’re made primarily for Semitsu buttons. It holds two super bright RGB LEDs and resistors (SMT or THD). Its design is flexible and capable of many different colors and configurations.
This will save you a ton of hassle. No more hunting for approprate LED (I’ve done the work for you). These are insanely bright and high quality! Also, there is no need to wire inline resistors, since they are housed on the board, inside the button and out of sight! This will help keep your wiring cleaner.
Q: Why is it named Arc-Eye?
A: Arc-eye is a medical condition described as painful inflamation of the cornea from excessive exposure to UV light. Common causes are staring directly at the sun, welding / tanning without eye protection, snow blindess.
Q: How do i switch these on and off?
A: Wired joystick users can tap directly into USB with no switch required (LEDs will turn on when you plug in). Wireless joystick users need one spare pole on a switch to do that. Alternately, both wired and wireless users can get a MASTER STRIKE controller board. This will allow you to control LEDs, USB, PCB power switching if using a battery. Announcement coming very soon!!
Q: Whats with the design / price?
A: The price of the production version has been reduced from prototype cost to reflect mass order discounts. The shape of the board and the white solder mask are the two biggest factors for manufacturing cost. The center cutout and white solder mask is a must, or you would see green solder mask through the button.
Q: But SMT soldering is difficult!
A: Afraid to install or solder on your own? Gummowned offers custom install service. Drop him a line!
If you are adventurous, its not as bad as you think. The Arc-Eye is capable of using either SMT resistors, or regular 1/8 watt THD resistors. So the only SMT soldering thats required is for the LEDs themselves. A flux dispensing pen will make SMT soldering a million times easier! I recommend the Chemtronics CW8400 . For DIY’ers, I recommend ordering one extra arc-eye just in case…
Here is a nice SMT soldering tutorial by 32Teeth:Part 1 | Part 2 | Part 3 | Part 4
Q: Does this come with the buttons themselves or the translucent button caps?
Q: How did you get those akuma Kanji symbols to light up? Can i get those too?
A: The stock semitsu button caps are opaque white (light does not shine well through it, which is why only the plunger body lights up in typical LED button mods). The symbols are a different mod, which consists of a translucent button cap, and some black cardboard laser cut stencils. The arc-eye does not include this cap. However, I will consider a limited run in late spring / early summer, exclusively available to arc-eye or master strike customers.
Q: What buttons will this work with? Semitsu or Sanwa? 24mm or 30mm? Clear or colored?
A: This mod was designed for Semitsu 30mm PS-14 (both screw in and snap in). It will fit into Sanwa OBSF-30 and possibly other sanwa types (you will need to use a dab of hot glue or double sided foam tape to hold them down in this case). The ideal buttons to use are clear white 30mm semitsu PS-14-K / KN. This will NOT fit 24mm, and looks best on clear buttons. Colored buttons will still work, but I recommend using white LED in this case. I have a very small amount of these (by request only).
Q: **How bright is it and what colors can i create? **
A: At full power (20ma per LED), its distractingly bright. Each LED is rated at 7000fl at that current. You can see in the pics in this thread that you can even see the outline of the opaque button caps! Since this is an RGB LED, you can create any assortment of colors by varying the resistors.
Q: Is this common ground or common power?
A: The board can be configured as common power or common ground by the orientation of the LED on the board. Notch facing up and right is common ground, notch facing down and left is common power. You can combine colors, and vary the resistors to change intensity (and therefore achieve any number of colors). Diagrams and instructions will be provided. The production version will be marked for common ground setup.
How do you know which you want?
Common Ground: Required if you want to have two sets of colors that are switchable with masterstrike (can still be done in common power setup with a physical switc). But this limits other applications like button press light-up (since button activation will control the ground connection and it is common to all three colors, so individual colors cannot be controlled)
Common Power: Required if you want to do fun stuff like LED rumble activation, button press light-up from dim to full power, button press light up of a second color…
Q: How do I power them?
A: Most people own TE sticks or use Cthulu / Dualstrike, where the power source is 5v USB. Simply tap into 5V power source from Cthulu / Dualstrike board. The LEDs will be on whenever you plug in the USB cable this way (you can also add an in-line SPST switch).
Here is where to tap power on a Cthulu and ChImp:
http://www.fakesite.com/UPLOADS/cthulhu.png
http://www.fakesite.com/UPLOADS/chimp.png
The rest use battery power (for wireless setups), in which case you need different value resistors. A stock PS3 battery does not have enough capacity to drive everything for more than two hours, so you will need a 3.7v LiPo (Lithium Polymer) battery upgrade (3000mah+ recommended).
Note 1: Xbox 360 controller users with play and charge battery is 2.4v, which is not high enough to drive the LEDs. But don’t fret: you can wire a 3.7v LiPO battery and it will work fine.
Note 2: LiPo batteries can varry in voltage depending on their charge and make. Don’t assume that because its stamped 3.7v that its exactly 3.7v! Forward voltage of green/blue is ~3.6v so you need to be careful with resistor values! Fair warning!
Q: Can my battery/USB handle the extra current required by LEDs?
A: The board is designed to consume up to 20ma per LEDs per color, with two LEDs on each circuit board. So each button typically consumes 40ma if only one primary color is used. USB is rated to provide 500ma of current so 8 buttons is well within the limit. 32Teeth has successfully installed this with his Cthulu dual mod. The appropriate resistors will be provided to facilitate this. If you choose, you can substitute your own resistors to decrease brightness and conserve battery power.
If you activate more than one color per LED (i.e., red + green = yellow) then that is extra power you are using… use the math above to calculate roughly how much power you’d be using…
There is a workaround to get more USB power. Details here.
Q: Where do i get a large capacity battery from?
A: I personally use a 6AH battery from Sparkfun. You can also pick up any 3.7v LiPO high capacity battery here.
Q: Will the LED board interfere with button function?
A: No. The button cap will not come into contact with the board when fully pressed. There is a lot of clearance.
Q: How does the mod stay in place? Do I need glue or tape?
A: For PS-14-KN (screw in semitsu type), friction with the button collar will hold the circuit board in place. In fact, you will need a flathead to remove it. For other button types, you will need to use a small dab of glue from a hot glue gun, or double side foam tape to hold it down.
Q: What resistor values do you use / what are the forward voltages of the LED?
A: For 5V operation @ aprox 20ma, i provide 100ma for green/blue and 200ma for red
For 3.7v operation @ aprox 20ma, i provide 33ma for green/blue and 100ma for red
For 10ma operation, resistor values are doubled.
Forward Voltages (@20ma):
Blue/Green: 3.4-3.8v
Red: 1.9-2.3v
Q: Can I do button press light-up? Does it work with Cthulu / Dualstrike?
A: **YES! **Its just a matter of wiring. Check out 32Teeth’s install:
[media=youtube]cg9dd7BpCMY[/media]
Q: Can you provide a wiring diagram?
A: Yes. Here it is!
http://i579.photobucket.com/albums/ss240/purplearms/Arc-EyeConfig.jpg
Also, here is a wiring diagram by Gummowned on how to wire arc-eyes so they are dim but become fully bright on button press lightup, as well as rumble activation. This is on 5v usb setup
http://i79.photobucket.com/albums/j138/gocontourgo/projects/dim.jpg
You can also have one color on (red green or blue), and do button light up activation of another of those 3 colors (so the two colors mix to become a secondary color). Here is a demonstration by Bencao74
And now the original post:
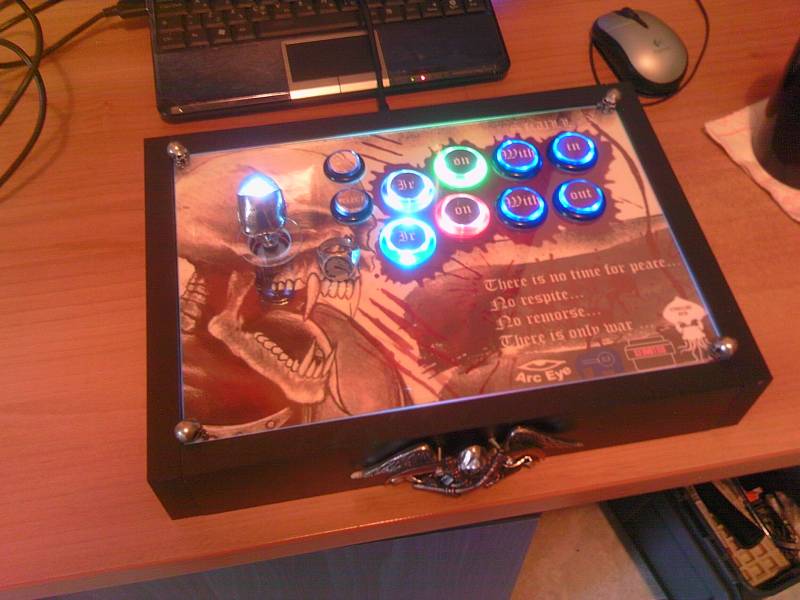
Hello fellow modders!
I’m at long last ready to reveal my latest joystick. I call it project Gouken. Its about 75% complete, dual wireless and fully functional. The first mod I will feature is the LED button mod, which i call the Arc-Eye. The Arc-eye is a circuit board that holds super bright LEDs and resistors. I hope you like it! More mods and surprises are coming, so keep track of this thread!
Props go to Madlabs Studios who did the artwork for me! If you want to see some jaw dropping art, drop by his website!
http://i579.photobucket.com/albums/ss240/purplearms/ProjGouken1.jpg
http://i579.photobucket.com/albums/ss240/purplearms/ProjGouken2.jpg
http://i579.photobucket.com/albums/ss240/purplearms/ProjGouken3.jpg
http://i579.photobucket.com/albums/ss240/purplearms/ProjGouken5.jpg


