Thanks a lot, broski!
So SE Stick is a good option, IF I could find one – buut…
Thanks for the compliment Toodles! (Full House canned sound) Awwwwww
I’m very happy to receive all this advice!
I just realized that the TE stick is actually $119 CDN – so it makes my savings look just that much more attractive now! I will keep an eye out for an SE stick. In honesty, Toodles - I have very little spare time these days. sigh I suppose that means that the best thing to do is to trust everyone’s general advice right now and shell out for a good , pre-made stick or higher.
I have too many hobbies such as it is, and as cool and as awesome as stick-making is, it’s a means to an end (playing SSF4). I already have way too many dorky hobbies to occupy me with, and too little time to perform them. My Intec stick is really hampering my growth as a player. I cannot consistently perform moves on it. (Thanks for the earlier comment about the stick not being designed with a circular gate leading to my problems!) It’s quite frustrating–
I just hate the thought that if I shell out for an SE stick, one day, I’ll go and drop another ~30 for buttons (etc) bringing it much nearer to the cost of the TE. I have checked the Trading section today - there’s nothing that’s bite-worthy for me yet!
It all comes down to cost. If I must, I will try to find a few hours a week to tinker with my stick. I realize that it is a big project from sawing apart a controller, soldering all of the buttons and wiring the stick itself to work with the controller. Then a box must be built and the list goes on. But you do speak very rightly though – I really DON’T know how much work -really- goes into making my own stick. And there is a terribly good chance that I will not be happy with my 1st or even 2nd attempt.
Aiyah!
This is the crappy Gamestop controller I have.
EBGames.com - Buy PS3 Controller - Playstation 3
As no picture was ever linked in that thread, rtdzign, I’m unsure of WHICH controller it is. Mine does light up, but it was not advertised as the Afterglow. I am fairly certain that it is THIS one as neither are called ‘Afterglow’ and I do have that solidly coloured rubbery skin on the handle just like it. Now – as to whether it locks up after 2 seconds of input… the hell if I know. Do any of you have a clue?
Thanks also for the recommendation of this Komodo controller! It’s a shame that I can’t get it locally. The shipping would most likely offset all merits of the low retail cost. If I should start multiple sticks, or need several PCBs, this certainly does look like a tasty option.
If I lived in Toronto-area or the GTA in Canada , I could probably find an SE stick without an issue. But being where I am (somewhat near Windsor, across from Detroit, Michigan) I have doubts that the Canadian gaming community has enough of a demand or a foothold for me to find the SE controller within reasonable efforts. I may have to save up for the TE.
This whole thing is intimidating and rather frustrating, TBH. Although I very much appreciate your feedback gentlemen. Thanks for your graces thus far.
Is there any way to make the TE stick a 6 button stick, because I don’t like the two extra buttons, it’s in the way.
I want to be able to help you. :sad:
Remove the two Buttons.
Get a new art and cover with Custom Acrylic Panel with six holes.
Or remove Buttons and use Button Plugs?
Aight, those resistors that were bought for the Dualshock3 pcb… they weren’t 1/4watt, but 1/8 watts. Can I still use them? Is there such a thing as adding watts?
Aww thanks for the sentiment! Maybe you can!
IF I decide to take the route of making my own controller for the PS3 – which stock controller type should I rip the PCB from? Is the Intec stick I have a viable option (for the PCB)?
I pasted a link to the Gamestop controller that I bought for this purpose: but I’m currently unsure of whether THAT one will give me an input error after holding down the directions for two seconds or more. I have read that even a PSX controller works with an adapter. That’s a very cheap alternative, but the adapter costs money, too! I’m also worried about lag related issues arising from adapters.
You gents have been great so far!
Hey SupMyKneeGrows! I know that they have button plugs out there, but some people find them annoying to have on the surface. They are a cheap and good alternative. But I also want to suggest that you simply open up the console, remove the unwanted buttons and then make your own cap. Seal the one end of the hole with masking tape or something similar and pour in Bondo or some other putty-medium. Or better still, if you can cut a perfectly shaped hole out of a solid material that fits into this hole in a near-perfect way, you can have a very flush plug for the button! Of course, my solutions are very n00b suggestions, but it’s a viable course of action nonetheless!
The watts will not matter for your application.
I still suggest use of Cthulhu.
But for money, you can get the Komodo PS3 Controller rtdzign linked.
That komodo has no guide button, right? Not even any solder point?
Nope. :shake:
That Button on the Controller only switches in and out of Analog.
Can you link me to a site that sells button plugs and covers with six holes?
arthong for Custom Acrylic Panel.
http://www.tek-innovations.com/arthobbies/
Lizard Lick for Button Plugs.
http://www.lizardlick.com/
But you don’t need Button Plugs if you buy a 6-Button Acrylic Panel.
I just bought an ASUS monitor for my PS3, and when i plugged it in, I got no sound. I went to the sounds settings and it says " This HDMi device cannot be used for audio output"
Can anyone help me out on this please?
Hey all. After lurking this this thread for a little bit this seems to be the right place to ask, but please tell me if I’m wrong. Sometime ago I got the madcatz SE stick as a gift. Although I’ve basically grown up playing arcade games on home consoles with D-Pads, I could feel pretty instantly a noticeable difference in control, although I never was happy wit the 360’s crap pad. Always preferred the PS2 pad overall. But it was still tough at first. I never played much fighting games in the arcade, so it took about a month of getting used to before I felt I could even throw a dragon punch motion with half as much certainty.
But I still feel sometimes like the motions aren’t quite getting read right. I have a hell of a time hitting air executions and getting simple double QCF motions to go through their full motion when I think I’m doing so. I also have some sort of weird problem doing a really, really simple dash. No idea what that one is about yet. I’ve not modded the case yet at all, but now I’m seriously beginning to consider doing so.
I’ve seen [media=youtube]vXUrTS22fmw"[/media] which makes it look super easy to do so with the right parts. Now, most of my problem seems to be with the motion range on the stick not living up to my mind’s eye really. I really don’t understand the complaint with the default knockoff buttons, but I’ve never had a comparison to know better. For now I think I’d prefer to just upgrade the stick.
The previous video and a little bit of lurking are pretty much the only thing I know about the subject though. After watching [media=youtube]ILkn4xSQ4mc"[/media] to finally explain to me the difference in the restrictor plates, it * looks *like what I’d prefer, what I think of when I do my motions on the stick, actually lines up with an octagonal gate. I think I would prefer that, but since I really only have my current default stick with the SE to go off of, I’m not positive  I wiffle between Balrog, Guy, and Gen, so I often play both charge and QC characters.
The issue I have is, like I previously mentioned, those two videos are pretty much the sum of all I know on the matter, and they’re not exactly in-depth. Primarily, the part mentioned in the first video, the Sanwa JLF-TP-8YT-SK, ships with another square gate it looks like, and I haven’t seen any similar tutorial on adding an octo-gate. I don’t know if there’s another part exactly like that one BUT with an octo-gate I should order (that doesn’t require the rotation still), or if I need to buy that Sanwa part, an octo-gate(no idea if there’s more than one to consider?) and then have to find out how to mod the stick to use the octo-gate and THEN do the replacement? Thank you for any advice you can give on the matter!
Need Padhackinghelp
hey guys
i have a few questions about padhacking, the main thing is clear but a few things are not 
iam reffering to slagcoins diagramm because it will be a ps3 pad!(no ds3, saw in the other thread that this would be very difficult)
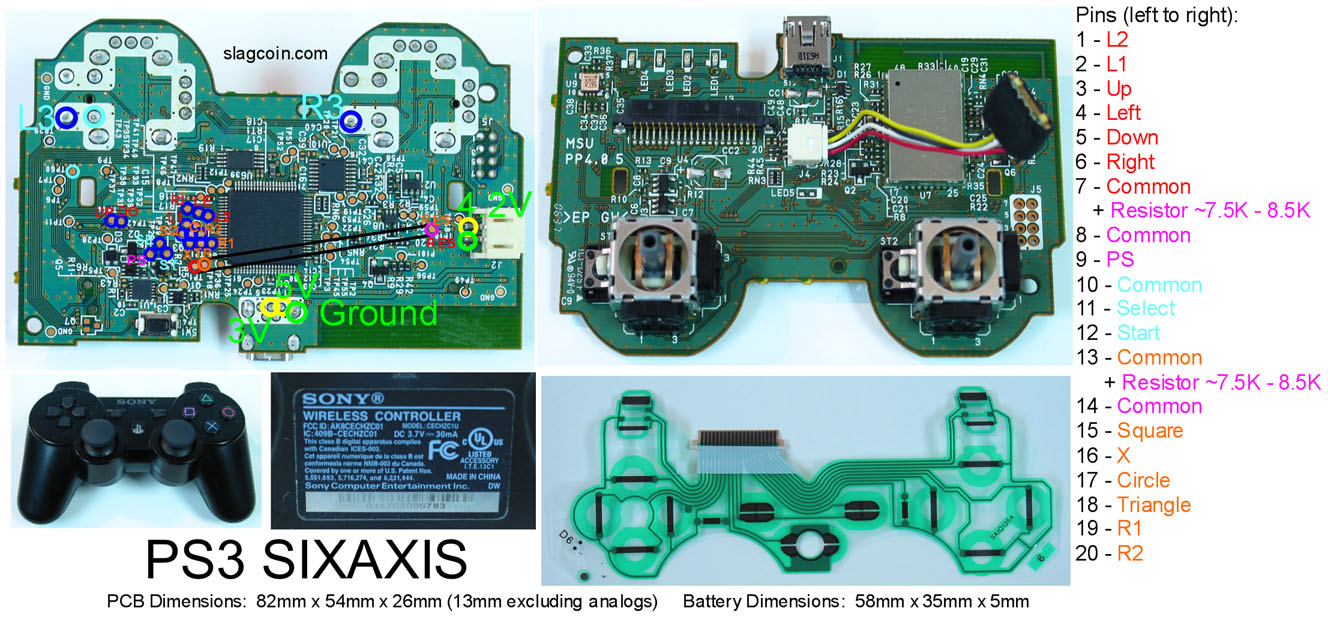
1:where exactly is the main ground?iam a little bit confused cause he wrote it is circled red, but red is a common (7)and added with a 8.2k resistor to 8.
or is it possible to solder my groundwire to the area where ground stands?
2:how do i know if my pad(pcb) has comon ground?
tingboy wrote in the light on activation thread that this is neccesary for the led part.
3:also about the resistors, is it true that i can use any kind of w, cause there are a lot out there and iam not sure which to buy like 0,25 0,5 0,75 1 5 etc
thanks 4 help in advance and sry 4 my english its been a while since school
All Sanwa JLF will come with Square no matter what.
The Octagon, Sanwa GT-Y, is to be bought separately.
First video, he shows removing the Restrictor Gate.
That is how you remove.
And if you have Sanwa GT-Y, then just pop that on.
Are you afraid of the rotating of PCB?
Because all you do is take off the Restrictor as shown, and rotate PCB.
There is nothing else to it, but exactly doing that; it is extremely super easy.
There is no main Ground.
The PCB is not Common Ground.
For this application, Watt does not matter.
thanks for the fast reply
so there is no main ground means i can attach my groundwire to? anywhere on the pcb where are no circuits?
and iam not abel to do any led stuff right? which makes me a little bit disapointed
If you are going to use the PCB for just PlayStation 3 alone, you can still use.
You’ll have Pin 7, the Common, be used as “Ground” for all the things in red.
You’ll have Pin 8, the Common, be used as “Ground” for all the things in pink.
You’ll have Pin 10, the Common, be used as “Ground” for all the things in blue.
You’ll have Pin 13, the Common, be used as “Ground” for all the things in orange.
So instead of having one Daisy-chain like in a Common Ground, you will have three sets of Daisy-chain.
You can still do LED, but it will not be like the TingBoy Tutorial.
There are extra things to do.
And more money cost.
Also another thing is that you can use the Leo Board from Gummowned.
Leo Board will turn the SIXAXIS into Common Ground.
http://shoryuken.com/f177/project-leo-sixaxis-wireless-360-dual-mod-194525/
Thanks a lot so far
i might be wrong and its hard to see and it could be that there are no wires solded cause the stick and buttons are not attached yet but i cant see the wires for the common grounds at this pic: http://slagcoin.com/joystick/pcb_wiring/ps3_solderless.jpg
my new question is : what´s with the ps button (pink) two commons, so i have to link the ps button to both grounds?