Not without ditching HDMI
Awww alright, gotcha. Thanks for your help 
Does anyone happen to know what kind of connector MadCatz uses on the ends of their ribbon cables? I’m thinking this would work? I’m pretty sure of the 2-mm pitch, and the keying looks about right. (Then I just have to hope I can come up with a reasonable facsimile of the correct crimpers.)
Yup, that’s the one. There’s like 4 of those, one 5 pin of the same family, and a 5 pin JST EH for the joystick.
wow, so I just found out that a sanwa or seimitsu screw-in button won’t fit into the bottom left hole of an hrap because the part that screws in doesn’t have enough clearance with the joystick mount. would have been good to know before i ordered those buttons. So why is it that all the snap-ins seem to have been phased out in preference to screw-ins?
What hrap model do you have? I’ve been using screw-in seimitsus in my Hrap3 pretty much ever since I got it. The buttons closest to the stock JLF stick can be a little tight to get in there to tighten but I’ve never really had a major issue with it.
- Does anyone know of a good light-blocking material to use on inserts? I have a particular pattern I want the light to shine through.
i have an hrap3sa and it doesnt even come close to fitting
I’ve done a little searching and I haven’t found anything that suggests a Hrap3 won’t fit seimitsu button screws. The closest I’ve found is a comparison here in the last post that shows the difference between a Hrap3 and a Hrap2. The Hrap2 seems to display the same issue you’re describing in which case the common solution seems to be to sand down the button’s nut till it fits. Or use snap-ins.
Lizardlick has snap-ins of both the Sanwa and Seimitsu variety.
oh believe me, im familiar with the button inventory of every online seller. basically none had seimitsu snap-ins of any (perfectly normal) color I was looking for, if at all. that’s why I finally gave up and went with the screw-ins. and now even that doesnt work.
…yes the 3sa looks like the hrap2 in that picture. sorry i seem to have misplaced my sander along with my other power tools
if your trying for seimitsu for LED reasons have you looked into the Rollie buttons being sold in the trade forum?
yeah no the problem is i seem to be one of the only people with no interest in translucent buttons.
hey dudes makin 1st arcade stick, gonna go for a shoppin trip soon.but dont know what types of wires i need. cheers
Ive posted a link to an image of the pcb I plan to wire to a Sanwa JLF and Sanwa OBSF 30 buttons.
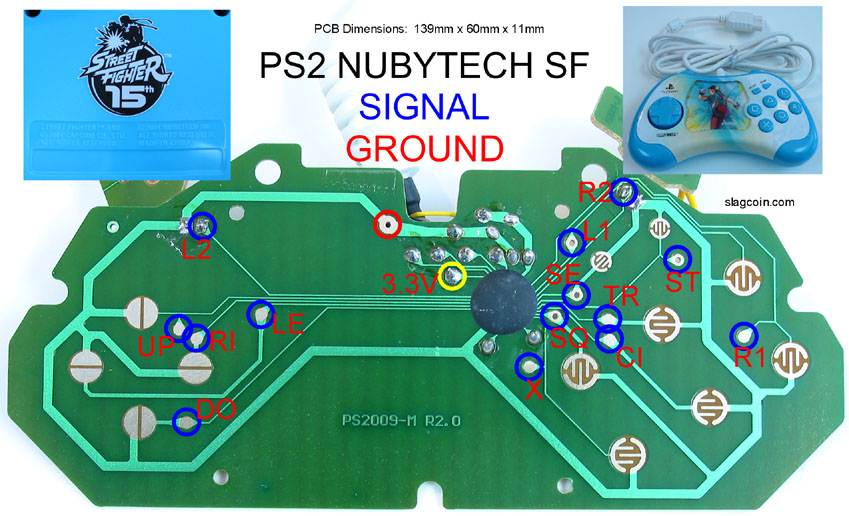
would any one like to give me some advice as to what the wiring schematic should look like.
Im not sure if I can just us the single ground for the JLF of if i’m gonna have to do a cherry mod.
22 gauge AWG or higher is the general consensus, Stranded. Don’t get solid core. Solid core is a pain to work with. It’s generally referred to as “Hook-up wire,” so don’t get something like speaker wire (Which is terrible for joysticks, anyways)
I answered you in the other thread! But if you replace with Cherry microswitches, You can still Daisy Chain ground to the lug labeled “COM,” it will be the one that is on the side. Then connect signal wire to “N.O.” Normally open. The other, “N.C.” will not be used. Here is a good diagram of wiring:
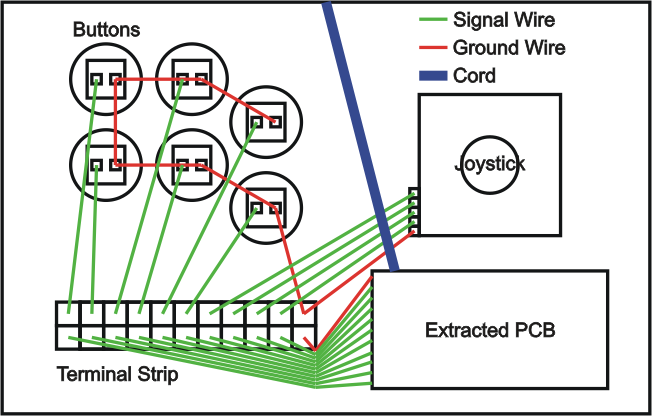
But you probably already know this from slagcoin. The terminal strip is optional.
Hey guys well going through digikey i got lost pretty easily hahaha so my question is
can someone point me in the right direction of a 9 pin female and male connectors, similar to the connectors the madcatz pcb uses.
I have an idea about wiring the signals to a 9 pin connector and then wiring the buttons to the 9 pin matching connector. I think this will make switching panels as simple as possible and take no time at all. Thanks alot guys.
I’ve been looking at a lot of connectors recently too; it gets tedious and frustrating.
The EXACT kind of connector MadCatz uses, in 9-pin form, would be Digi-Key 455-1162-ND. Problem #1 with that though is that it uses crimped pins. I assume you’re not going to drop $400+ on a crimper, so unless you have a plan for this it’s probably not a connector you want to use. Problem #2 is that the mating connector only comes in a PC-board-mounted styles and sounds like you want to connect two cables. (Problem #3 is that it’s a 2mm pitch and won’t exactly fit into a 0.1" breadboard if you did want to solder.)
What I was thinking of instead was something like this – screw terminals make for easy wiring. However, although I did find a mating connector that’s not PC-board mounted (Weidmueller’s SLS 5.08), no one stocks it.
In the end, your best bet may be to just use a D-Sub 9 connector. You can get them as solder-cup so there’s no concerns about crimping. There’s a million of 'em, but here’s a male and female I chose at random.
Play-asia and other sites say the Fighting commander 3 is Japanese-regioned…But numerous people here have bought one, so that would conclude that it is a region-free product capable of running on non-JPN ps3’s?
Yea JDM sent me a link of what i was looking for but after looking at everything i also believe that it would just be easier to just use a dsub connector
I doubt there’s any way they could region lock a controller. Especially on PS3, which accepts any universal human interface device (Including mouse and keyboard, Unreal Tournament 3 on PS3 had the option to play on Mouse and Keyboard), which is why it’s so easy to make custom PS3 PCBs. I mean, the games aren’t even region locked.
I’m looking into modding and painting my SE, and there is one odd thing I notice with this stick. Just outside the main face template, there is a very small “Valley” or “Gap” before the stick returns to the plastic that continues on to what is the base of the stick.
I have no clue why this very small gap is here. All it seems to be doing when I look at it is collect dust, sweat, and dead skin. What would be good for filling in this gap? Whatever I fill it with I will most likely sand it to be level with the continuing plastic.