I just got my new Sanwa JLF joysticks from lizardlick and was about to put them in when i realized…
I dont know which side is up on the stick…
Is one of the microswitches labeled or is there a way to tell? I really dont want to put the stick in upside-down and have to unscrew everything and flip it around.
It also looks like the connector is facing a different direction than the madcatz one. I dont think this will be an issue but i can’t use the 5-pin connector to make sure my stick is facing the right way.
Is there a way to get this right without just using trial and error?
There are four little tabs holding the clear plastic retrictor on the bottom of the JLF. Pull it off. Then the PCB with the switches will come right out. Turn it around and put it back in the same direction as the stock stick and install it in the same orientation. The stock wiring harness should work then.
What about taking the plastic sleeves off of the wires going to the buttons? is there an easy way to do that or what? I’ve been trying to disconnect the buttons, but been having difficulty getting them disconnected. The plastic is really tight over the quick connect and the quick connect is really tight on the button.
I couldnt find any instructions on lizard lick? can you link them?
Sleeves should come up without too much resistance. Use a flathead screwdriver and insert it between the button and the quick disconnect. Rotate the flathead screwdriver and the quick disconnect should come off the button.
Thanks, the quick connects are being a big hassle, i’ve been destroying my fingers trying to get a few of them off. I got the lp/mp/lk/mk in though now. Although when i plugged the quick connects into the new sanwa buttons the microswitch popped down and up a bit, it seems to be in place right now so im hoping it isnt busted or anything. lol
Cool thanks. I was able to swap out the PCB on the stick very easily. Much easier than it sounded.
Now all i have to do is figure out how to get off the last two quick disconnects that are stuck on really hard. lol it sucks. - I blame madcatz. :wgrin:
The qd’s always provide resistance coming off, but that’s good for knowing they are secure. Use a small flathead to pry them up from the side helps a lot.
As for your buttons moving as you installed the qd’s, that’s okay, it’s just the switch moving, you probably pressed in a side tab. Just make sure to pull the switch back down to make sure it is snapped in.
so i just finished work on my second stick and heres how it has gone.
stick1:
totally done, everything is plugged in, new buttons new stick working fine. can’t wait to stop working and start playing.
stick2: buttons in (working fine)… stick is in (the stick itself is working) but i have a smallish problem…
The plastic (female) end of the 5-pin connector going from the stick to the main PCB is not snug enough.
When i plugged the stick in to test it out (i tried it out before screwing the back plate on because i wanted to have easy access to everything in case something didnt work) the stick wasnt working at all. Up/Down/Left/Right… nothing. I was a little freaked out because i wanted to get it working. So i unplugged it and plugged it back in. Still nothing…
So i tried tilting the plastic female side of the 5-pin connector. And when it is tilted down a bit it works fine. But it seems that the female end of the connecter doesnt fit snugly on, and if it isn’t tilted a certain way, it wont work.
How can i remedy this conveniently. Should i try to glue it into place and risk not being able to remove it later or is there a another way to solve this?
–edit:
I just tested it some more and its strange. There is definitely a problem when the connector is at a certain angle but visually the angle is really really subtle. I move its around slightly and tried it a few different times and was able to duplicate the problem but visually the connector looks like its in place right. It seems like i might have to just find out where the sweet spot is and glue it tight. But that will stop me from being able to remove the stick in the future.
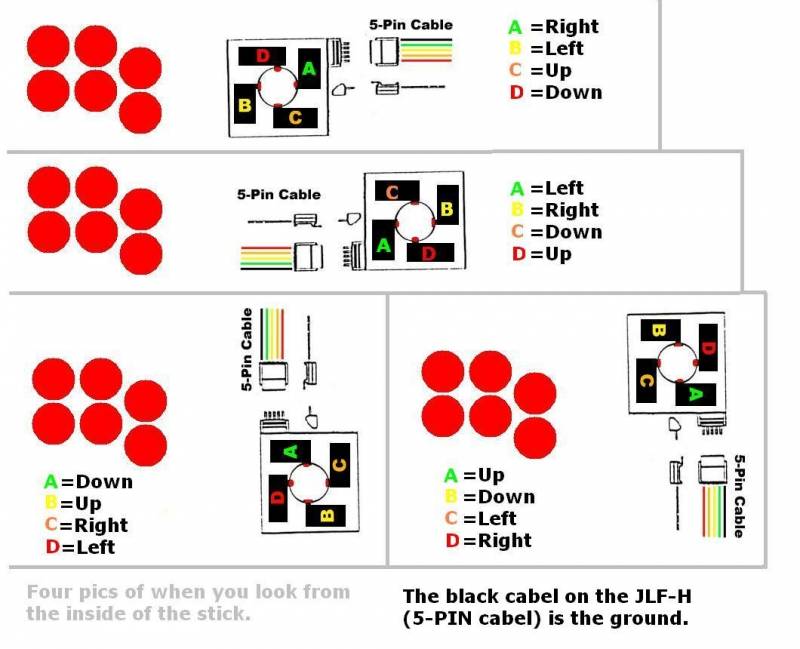
haha, this thing is awesome. I still have this ratty old piece of paper with that printed on it that I’ve been using for years. It’s got solder on it, lines from accidentally cutting part of it with an exacto knife, it’s partly crumpled… I lost the file, but I held on to that printout because I didn’t think I would be able to come across that image again! lol. I think I have it memorized by now.

 it sucks. - I blame madcatz. :wgrin: