^^^ are all you guys talking about this pad?
http://content.answers.com/main/content/wp/en/thumb/8/85/180px-Playstation_Controller.jpg
Yeah, I need help with soldering points too, there is no copper anywhere…
^^^ are all you guys talking about this pad?
http://content.answers.com/main/content/wp/en/thumb/8/85/180px-Playstation_Controller.jpg
Yeah, I need help with soldering points too, there is no copper anywhere…
Yes. :lovin:
yeah thats the one.
al i know is that u have to scape the black stuff off to see the copper.
I just learned that those models branded by Sony, doesn’t have the copper contacts. I scrapped the black stuff and there was just metal underneath.
There is usually copper under the metal, at least on the dual shocks.
Yeah, on those models, but not the old school regular PSX 1 controllers. I scraped until there was green.
I’m sorry if this has been discussed before:
I have done a mod for a guy and put a noname PS2 PCB inside a HRAP3 stick. Said guy claims the controler is not recognised by the games since the PCB is not analog. Completely stupid to disable a pad if there’s no analog and the game doesn’t need them anyway, if you ask me. Can people confirm this ? I mean, do I really have to connect a SONY dualshock ?
Note: I don’t own a PS2 or any other game console
Some games do require you to have a PS2 analog controller. Only time I remembered having the game require a PS2 analog controller would be some Square Enix RPGs (Valkyrie Profile 2/Final Fantasy XII) and for some reason, some of the Karaoke Revolution games (which doesn’t even need the analog sticks). I’m sure there’s more games that require it, but I don’t recall any fighting games that would need one off hand, though.
Most games that you would play with an arcade stick will not be looking for Analog/PS2 controls so you should be good with digital.
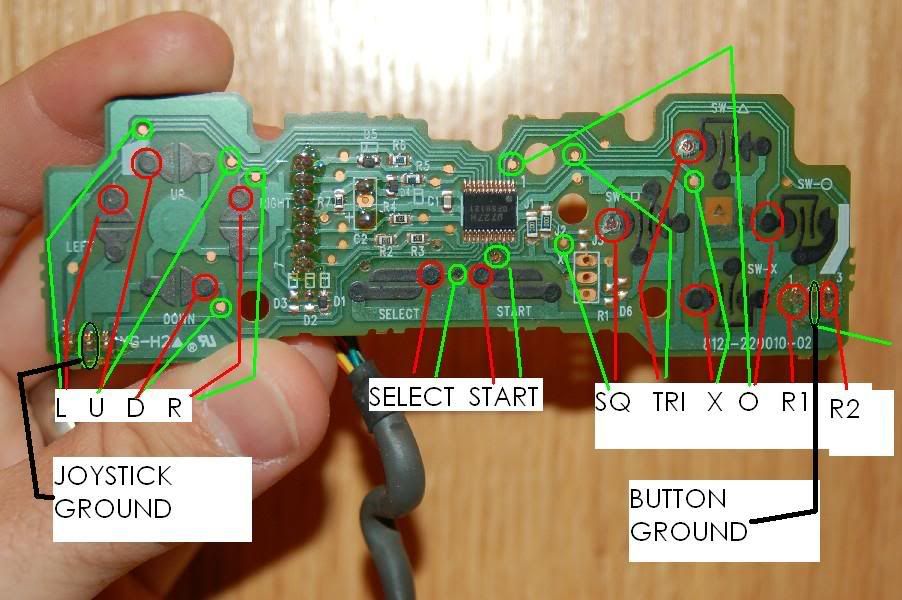
With the Series H controller you can use the ground in between R1 & R2. This is the same ground for all buttons including the D-pad.
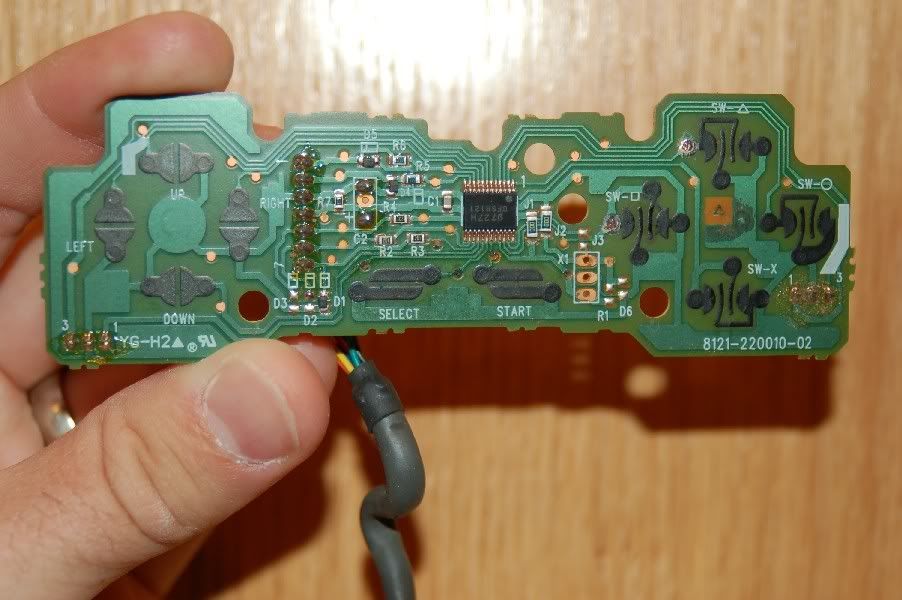
Sony Digital PS1 Series H PCB
Here is the outside of the controller prior to removal of the casing.

In this picture you can see that I have scratched off the black stuff to expose the surface to receive solder for the Triangle and Square buttons.
**In the image below I have labeled the solder locations (if you want to scratch) with the red lines.
The green lines represent alternative solder points for the same buttons. You do not need to do any scratching for the green points.**
I strongly recommend that you re-read through the first couple pages of this thread, if you have not already done so, prior to soldering your PCB.
That being said, these things are next to impossible to mess up, even then they are still salvagable.
Good luck.
dude thanku so much u r a life saver. now i can final finish my stick.=D
So I’m working on my dual PSX-360 PCB stick, and I have yet another question (more confirmation, I think).
I bought a PSX extension cord to hack, and there’s no ground “wire” - it turns out it’s one of those that uses the braid sheath around the wires connected to the ground pin. That makes it pretty much worthless, and I need to get a controller/extension that actually uses a ground WIRE, right?
On the same note, the 360 PCB I’m using looks like it might be doing the same thing. Since I’m wiring the controller wires to a DB9, I have to have a real ground wire - so I should solder my own ground wire onto the point, correct?
Check again. There will be a ground wire separate from the shielding.
Both cables have real ground wires inside, separate from the shielding. The consoles with connect it to ground, but you dont need to futz with it at all with what you’re doing. When making the DB cables, strip the insulation out of the way, and solder only the wires inside.
I don’t know how you guys handle soldering to PCBs without through-holes…
It’s really not too difficult. Just heat the place you are soldering to a bit and apply solder. Flux helps, but isn’t needed. Just make sure you aren’t using a high wattage iron, or you could burn through the board.
Do you mean you load up the copper with a blob first, and then push the wire into the blob?
I usually do something like that yes, as it is easy to do with two hands and no additional tools/clamps. It is technically bad technique, but it works fine. Don’t overdo the “blob” though. It doesn’t take a lot to do the trick.
It is probably better to apply solder on top of both the wire and the contact simultaneously, though you have to keep the wire locked down while holding solder and the iron.
Either way though, it isn’t particularly difficult. I did my first pad hacks after not touching a soldering iron for 10 years. Both (I did two at once) worked fine with no re solders needed. If I can do it, most anyone with the proper tools and some patience can.
^ I get a small amount of solder on the tip of the soldering iron then just press it down on the end of the wire over the solder point.
Thanks for the pics Timoe.
Great way to get cold joints.
Not is you leave the iron on long enough to make sure both the wire and copper are heating up good.
The best way would be to tin the wire with solder first, making sure the wire is good and hot. Then you wouldn’t need a third hand to hold the solder, and you won’t have any excess solder because the wire will only hold as much as is needed.