I finally got my sanwa parts last week and hooked everything up… works great… can’t thank this community enough…
I did have a question tho… I’m using the madcatz pad (black 4716) and in the lobby where I’m waiting to hit ‘Ready’, it shows that I have a headset connected when I don’t have anything hooked up (or a wireless one on)
Does anyone have any labeled wiring shots for the xbox360 madcatz sf4 fightpad? Code Man had 2 pictures earlier, but they were unlabeled (and not very large images at that). I’m doing my first padhack soon, and figured this would be an easy board to use.
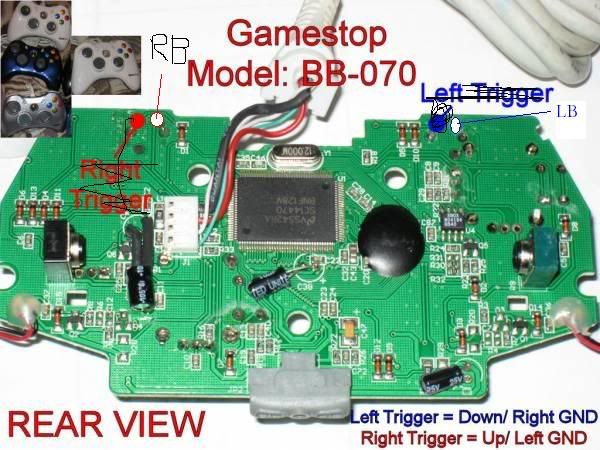
hello i desperately need help wiring my xbox 360 non common ground pcb (gamestop bbo70) to all sanwa parts (the JLF PCB will be taken off), i have posted more photos here
if someone is able to copy the image and draw over top the red/black appropriate lines and email me at dustin_ronald@hotmail.com i would appreciate it very much, i will also post it for other users to help them
i thank everyone for there help so far and in the future, i wouldn’t be this far if it wasn’t for you guys :rock:
Ok I am totally stumped on this one and Cant find it anywhere in the whole forum so here it goes: Working on a Late 360 Wireless controller PBC Ive managed to Solder all Buttons [X,A,Y,B,LB,RB, start, and Xbox button] with Success. But in soldering the directional buttons to connect to my Happ Competition Joy stick I am having no luck what so ever in getting a signal to come from them. It seems there is no copper in those tiny Solder Points on the front of the board and seems to be more of a whiteish color at the points like the copper has some how come off of the board due to lackluster soldering attempts, or maybe scraping it off [if thats possible]
and I cant seem to find the a diagram on how to do run the signal from the back of my model of controller… any ideas… much thanks in advance…
Padhacked a madcatz retro arcade pad, wired everything up and it works except for the right trigger. In SF4 it registers as crouch, even with the buttons set to off in the game.
I did the 10K resistor mod to both sides and they (LT/RT) are wired up correctly. I’m using one ground for all buttons. Any advice?
My friend just bought one of these and here are the notes I took so far on what I’ve noticed about it.
Down, Right, LB, A, Y - Can use Downs ground
Start, Guide - Can use either Start or Guides ground
Up, Left - Can use either Up or Lefts ground
X, B, RB, Back - Can use X ground for all
And note apparently X/A use same signal and Y/B use same signal.
Not a single thing soldered to A or B and theyre working fine.
I used the X signal to X ground, X works. Use X signal with downs ground, I get a A.
Use Y with X ground, gets a Y. Use Y with Downs ground, I get B.
And putting X signal to X and downs ground triggers both X and A
as does putting the Y signal with X and down grounds yields Y and B.
ok so i have just managed to solder all the wires to the connector (EPIC WOOT)
i burned my first attempt when both my light and magic hands broke at the same time :S so i can now only solder in the day as my normal room light doesnt provide enough light lol
this attempt took me a few hours this morning and is my first first time soldering, it looks ugly but i am hoping it will work and that brings me onto my question;
i still need to go out and buy the resistors but i really really want to test it, can i test it if i leave the strip in (even though i have soldered the full 20 wires on) or do i now have to attach the resistors before i can test?
and once i know it all works i think i am going to glue the thing up.
EDIT-
gone over all the connections from the FFC to the wires with a multimeter and they seem to be ok, no crossovers or anything that i am aware off.
first go through, one of the wires didn’t receive the signal and suddenly fell off and i had to re-solder it back on! it was part way in too, so i was lucky not to break it
Didn’t bother explaining how to get right bumper or left bumper, or which side is ground and which is signal on the start button. Can anyone help please? :karate:
The only thing that lags are the trigger buttons, which lag around 3 or 4 frames. You probably won’t notice if you’re a casual gamer but not recommended if you want to get serious about gaming.
when i have the pcb plugged into computer i can get every button to work connecting grnd/signal except i can’t figure how where the LT and RT are, when i move the little screw thing where the RT and LT go i get a response on the computer with the Z axis but can’t reproduce that with wire… im newb… plz help… PS thanks theglow all your connections check out properly!
I need help with these triggers too! SRK user “The Glow” sent me this picture, apparently he thinks there are some errors in the pic on the joystick vault:
But can anyone help with how you wire the triggers on the Gamestop bb 070? Thanks!
Blast from the ~75 pages ago past. I was shopping around for solder, switches, etc today when I saw these things hanging up for $15 and thought I’d ask these folks as well. Anyone with more electronics knowledge than I care to explain how we would go about figuring this out on our own, like which points do what and where the ground is?
Here’s my ghetto as hell approach that doesn’t require a background in electronics. I’m sure this is about 10x more efficiently done with a multimeter.
Connect it to your PC and load the MS drivers if you haven’t already.
Open the Control Panel/Game Controllers and make sure it works/the buttons are recognized.
Make a button mapping using notepad, like 1 = A, 2 = B, etc.
Crack open the pad to expose the PCB.
Strip a piece of wire at both ends.
Connect the wire to two points until a button activates. One of them is a ground. Keep working like that for a little while of trial and error.
Match up the buttons you wrote down earlier on your mappings to the points you connect the wire to.
This would probably make Toodles or Slagcoin laugh but I’ve mapped out a couple of pads like this.
is there a reason that i shouldn’t make my own stick using a wireless xbox 360 controller as opposed to the wired one? i only have wireless controllers and they’re all the older matrix style
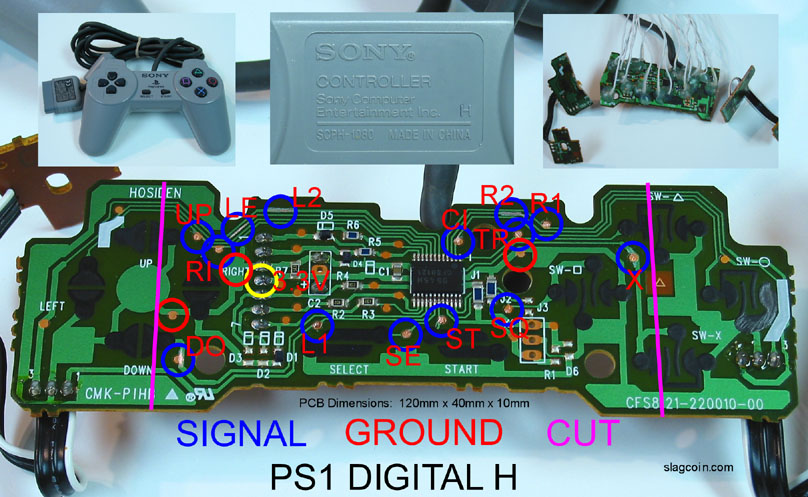
About to go pick up some 24gauge wire, ill be hacking a H series psx pad. other than cutting the excess board i dont need, there no other prep work involved since the contact points are already showing, right?
Even if you have those copper points, don’t solder to them. They lift from the board extremely easily. Scrape that bad boy like this and solder to the scraped points instead. If you use those points and nudge the wire connecting to them they have a tendency to rip right off the board.
Hey guys one of my buttons shows that its being pushed down constantly(A button). Even when i removed the button wire from the pcb when i plug it into my pc it still shows that its being held down. Do any of you know what can be the cause of this is? Is my circuit board for this button screwed or could my solder be touchin the ground (which i dont think it is).
Yeah, post pictures of the soldered point if you can. It’s very likely that it’s touching something it shouldn’t be. If you have a solder sucker suck it up and see if the problem still occurs.

