Edit: damn double posting
You are correct. Remove the pot an just run the single wire to the invert spot on the chimp.
anytime! Enjoy the dual modding with the chimp. So much easier now!
I’ll be doing another dual modded TE (round 2) tomorrow.
Spektrum, if you get a chance, I’d really love to get a good up close picture or scan of the pcb. I need to make some diagrams for installing on TE’s, and don’t have any good pictures of the TE board to work from. Plus, I’m curious what the round 2 pcb’s look like.
I’ll take some high res pics tomorrow and shoot them over to you!
Appreciated.
Thanks a lot spektrum. so much easier now that you dont have to prepare the inverter chip.
marcus,
check your marcus@marcuspost.com email address for the pics.
FYI to everyone else…the PCB in the Round 2 TE fightstick is the same as the Round 1.
I know there were two different boards in the TE Round 1 (same version number, but slightly different color and a few other subtle differences), but I’m not sure if this one is the same as the original or the updated one.
Is the later one; the ‘rev. B’ is on the photos you sent.
I have 2 different rev. B in my drawer. It’s strange, as all the numbers are the same, but you see a difference. Almost like it was a different manufacturer.
haven’t follow this in awhile. quick question for anyone. the new chimp board, is that ps3 only or is that MC? if it’s ps3 only does that mean that you no longer sell MC unassembled? I read over the first page and there’s only MC assembled. are you phasing out the MC and no longer support other consols? so if I want multi consols, I’d have to buy MC + imp like the old days?
shrimpnoodles: FAQs, first post.
Did you know that there is a 25,000 character limit per posts?
Damn, I may have to make a new thread so I can camp the first ten posts or so.
I had to cut the trade list out so it’d fit. Here is the trade list; 150% trade in value until Jan 17th, so if there’s something you’d like to trade in, get on it and send me a PM
Trade Wants
Spoiler
Wii Games (w/ case and manual):
Zak & Wiki : $15
Sam and Max Season 1 : $15
Wario Land: Shake It: $15
Boy and his Blob : $15
Mario Party 8: $30
Raving Rabbids 2: $20
Monster Hunter: $40
Mario Galaxy 2: $40
WarioWare SmoothMoves: $25
Super Mario Strikers: $25
Conduit: $10
Star Wars: Republic Heroes: $10
DJ Hero (with controller): $40
Trauma Center: Second Opinion: $10
Trauma Center: New Blood: $10
Trauma Team: $40
PSP Games (w/ case and manual):
Disgaea 2: $25
Patapon: $10
Resistance Retribution: $15
Dungeon Siege: ToA: $15
Infected:$15
Lemmings: $10
Worms: $10
Brave Story: $15
PS3 Games (w/ case and manual):
Lego Star Wars TCS: $15
Lego Batman: $10
NG Sigma 2: $40
RCF: Crack in Time: $30
Katamari Forever: $35
Brutal Legend: $20
Buzz: Quiz TV: $25 (game only)
KOF 12: $15
360 Games (w/ case and manual):
Chronicles of Riddick: AoA: $20
FEAR 2: $20
FEAR: $10
Xbox1 Games (w/ case and manual):
Star Wars Battlefront: $10
Call of Cthulhu: $15
PoP: Sands of Time: $10
PoP: Two Thrones: $10
PoP: Warrior Within: $10
Psychonauts: $15
Silent Hill 4: $10
Fatal Frame: $35
PS2 Games (w/ case and manual):
We Love Katamari: $15
Killzone: $5
Ar Tonelico: $25
Ar Tonelico 2: $30
Fatal Frame 3: $30
GC Games (w/ case and manual):
Mario Party 6: $20
Mario Party 7: $20
Megaman Anniversary Collection: $20
Capcom vs SNK 2 EO: $15
SNES Games (w/ good sticker on it):
DKC (any): $5 each
NES games (cart w/ good sticker):
GBA Games (w/ good sticker; box and manual prefered):
Puyo Pop $10, $15 w/ box and manual.
DS Games (w/ Box and manual):
Chrono Trigger: $20
The World Ends with You: $20
PSX Games (w/ Case and manual only):
IQ: $50
Threads of Fate: $20
Vagrant Story: $20
Parasite Eve 2: $25
Saga Frontier: $10
Saga Frontier 2: $10
Uncut original full marquee for Garou:MOTW: Soul.
hey,
I read through some posts and I just wanted to make sure that I have everything correct before i buy/plan to do anything. A simple yes/no would suffice to each.
-
If I have a ps3 TE stick, then I need to find a common ground 360 pad (and pad hack it) and throw the CHIMP in there to have one wire coming out so it can auto select if its in a ps3 or 360.
-
If I have a 360 stick, then all i need to do is buy the CHIMP and I am essentially good to go
-
The madcatz xbox 360 TE stick has a common ground.
THANKS!
If you have PlayStation 3 TE and want auto-detection for PS3 and Xbox 360, then get ChImp and Common Ground Xbox 360 Controller PCB.
If you have Xbox 360 Arcade Stick and want auto-detection for PS3 and Xbox 360, then get ChImp.
Xbox 360 Arcade Stick has to be Common Ground.
Not all Arcade Sticks for Xbox 360 are.
PCB in Xbox 360 Mad Catz Arcade FightStick Tournament Edition is Common Ground.
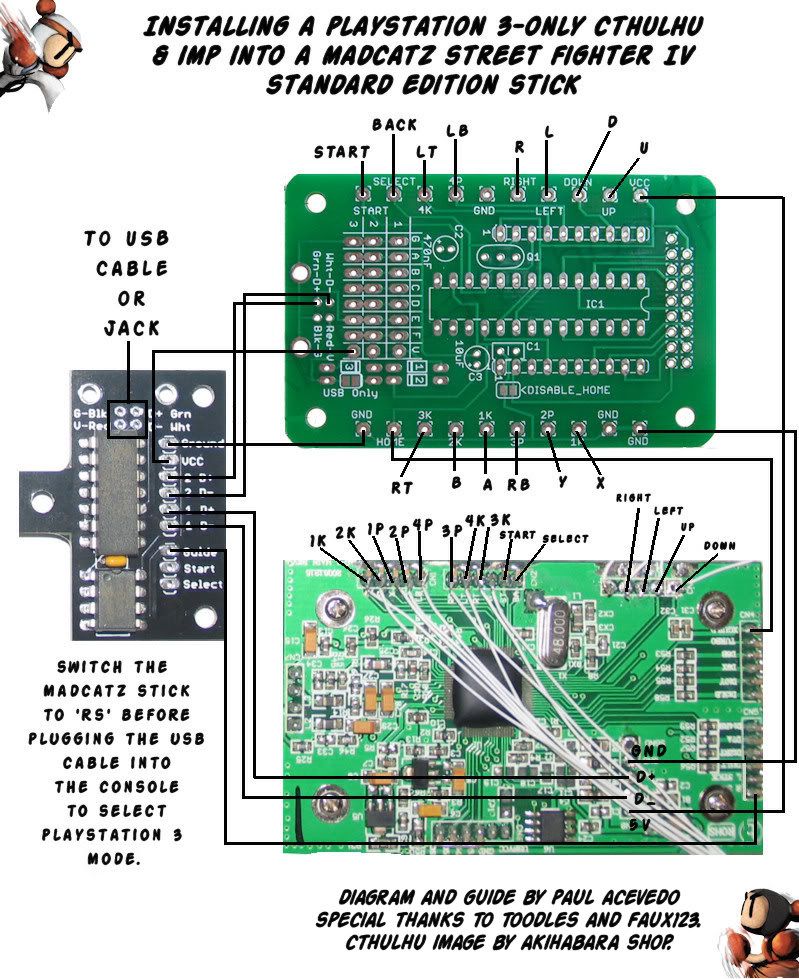
My first attempt at a diagram like this. Any input good or bad would be appreciated; especially from noobs who haven’t done this sort of thing before.
Chimp+MadCatz FightStick Diagram
I have an Imp+ regular Chutlu+360SE stick that I am working on. Where do the VCC point goto on the Chutlu? The more I read over the pages here that more confused I get.
Currently I have the imp wired as such:
IMP
Ground -> Ground on Chutlu
VCC ->V3 on Chutlu
2 D+ -> Green D+ on Chultu
2 D- -> Wht D- on Chultu
1 D+ -> D+ on SE PCB
1 D- -> D- on SE PCB
I’m concerened that the VCC is hooked up incorrectly as I read various posts with people using various points for this. My guide button just flashes when plugged into a PS3 and the stick or buttons are not working. Although it did register as a Virtual High Grade Stick when plugged into my PC. Nada on the 360, no lights or anything.
I’m following this. The USB cable and Guide is hooked up also as it appears in the diagram and I’m having no luck so far, any advice?
Hey Toodles,
I have done the cthulhu/imp dual mod on a 360 TE already, and I have 2 chImp boards coming in. My question is, where you have the wire connecting the guide button from the TE pcb to the chImp. According to your diagram you connect the wire to the pad marked “BE16”, on my pcb, there already is 2 beads of solder on that pad. Is it alright to bridge the 2 spots on “BE16” together when soldering? I ask because when i did the cthulhu/imp mod I’m fairly certain i soldered the guide button wire to a different spot. So is “BE16” an alternate spot to solder to, or is that spot chImp specific?
I have the same question with the up, down, left, right sections on the 360 TE pcb. On my previous mod i soldered to where the pre-existing solder points were, but on your chImp diagram, the solder points are on the pads under those “BE11- BE14”. So are those pads just alternate places to solder and is it ok to bridge those seperate points when soldering?
I’m sorry if my questions seems dumb, but you did ask for input “especially from noobs”.
Ok, looking at this diagram, its very strait forward. Just one question, you say to de-solder the usb cable going to the madcatz pcb, and connect it to the chimp instead. Doing this, the old board no longer has a usb connection obviously. That is the proper method and the chimp makes it work that way for 360 as well?
Everything else looks very strait forward. Also, if there is a picture of what the USB cable soldered onto the madcatz board looks like and which pin is which, that would also be very useful. Thanks.
Everything you described is has it should be, so your problem is somewhere else. Did you connect the power and ground between the Cthulhu and 360 pad as directed ?
The whole idea is to have one USB cable coming out of the stick, and have the stick automagically work on 360 and PS3. To do that, we need the Chimp to control the USB cable. You’ll notice that all of the holes that used to have USB wires in it are connected to the Chimp; when the Chimp is plugged into a 360 console, it will connect those 360 USB wires to the USB cable.
Alternate spots. Almost all of the button and direction lines on the TE/Se pcb have those small surface mount exposed copper pads. I prefer soldering to them over soldering to the metal posts most folks do, but its a preference thing.
The points aren’t separate. Each one is made of two copper pads connected together by a very thin wire trace on the board. You’re not connected two previously unconnected things; electrically, its the same as soldering a wire to the end post, I just find it easier/cleaner.
I’ll try to explain this better in the diagram, maybe get shots of the similar spots available for the buttons on the top.
Thanks for the diagram (and for designing these in the first place!)
I got everything hooked up and everything is working except for the Home/Guide button. Start+Select works fine to bring it up on PS3/360/PC, but I’ve re-done my connection several times and it’s not working. Any ideas?
edit: Just to clarify, I’m installing the Chimp in a 360 TE
You have the slide switch set to ‘Locked’ which disables the Guide button.