The Art of Punishing

The Art of Punishing - Practical Applications of Frame Data and hitboxes

I didn’t feel like doing a main video for a lot of the examples, but i’m willing to record and post a video on any of the examples above if someone wants me to. There are video’s below showing specific punishes for specific characters. Scroll to Post 2 if you want to see them.

Also in my defense, it didn’t seem this long as I was putting everything together :[

How to punish an attack is a really big part of the metagame in SF4, when you show an opponent that you know how to and when you can punish an attack, it should make your opponent think twice about using the attack again. Attacks in SF4 can be punished on contact, whiff and on reaction.

Frame data is really important in determining how you can punish an attack, yet frame data does not give enough information to guarantee or confirm a punish. There are things to take into consideration such as hitbox interactions, pushback, spacing and hitstop (especially with attacks with ex.armor).

The important numbers in frame data are:

Startup frames
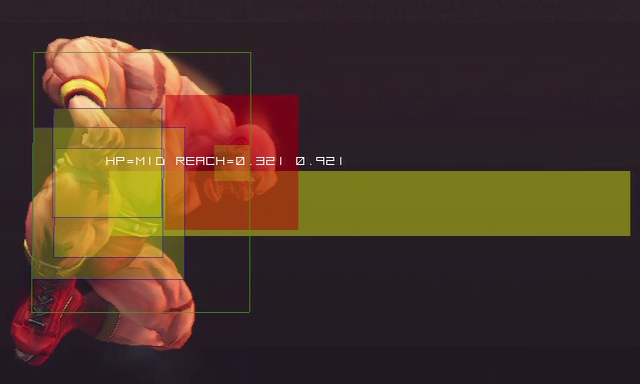
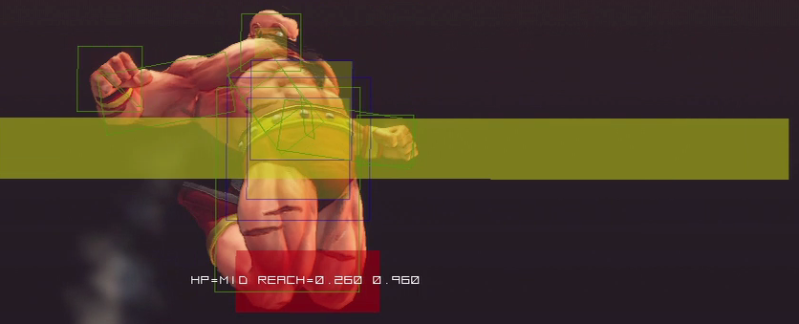
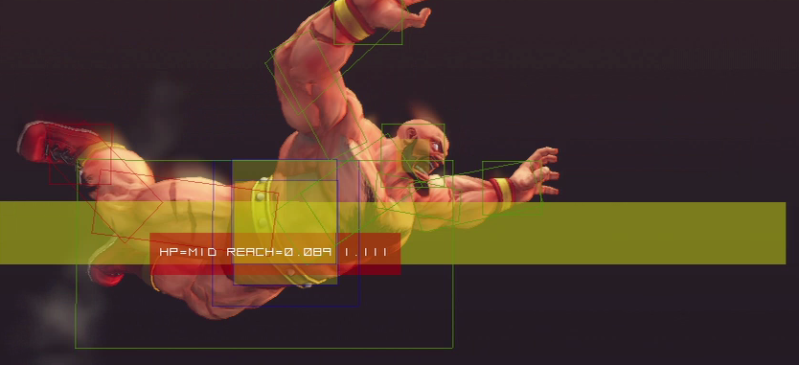
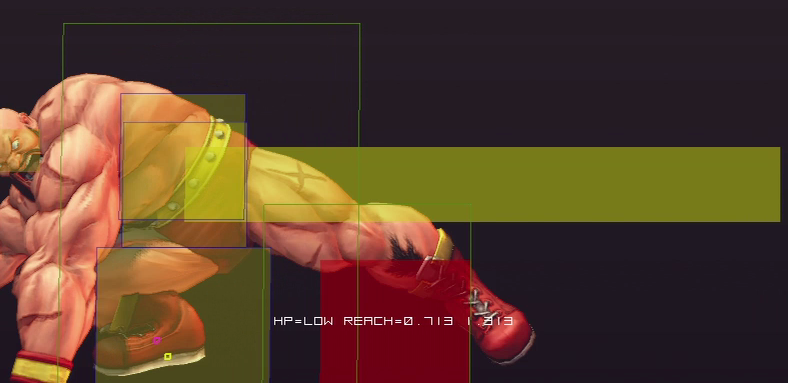
Startup frames are the frames before an attack can actually hit if it collides with a hurtbox. If you watch the hitbox videos (torrent), the startup is the time between when the animation begins and the red boxes appear. During startup, attacks can be counterhit, this is not true for recovery or active frames (in most cases). When you interrupt an attack on startup, that attack gets a damage buff and a frame advantage buff. So if you were to CH an attack with cr.mk, you’d get 125% damage and instead of being +7 on hit, you’d be +10. Keep in mind very few attacks force stand (balrog’s cl.mp, cl.hp, dash straight and lp.oh on CH, force stand) so combing into Ultra after CH is difficult. Good invincible attacks have invincibility up until their active frames or invincible startup AND active frames (compare Gief’s ex.gh to Rose’s ex.ss). Subpar invincible attacks only have some invincible startup frames, meaning that they can lose to attacks with enough active frames. Also for those who download the hitbox videos, the hitboxes are only accurate up to SSF4 and don’t include the changes (or characters) for SSF4:AE or SSF4 v2012, Eventhubs has images for those characters as well as updated hitbox images accessible from the hitbox link after clicking on the appropriate character name, nowhere near as good as the videos.

Active frames
Active frames are the frames in which an attack can count as a hit. Some attacks only hit once, and some hit multiple times. If the frame data shows only one number (e.g. 2f) then the attack can hit once within those 2f, while if they show multiple numbers (2*3), then the attack can hit once for each of the frame durations listed, this is important when dealing with '“trades” between attacks and armored attacks. Some attacks also have active frames that can break armor. Active frames can trade with another attack if the hitboxes collide with hurtboxes simultaneously. When a trade occurs the frame data goes kerflooie and you get combo videos (lol). The only useful trade that Balrog has consistently is a non-ex.hb trade with jump-ins, mostly lp.hb. This is only useful for jump-ins that don’t slam you to the ground (e.g. Juri d+hk or Gouken nj.hp/j.hk).

Recovery frames
Recovery frames occur after the active frames are finished. An opponent is completely vulnerable during these frames and HAS to complete the animation. Recovery frames are often masked on hit/block because both characters are committed to the animation in terms of hitstun/blockstun. If an attack whiffs and doesn’t come into contact with an opponent, then it goes through the recovery. There is also recovery on aerial attacks; some aerial attacks (especially jumping normals) are cancelled by landing frames (4f of recovery), while others have special recovery (compare Rufus’ dive kick to Vega’s Whiffed Flying Barcelona).

Frame advantage
Frame advantage/disadvantage only occurs when active hitboxes come into contact with a character. Because recovery is static (never changes), hitting with late active frames increase the frame advantage by the number of active frames before the active frame that hits (see SF4 Game Mechanics: Meaties and Safe Jumps). Negative advantage on is when the character being attacked recovers sooner than the attacker while positive advantage is when the character attacking recovers before the character being attacked. When someone attacks and their at negative frame advantage you can attack before they recover (punish), and when someone attacks and has positive frame advantage, they can attack before you and given enough frame advantage they can keep attacking while their opp is in block/hitstun (blockstring/frametrap).

Special properties (notes)
There are a number of properties that can be attached to frames. The most well known are invincibility, airborne, and pursuit property. Pursuit property lets you juggle from certain juggle states, airborne generally means you’re invincible to grounded normal throws and air reset if hit. Invincibility means that your hitboxes are invulnerable to certain types of active frames such as strike, throw, and projectile; some invincible attacks are invincible to all while some may only have one or two.

The armor property is a really important when playing with Balrog as his ex.dashes serve a ridiculous number of defensive and offensive uses. Attacks with super armor can absorb one non-armor breaking hit while attacks with hyper armor can absorb two non-armor breaking hits (Fuerte’s and Guy’s run can absorb two hits). All armored attacks have armored from the first startup frame through their active frames; this means that they can beat some meaty attacks and jump-ins. The armor breaking property is attached to active frames of certain attacks; when these active frames come into contact with an armored hitbox, there’s the sound of glass shattering and the attack will either be beat out alltogether or trade.

Armored Exchanges

Spoiler

For example, if Balrog does an ex.torpedo, and Bison does a reaction ex.pc, the pc trades with the ex.dash even though the armor is broken, this is because when the invincibility on ex.pc is gone, both the ex.dash and Bison are in their active frames and a trade occurs. Only some moves actually have the armor breaking property versus hitting multiple times. Another example is Fei Long and Cammy’s U1, if Balrog does an ex.dash punch and they reversal/reaction Ultra, but come into contact with Balrog AFTER their invincible frames have completed, balrog absorbs the hit and hits them clean.

Finally, armored attacks are usually ex attacks, and can be kara-cancelled/armor-cancelled into a higher priority special (see SF4 Game Mechanics: Option-Selects).

Hitstop
This is another magical frame data number that isn’t well known. Hit stop or impact freeze is what happens when hitboxes come into contact with each other. There’s a finite amount of time where the two players freeze and then the recovery animation ensues. Hitstop is where you actually cancel one attack into a special/super/Focus Attack.

Full Damage trades

Spoiler

The easiest example of hitstop is when you attempt to safe jump Dhalsim and he does reversal U1 which starts up in 12f but only has 1f of full body invincibility. So you perform a 5f safe jump against Dhalsim and somewhere within it’s last couple of airborne active frames it hits Dhalsim between startup frame 2 of his U1 and frame 12. Because you are stuck in hitstop and Dhalsim has already activated his U1, you hit Dhalsim, but the actual fireball doesn’t go away, and it’s active and hits you as you recover from hitstop (instead of you blocking). Compare this to a safe jump against Abel who does a reversal U1, which starts up in 14f (fully invincible from frames 1-4) but because you don’t hit him, you’re able to block.

Important physical properties within the sf4 engine are:

Pushback
Although pushback is a numerical property, it’s not well documented, but understood instinctively (e.g. i’m not in close enough to punish). Pushback is very visual. The biggest press pushback ever got was when Dictator’s cr.lk xx lk.sk block string was so powerful because he was still in range for cr.lk after a blocked lk.sk in the corner.
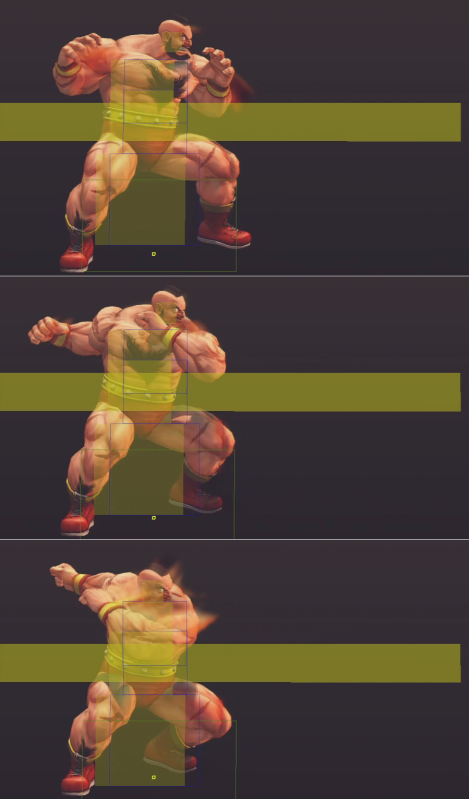
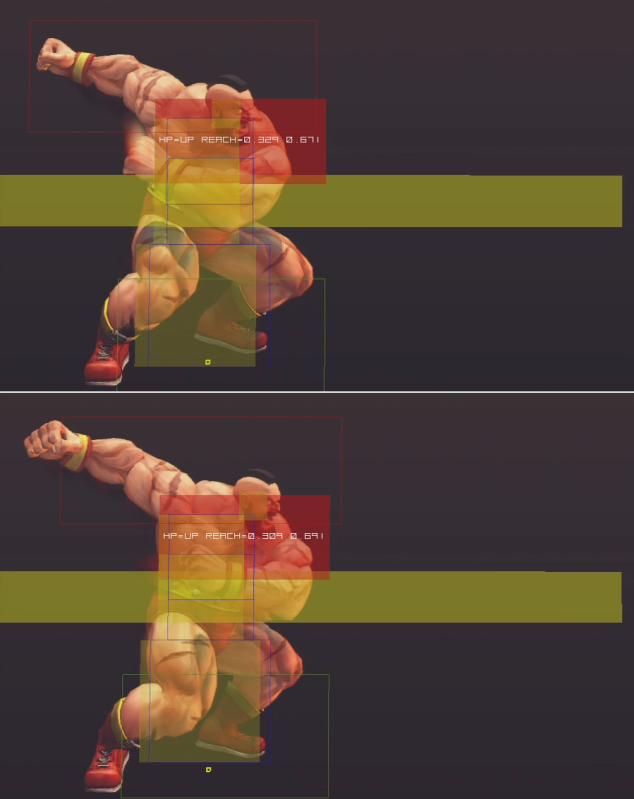
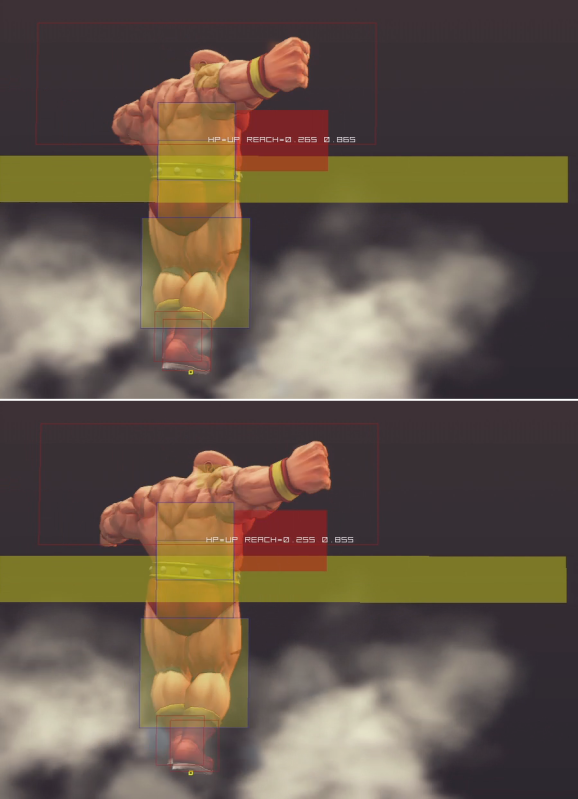
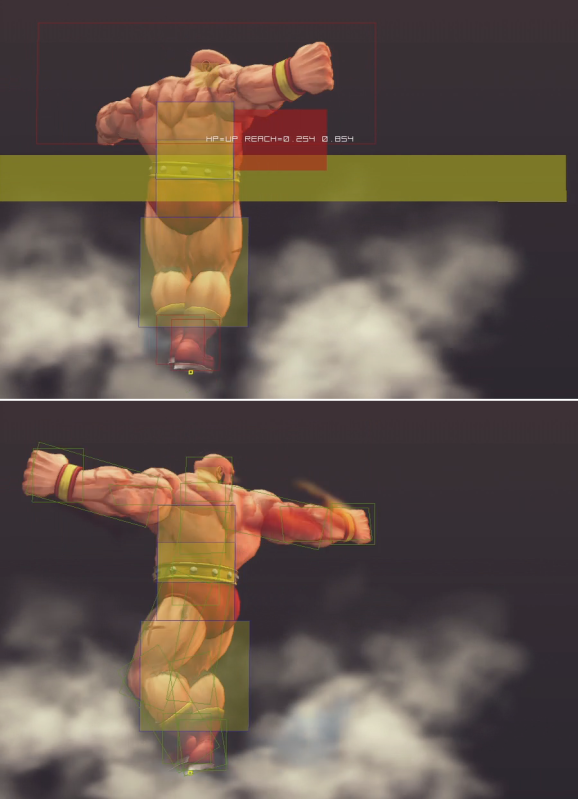
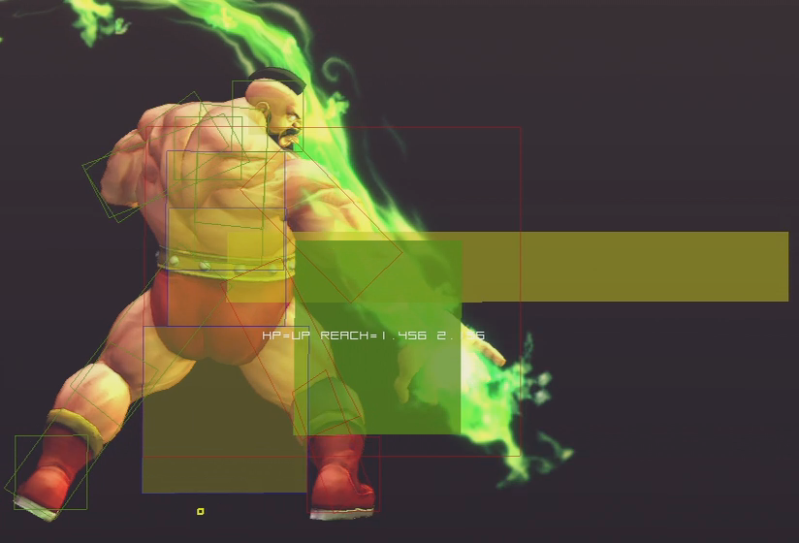
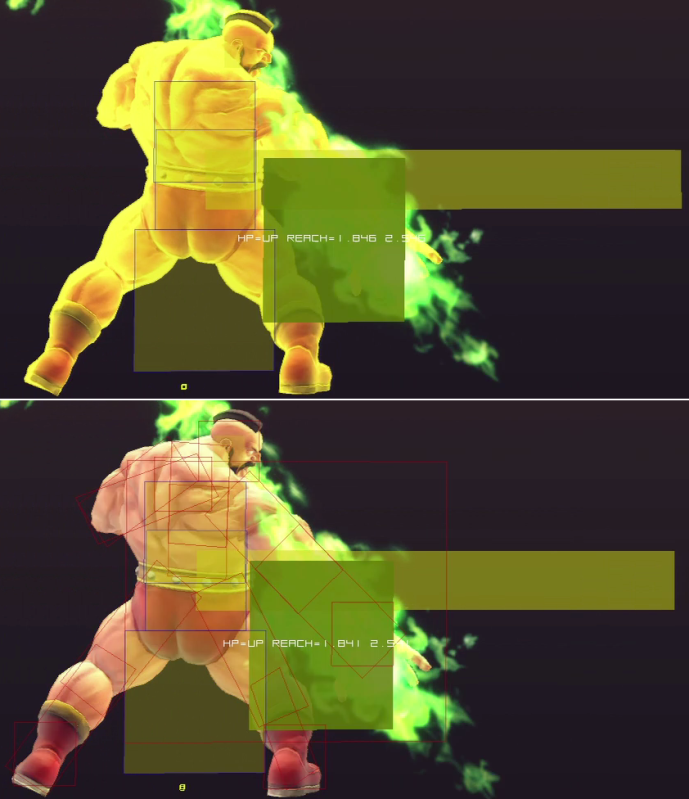
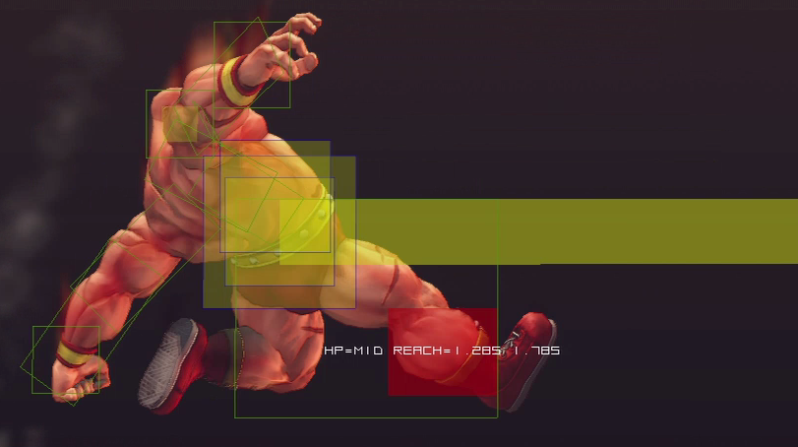
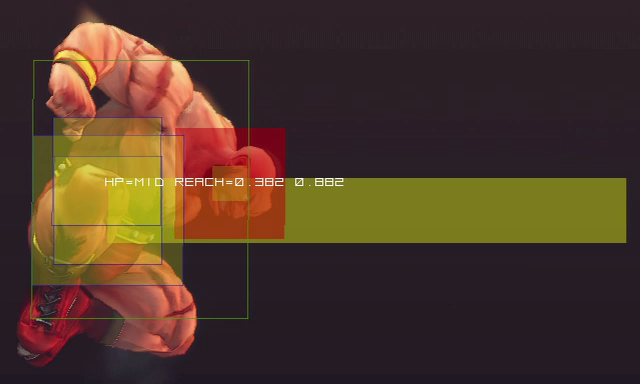
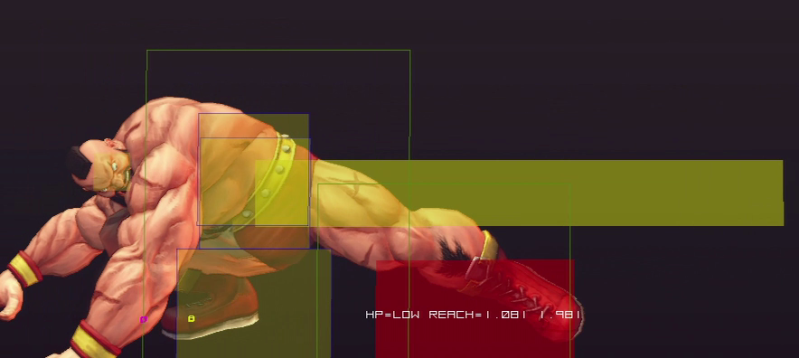
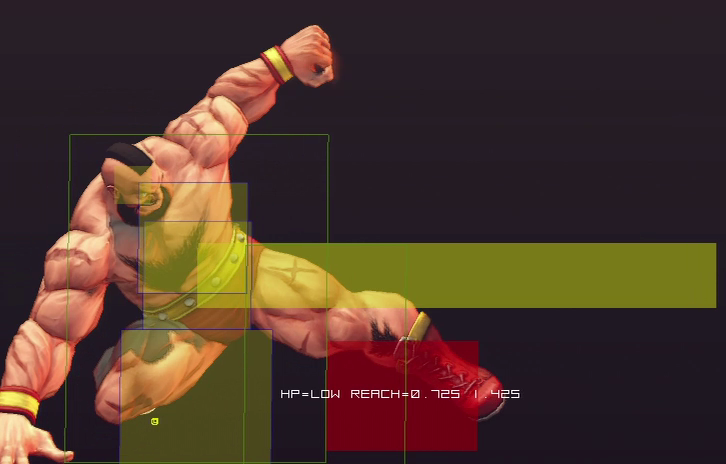
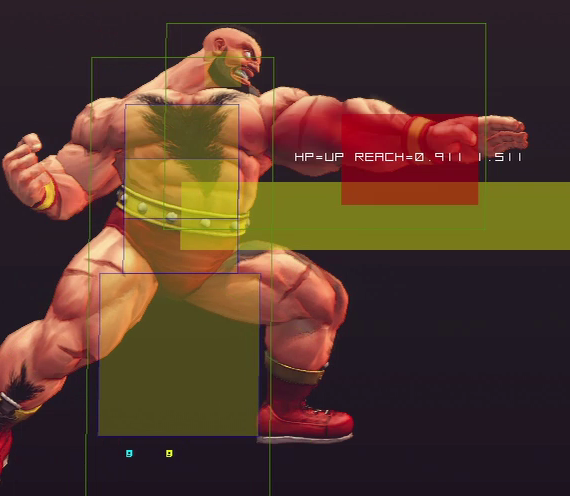
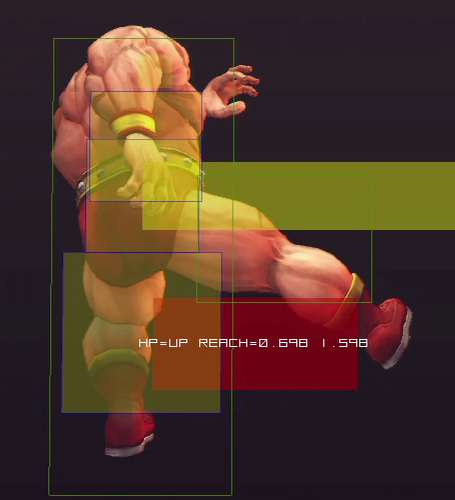
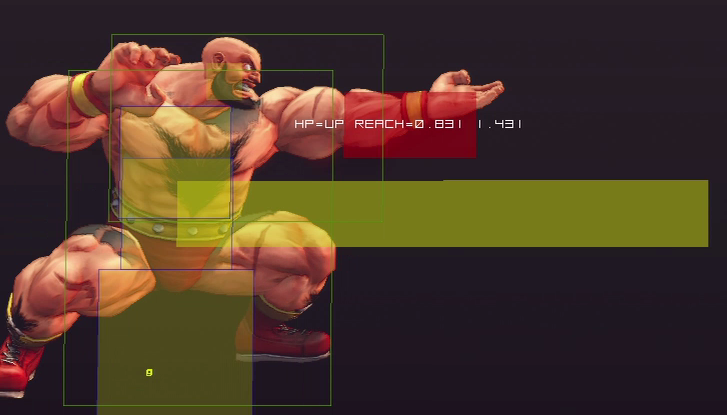
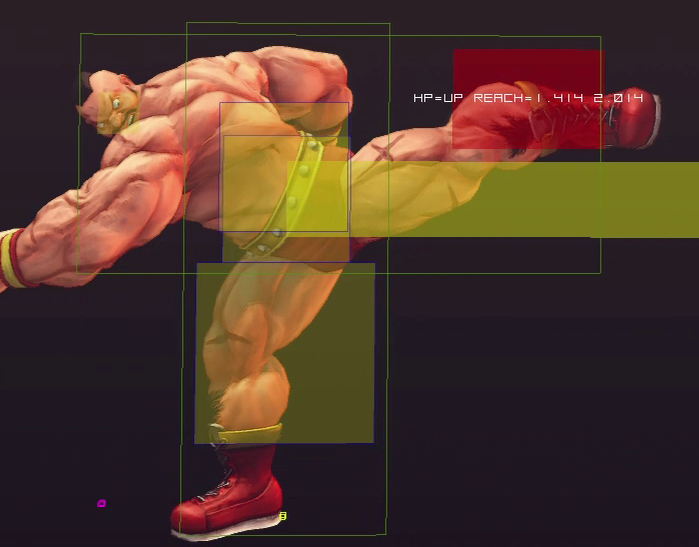
Hitboxes
When you come into contact with an opponent, you actually come into contact with their hitboxes versus a 3D model that matches exactly what you see. Sometimes, punishes don’t make sense visually. For example if you counter poke, Sagat’s st.hk with Balrog’s cr.hk, it looks like Boxer’s glove is maybe a pixel or two away from Sagat’s foot. The reason this is a punish is because most character’s hurt box on their vulnerable recovery is much fatter (horizontally challenged) than the actual 3D model. More on this in whiff punishing.

Calculating Vulnerable Frames
If you’re in the lab trying to figure out how to beat an attack whether with an O/S or a simple punish on whiff/block, knowing when you can hit the opponent and not trade and what types of attacks you can use makes a big difference. Below i’ll walk through the process of finding the vulnerable frames of Zangief’s jab green hand.

Calculating Vulnerable Frames

[details=Spoiler]lp.gh has no invincibility so he always has a hurtbox, thus the number of vulnerable frames are equal to the total duration of the attack. lp.GH has 34 vulnerable frames with only 2 that can trade. Contrast with Gief’s ex.GH which has 13f of strike/projectile invincibility in a total animation of (13 + 2 + 26) = 42f. Those frames minus frames where you can’t hurt the opponent (invincible frames) are vulnerable frames. Thus Gief’s ex.gh has 29 strike/projectile vulnerable frames located toward the end of his animation, but 42 throw vulnerable frames since the attack has no invincibility to throws.

These frames are very important when trying to offensively combat meaty attacks. If the startup for your invincible attack is less than the opponents vulnerable frames (usually active+recovery) then your attack will beat theirs. For example, Balrog’s meaty cr.lp: if hit on the 2nd active frames has 6 vulnerable frames and can be beat with a reversal 3-5f dp, but if C. Viper does a reversal U1 (5+1f startup), Balrog can block. [/details]

Punishing on Contact

The most well known way to punish an attack is on hit/block. An example attacks that fits both of these is Zangief’s jab green hand (banishing flat). On block you can punish with cr.lp and on hit you can punish with cr.lp .

PLINK YOUR NORMAL PUNISHES!

                                           Frame Advantage

Attack Startup Active Recovery Block Hit
lp banishing flat 11f 2f 21f -7f -5f
[LIST=1]
[]On block, if hit on the first active frame you enter 14f of recovery (21f - 7f), because you recover 7f earlier than Zangief you can punish with any attack that’s in range and goes active before he recovers.
[
]on hit you enter 16f of recovery (21f - 5f), because you recover 5f earlier than Zangief you can punish with anything that fulfills the punish requirement in 5f. At worst the lp.gh comes into contact with you and you can always punish with st/cr.lp . At best you block and punish with cr.mp/cl.hk
[/LIST]
But what if Gief FADCs the attack?!

Gief’s dash is the same forwards and backwards (26f), so it makes the math easier. When an attack is cancelled into a focus attack, it converts the remaining frames (active and recovery) into a focus attack or focus attack and dash. Because you were hit, you encounter the same amount of blockstun that you would usually encountered if he didn’t FADC.

Gief connects on the first active frame
BLOCK: Gief - 22f -> 26f Opp - 15f Frame advantage[-11]
HIT : Gief - 22f -> 26f Opp - 17f Frame advantage[-9]

Aside from the distance requirement (whether he fwd dashes or backdashes) Gief is at -11 if he fadc’s lp.GH on block and at -9 on hit. Punishing with something other than U1/super has a distance requirement. If Gief hit’s you with just the tip of his hand and back dashes, you’re not in range for anything but super and U1. Balrog can punish with st/cr.hk, st.hp, super and U1 if Gief is very close to you. If he dashes fwd, you can punish with U2 as fwd.dashes are completely vulnerable and non airborne. Zangief’s symmetric dashes are specific to him; most characters have faster forward dashes than backdashes. For example Balrog is 18f forward and 22f backward, while Sagat is 18f forward and 29f backward.

I have a Chart that notes Balrog’s ability to punish FADC backdashes on the first active frame, look at the FADC punish sheet.

What if you use an attack with armor?

When you hit an opponent during their active frames with an armored attack, the opponents attack both “whiffs” and “hits” simultaneously. With the exception of Juri’s ex.counter, the performer of the armored attack takes some damage, but doesn’t have to go through the recovery associated with blocking or being hit by an attack. It is because of this that the attack effectively “whiffs”, thus if the armored attack reaches it’s active frames before the opponents attack completes its recovery, they get hit.

Vega meaty cr.mk

Spoiler

For example, Vega (claw) does a meaty cr.mk at max distance and balrog attempts to offensively counter with ex.dash low (because it low profiles), Vega will recover first and be able to block, or (possibly) offensively reaction punish with U2 before you come into contact with him. The I tested was, df+hk, cr.hk, bwd.dash, slight delay, cr.mk.

Focus attacks also fit into this category. Because FA’s have armor, they also cause the attack to whiff and their vulnerable frames are equal to their remaining active frames plus their recovery. There are two ways you can punish with focus attacks: (1) charging the focus attack and releasing (lvl 2’s are the most useful), or (2) focus attack dash cancelling into a normal throw or a jab or special (See Auto-dash U2). The vulnerable recovery necessary for both of these to be effective is >22f. For example, two of balrog’s most useful pokes, cr.hk and far st.hp, are focus bait because their recovery is greater than 20f. These can be punished on reaction with a FADC into cr.lp/throw for some characters, or a lvl2 focus fish (e.g. between cr/st.lp, cr.hk poke string). Fireball blockstrings are the easiest to punish with this, if Dan/Ken/Akuma/Sakura or Ryu (max distance) do cr.mk xx hado, it’s not a block string, and thus can be punished with an armored/invincible attack.

Also lets keep in mind that Balrog has a shitty FA, verus Fuerte, Dictator, or Dudley…or Chun (shudder) See SF4 Game Mechanics: Focus Attacks for more info.

Another Example - Honda’s ex.hb

[details=Spoiler]
Frame Advantage
Attack Startup Active Recovery Block Hit
lp headbutt 13f 17f 14+13f -9f -
ex headbutt 8f 25f 14+13f -8f -

In the Honda matchup, Boxer’s range for “safe” chip damage is about 3/4 screen, while Honda’s is about 1/2 screen with lp.hb and almost full screen with ex.hb. In general what can happen is that you step within this range, and if you’ve got bad reactions, you allow him to get chip damage safely with lp/ex.hb. Honda’s jab and ex headbutt for all intents and purposes are unpunishable under most circumstances. There are only two situations where you have guaranteed punishes against the two, both with super. What makes the reversal super punish difficult is pushback. The pushback for headbutt on block changes depending on if you block standing or block crouching. Thus to punish ex.hb with reversal super on block mid-screen, you have to block standing and then reversal super.

Also some will ask why can’t you punish with U1 since you can do the frame trick and activate in 8f, and the reason is because U1 doesn’t cover as much distance in 8f as super, so unless you’re in the corner, being able to punish with reversal U1, is going to be very dependent on spacing but possible.[/details]

Punishing on Whiff
Whiff punishing is applicable in a few situations:

(1)When using an invincible special
(2)when the opp is out of range
(3)when you jump on reaction to avoid the attack

When an attack doesn’t come into contact with an opponent, the total animation is equal to (startup + active + recovery). There are no frame advantage modifiers in this case. Using Gief’s lp.GH as an example, you have 11f_Su + 2f_A + 21f_R = 34f to punish if done from neutral, if done meaty then you have 1f_A + 21f_R = 22f to punish.

An invincible special can be considered a whiff punish because the opponent never comes in contact with you and thus can only be hit during their vulnerable frames or trade when the active frames (that don’t overlap with invincibility frames) collide. Thus hypothetically, if an opponent did an invincible special that never came into contact with the opponent, they would pass through each other and whoever had the least amount of recovery would have the advantage (e.g. Ken’s ex.dp versus Balrog’s ex.hb). This is another way you can measure whether an attack is good. For example, in Super, Vega’s U2 was very good because it had quick startup, and a lot of overlapping active and invincibility frames. It has a 1+6f startup, 15f active, with frames 1-13 being invincible. Thus he has 7f where he can hit you, but you can’t hit him, Gorgeous! Vega/Claw Super frame data. In general what this means is that it’s hard to hit him out of it and not trade, before they increased its startup to 9f, it was godsend IMO…still couldn’t beat meaty jab though :).

I’ll also mention cinematic (or capture if you will) animations. Most cinematic/capture animations are completely invincible once they connect with the opponent. Here are two examples: Abel’s U2 verus Balrog’s U1 when used in reaction to a projectile. If Abel does reaction U2, and comes into contact with the character, no matter the projectile, he will grab the character and not be hit by the projectile. In contrast, if Balrog does reaction U1, and he hits the character, but doesn’t clear the fireball before his invincibility wears out, he gets hit by the projectile and his ultra animation is interrupted. Balrog’s U2 has a similar capture animation to Abels U2 (although it’s 1f versus ~10f).

If the opponent is out of range due to your superior spacing or because they fudged inputs, you can punish their vulnerable recovery. This is applicable in counter poking situations. For example, you’re just outside of st.hp range with Sagat and he does st.hk . When the attack whiffs, you can st.hp/cr.hk/st.hk on reaction and can counter poke him. You can even crouch block the first hit, counter poke with max distance st.lp. When attacks are in the recovery portion of their animation, their hurtboxes are still part of the animation and their hurtboxes are much wider than their neutral standing/crouching hurtboxes, thus it’s easier to counter poke during a whiffed attacks recovery because they’re bigger targets. A good example of this is Dhalsim’s st.hp, although his limbs cover 3/4 of the screen, you can counter poke a whiffed st.hp with cr.hk since his hurt box extends with the attack (hitbox). If you’re having issues with timing your counterpokes to actually hit during their recovery, you can press the button as soon as you “see” the attack, the window is really small, so reaction to their general animation gives you the right timing. Sagat’s st.hk has 18f of recovery, so it’s a 9f punish for st.hp, or 10f punish for st/cr.hk .

Whiff punishing also happens with aerial attacks. Some aerial attacks go through regular jump recovery (e.g. Akuma’s command normal dive kick) while other attacks go through custom recovery (e.g. Ryu’s Aerial non-ex.tatsu which has an extra 10f of grounded recovery AFTER it goes through jumping recovery). Balrog also has one: headbutt, which has a whopping 22f of grounded recovery…Saltiness aside, recovery on whiff of aerial attacks mean a lot in terms of frame advantage and the ability to whiff punish. As described above, when an attacks hits you with later active frames, you still go through the same recovery. So with aerial attacks, the closer to the ground they hit you, generally, the more positive they are (this is why Cammy is scary with instant air ex-tk.cs). But knowing which aerial attacks have grounded recovery, makes whiff punishing easier once you figure out the ranges. For example, if Makoto whiffs an axe kick in front of you and you have good reactions, you can punish with sweep at a distance. Also height requirements really play into frame advantage, because height requirements effectively cap the possible frame advantage of the attack, as well as cues as far as animation and general safety. Maj has some words about Ken whiffing lp.dp on his article on proximity blocking, that might be useful as it pertains to whiff punishing.

Some attacks can be punished with jump-ins, both on block and on reaction. Balrog’s jump is 44f total (4f_PJ, 36f_A, 4f_R). When his jump animation is active he can convert those frames into startup and active frames for his jumping attacks. Balrog’s neutral jump and fwd/bwd.jump have the same frame data (contrast with Hakan). This generally means that if an attack has at least 35f of recovery and balrog can avoid it by jumping or an attack is at least -35 on block, it’s possible to punish it with a jump-in attack.

There are generally two types of specials that can be whiff punished with jump-in attacks: command throws and projectiles. Projectiles have a total animation attached to the opp of around 40f, the projectile itself has different amounts of active frames as they may or may not be persistent or go full screen etc. The only data that matters in terms of whiff punishing projectiles is the time the opponent can’t move (they can still FADC though). Command throws generally have a similar recovery (~40f) and even more so the recovery of the command throw is balanced in terms of its range, so a longer range equals more recovery and vice versa.

lp.spd recovery

Spoiler

For example, gief’s lp.spd, easily the grab with the most range in the game at 1.75 has 52f of recovery, which approximately gives you a 10-15f window to jump in and punish if he whiffed the throw. Abel tornado throw is similar, notice that his hp.tt which has the least range of his throws at 0.93, has the least amount of recovery at 39f versus lp.tt which has 51f.

This is NOT true for normal throws. They generally recover half as quickly than command throws at 20f, if you avoid a normal throw by jumping, they’re usually always at an advantage since they have grounded mobility and can theoretically AA you. Another special that can usually be punished with a jump-in on block are dragon punches (or DP like attacks), notable examples are Ryu’s hp.dp which can be punished by a nj.hp and Sagat’s hp.dp which can be punished by a j.hp/j.hk.

Some characters like Juri, Adon, Chun-li and Vega can punish throw attempts with instant overheads, in these cases, only Juri’s and Adon’s are safe because they can special cancel. Only Adon’s is safe on block, while Vega’s j.hp and Chun’s j.hk are punishable on block and hit with Ultra, see (Punishing Yoga Snipers).

Punishing on reaction
Punishing on reaction is probably one of the hardest things to do in sf4 as far as punishing goes. The developers put a lot of time and effort into every character’s animation and there are cues that can help you punish attacks on startup: sound cues and animation cues. Another thing that will help you punish attacks on startup is buffering and poke strings (bad). Buffering means that when your expecting the opponent to throw out a specific attack, you’re buffering the inputs so that when they throw out the move all you need to react with is pressing the necessary buttons and not the directions (giving you a larger window to react). Poke strings is just a series of attacks that you whiff or throw out repeatedly in the event your opponent tosses out a certain attack and you beat it, this is generally bad as it’s possible to get into a predictable pattern.

Punishing on reaction is so deep into the meta game of sf4 in terms of conditioning, reading and guessing. Frame data wise, i’d say that most players can actually react to attacks with 5f startup given it has decent animation/sound cues. For example, Balrog’s lp.ds has been described as:

lp.ds is at max distance 13f (4f at minimum) and balrog can pixel walk lp.ds, to further bait/mask the animation since it looks as if he lost his back-charge. It covers so much distance, and the startup animation looks so much like his walking forward animation, it can cover right inside 3/4 of the screen in 13f. The easiest way to react to specials like that is to focus fish or neutral jump. In those cases you can just walk forward smash to bait the focus attack and then break armor or walk forward lk.ru to punish the neutral jump (and given the right circumstances juggle U1/super).

A poke string like: st.lp, st.mk, cr.mk, st.hp, cr.hk, cr.lp, cr.hk is not a block string, nor a frame trap, it’s easily punishable, but it can make the user afraid to push buttons. For example, As a dictator, if i’m pressing a lot of buttons out of normal range, he doesn’t have any offensive options to try to beat certain pokes at that distance clean except ex.pc. Most Dictators are going to want to get in by having you block a scissor kicks so he’s in st.mk or st.hk range. cr.hk beats non-ex.sk at the range he needs to get in, so if he throws out a scissor kicks and you’re poking with cr.hk he loses AND he has trouble walking forward.

Punishing Outside of the box

I’ll write this short section just to show how you can…seemingly create punishes from nothing just with system/game mechanic knowledge. Something Boxer’s may come into contact with on wakeup is uncrouchable air grabs. So command grabs like Cammy’s Hooligan throw, Guy’s Bushin flip, and Hakan’s Oil dive can’t grab crouching. So if you’re standing in neutral, and they do the attack, you get grabbed, forcing you to down+back it sometime in the match. But if they do it meaty, meaning that they’re in the active frames of their throw when you’re waking up, you can get thrown, because the first wakeup frame you’re hitbox/grabbable box is in its standing configuration. So all meaties connect against a standing opponent. So, a connected meaty OH, cr.mp, hp.hb would work against the majority of the cast (to put it in perspective). With that said, you can create a punish for this situation. By performing a reversal normal, you avoid “crouch-delay” forcing your crouching hitbox instead of your standing hitbox, and they’re throw whiffs and you get a free punish whether it causes an air reset, or punishes them during grounded recovery. This can’t be used to defeat fuzzy guard if you’re already in blockstun (AFAIK).

Hakan Meaty oil dive example

[details=Spoiler]Setup: cr.mk xx slide, Body press, st.hp, hk/ex.oil dive
If you are in defensive/offensive crouch, you will get grabbed by this attack, but if you perform a normal as soon as you wakeup, the oil dive will whiff. So you can use cr.mp or cr.hp to hit him for <100 damage, or you can use a normal that will always whiff like cr.hk, cr.lk or cr.mk and buffer in a more damaging attack like OH, Ultra/Super etc. Like punishing Fei Longs Chicken-wing
[/details]

Also crouching and standing hitboxes are different, these also affect the clipping hitbox. Sometimes you can create punishes from that. Balrog’s crouching clipping box is much wider than his standing box, so by standing, crouching, and standing during the gaps within a poke-string, you can push a character out of range. This also works well when opponents attempt to throw balrog (crouching and then standing). An example is against Sagat when he’s doing staggered cr.lk’s as a pseudo blockstring (e.g. cr.lk, cr.lk xx lk.tk), you can block the initial hit crouching and then stand to force the second cr.lk to whiff. Against Honda also, if he does cr.lk, point-blank, and then tick throws into normal grab, He’s just at the tip of his range, but if you block crouching, stand, and then crouch again, he’s out of range of throw and it’ll whiff (this doesn’t work for kara and command grabs as they have longer ranges).

Character specific punishes:

I don’t plan to do every character specifically, but I will do the characters who don’t have overlapping movesets. This is not meant to be a matchup thread or anything, just a note of how you can punish a character’s moveset. As I Will not be doing the entire cast, I implore everyone who has a knack for videos, or the time to put effort into testing an entire characters moveset and doing a writeup, to put something together and inbox me/post, i’ll drop it in one of the posts and give credit. I’m not going to reserve a lot of posts, so if the character is similar to one that’s already been done, i might just link to it rather than post it on the front page.

Ryu
Zangief
Sagat

Ryu (Shotos) - Video

[details=Spoiler]


Tatsu
frame advantage
strength startup active recovery block hit
short 11 2(6)2 12+5 -6 -
forward 12 [2(6)]x42 18+3 -2 -
roundhouse 12 [2(6)]x4
2 18+3 -2 -
ex 12 [1(3)]x41 18+3 -1 -
all hits of grounded tatsu breaks armor
All non-ex tatsu’s whiff on crouching Balrog (can’t hit when in offensive/defensive crouch).
[LIST]
[
]Short tatsu can be punished on block with jab, biggest combo starter is cl.mp
[
]Non ex-tatsu can be whiff punished with auto-correct headbutt or cr.hp clean.
[
]mk/hk tatsu can be punished on standing block with U2, he can’t jump out of it.
[]ex tatsu is unpunishable on block in terms of frame advantage and pushback. It hits on crouching balrog.
[
]ex.tatsu can be punished on whiff with cr.hk either between “shinku” and “tatsumaki” or after he finishes saying “tatsumaki”. It’s range is probably just inside of cr.hk range.
[*]ex.hb punishes ex.tatsu clean anytime during the animation, non-ex.hb is likely to trade w/o clean juggle.
[/LIST]

Aerial/Cross-up Tatsu
frame advantage
strength startup active recovery block hit
short 9 2(6)2(6)2 UG+10 - -
forward 9 [2(6)]x42 UG+10 - -
roundhouse 9 [2(6)]x4
2 UG+10 - -
ex 7 [1(3)]x4*1 UG+4 - -
*UG = until grounded

*air tatsu doesn’t break armor.
not active until it hits the ground, just active for a specific frame period, and then he experiences normal landing recovery +10f of grounded recovery. He crouches in his recovery so it low profiles headbutt and rush upper.
The setup is cr.hk, immediate jump and late lk/mk/hk.tatsu lk tatsu seems to always hit in front no matter if he hits point blank or at a distance (e.g. cr.mp, cr.mp, cr.hk). At point blank to mid-ranged cr.hk, mk.tatsu crosses up
You don’t lose your back-charge by the time you wakeup, so auto-correct ex.dashes and super/ultra are possible.
If done correctly, you shouldn’t be able to crouch or avoid them in anyway, meaty on first wakeup frame.
[LIST]
[
]All cross-up tatsus if done from cr.hk, should lose to wakeup ex.ds (so if you want to burn three bars for big damage, you can definitely ex.dash, FADC.fwd, cr.lp, cl.hk, cr.mp xx hk.ru)
[
]If tatsu lands in front, you can U2 (mostly only lk). crossup-mk.tatsu from this setup can beat U2.
[
]They can be beat with reversal U1/super, straights are the most likely to hit since he’s low to the ground, but the first upper of U1 has a hitbox with more vertical range than rush upper.
[
]Some tatsu setups actually wouldn’t hit if you were crouching, but because of the standing property of the wakeup frames they do, you can force them to whiff by performing a reversal crouching normal.
[/LIST]

Hadouken
*startup is not invincible, but the key to punishing this move is to take into account that the animation where Ryu puts his hands forward extends his hurtbox. So for punishing, you’re aiming for his hands for a MAX distance punish.
*All of the following examples are done in the training room with Ryu deep in the P1 corner. Different stages are bigger so you’ll need to find markers in the stages to help you find those ranges mid-screen and in the corner.

AGAIN: RANGES USE TRAINING ROOM BLOCKS WITH RYU IN DEEP CORNER. Using the tip of balrogs foot as the placement.

Ranges for Headbutt
hp.hb can hit from just beyond 3/4 screen. He can still FADC though so it’s punishable if you’re predictable, but if you do it right, they should realize that they can’t throw fireballs when you have down-charge, then you can just jump-in :slight_smile:
[LIST]
[
]jab - 3.5 blocks , inside 1/2 screen
[]strong - 3.9 blocks, right outside 1/2 screen
[
]fierce - 4.5 blocks, right outside 3/4 screen
[/LIST]
Ranges for Jump-ins
[LIST]
[]j.hk - 4.1 blocks, right inside 1/2 screen
[
]j.hp - 4.2 blocks, right inside 1/2 screen
[/LIST]
Ranges for Dash Ultra
*In general, you can dash ultra from full screen if you take Ryu to the corner before the final turn punch.
*It’s best to always activate with punches, drum and hold kicks, and then let straights come out for the rest, but you can also hit with straights. Doing it like above usually prevents you from spacing out too much, but if you don’t hit when his arms are out, you might miss the final turn punch.
*with Dash Ultra you’ve got 40-45f to land your punish (if you’re too early, or you miss the dash, you risk getting hit by hadou after your invincibility is gone.
*Range isn’t as important as the read, hadou in general, won’t tag you during your dash if you’re at least 1/2 screen away from Ryu before he chucks plasma.

cr.mk xx hado as a blockstring
*If Ryu pokes with just the tip of cr.mk, the startup and distance hadou has to travel doesn’t cover the recovery boxer goes through, thus it’s not a block string and you can punish with anything with enough invincibility.
*If at max distance, your punish doesn’t need to be reversal
*Focus Attack Auto-dash U2, does work. Although i’m sure he could FADC backdash to avoid the throw and get a full jump-in punish.
*FADC jab, doesn’t seem to work although it should (frame data supports the punish roughly).
*The 2012 rebuff of his cr.mk, actually makes this easier. The buff adds an extra active frame to the attack and increases the distance at which he can hit you at, so max distance is about at his toes, and if he cancel’s into Hado it’s unlikely to combo both on hit and block, so keep this in mind (this is not featured in the video fyi).

Shoryuken
All DPs startup in 3f and have invincibility at least until active (2f). ex and mp have at least 2 overlapping active and invincibility frames.
Shoryuken’s can be “safe jumped” mid-screen using the following setup: fwd.throw, cr.mp, j.hp . It hits meaty and can’t be crouched, but it can be walked out of (ryu can’t punish with anything though afaik). This safe jump is only through the spacing given by fwd.throw, if you throw them deep enough into the corner, the safe jump will not work.
[LIST]
[
]Punish a blocked hp.dp with a full jump-in combo using nj.hp (you’ll jump-over him with j.hp if you hold up+forward after blocking.
[
]You can frame trap his non-ex.dps with blocked TAP, ex.dash. It’s not 100% as he can beat it with either delaying it until the last possible moment, stand teching after TAP (which is most likely), and reversal DP (which breaks armor).
[/LIST]

Super/Ultra punishes
All of his super’s and ultras can be safe jumped using normal 5f safe jumps
[LIST]
[
]Reversal Super can punish lp.ds, cr.hk, and ex.smash on block.
[]Wakeup super loses to meaty throws (e.g. fwd.throw, fwd.dash, j.hp (throw), but you can’t do them on reaction since you don’t have enough time to go active (3f startup, 2f window after flash since it’s 1+2).
[
]If Ryu has super, and you do lp.ds or cr.hk, you can FADC backdash and be safe from super, but if they let it fly, you can backdash ultra/super (or buffer your charge during the freeze for headbutt).
[*]This is almost useless: If you do a deep TAP and Ryu attempts to punish with raw Ultra 1, It can trade and net you the win if it’s either a really high level TAP or if he doesn’t have much life left. He can beat this by just delaying it until the last second or doing it much, much earlier since TAP has a 30f startup (with only 10f with about a 10f vulnerable gap before going active) and his U1 has an 11f startup.
[/LIST]

Normal Punishes and Counterpokes
*The two normals that you’re going to see the most and that are punishable are cr.hk and cr.mk. his cr.mk range is just inside his cr.hk range. If Ryu blocks a cr.hk, no matter where on the screen, he’s at max distance for cr.hk, and just out of range for cr.mk.

cr.hk frame advantage
startup active recovery block hit
5f 4f 28f -14 UKD
It starts up quick and has a lot of range, but horrible recovery and horrible frame advantage on block. He CANNOT make this attack safe, and can’t FADC or cancel into anything. At max range you’re only answer’s to punish are lp.ds, st.hp, U1 and Super.
[LIST]
[]Punish on block point blank with with Super, U1, hp.ds, cr.hk, st.hp. It low profiles so you need straights (super/u1) and headbutts will whiff.
[
]Whiff punish with cr.hk, st.hk, and st.hp
[]If you read him well, and ex.dashes that will be low profile normals, will hit him every time. This is the prime opportunity to attempt an armor cancel, with 28f of recovery, anything you buffer in will connect, even TAP, but only if he hits with the first active frame.
[
]cr.mp, cr.hk is NOT a blockstring, there’s a 3f gap.
[*]You can whiff punish if Balrog’s deep in the corner with cr.mp, just keep in mind he’s still considered crouching so cr.mp xx ex.ru will whiff after the strong hits.
[/LIST]

cr.mk frame advantage
startup active recovery block hit
5f 3f 14f -3 0
Easily one of his best mid-range pokes. Not as fast as Ken’s though. You may be able to punish this on block, but at those ranges he can cancel in to hadou safely so it’s a non-issue.
[LIST]
[]Whiff punish with st.hk, cr.hk, st.mk, and cr.mk. It low profiles st.hp
[
]blocking boxer’s cr.hk puts Ryu beyond max distance for cr.mk, only his sweep can connect.
[*]counter poke with cr.mk and buffer super (that’s what its made for). Also keep in mind that U1 will not connect on CH cr.mk. Because he’s crouching you can only hit him with straights and cr.mk is only +10 on CH not +11 :[
[/LIST][/details]

Zangief (Traditional Grappler)

Spoiler

http://www.youtube.com/watch?v=GqfAIGz_xBI
Specials

Spinning Pile Driver
strength range startup active recovery
jab 1.75 2 2 52
strong 1.45 2 2 50
fierce 1.35 2 2 48
ex 1.35 4 2 47
Hitboxes: jab$/strong/fierce/ex
$0 across, 1 down
*Balrog dies in six jab spds
*Balrog dies in five strong/ex spds
*Balrog dies in four fierce spds

The above is only to show you why gief would risk an hp.spd with much shorter range over a lp.spd (Even at close range). Command grabs have the greatest non-super/ultra recovery in sf4. When Gief whiffs an spd from neutral, you have enough time to do ANYTHING (well almost anything). Hypothetically, Gief could whiff spd full screen and given back-charge you can do dash ultra and connect. If within 1/2 screen, you should ALWAYS be able to do a jump-in combo (keep it simple though, Gief’s clipping box makes st.lp xx ex.ru whiff often, to avoid this jump in with roundhouse, or use cl.hk, cr.mp/cr.lk) or simply punish with walk forward st.hp. Max distance cr.mp puts you out of range of hp.spd, but well inside lp.spd range.

jab SPDs are just about broken. Aside from really good reads (guesses), there’s only one other way to visually see an spd, and that’s paying attention to how Gief looks when he does 3/4 circle back ( :hcb::ub: ). This is the ONLY way to identify the possibility of a jab spd coming when Gief is grounded. To space lp.spd, you can use cr.hk and st.hp; if he blocks or his hit by either of these attacks, you are beyond max distance for lp.spd. But keep in mind that he CAN grab you out of cr.hk/st.hp during startup if you’re too close.

Although few Giefs will do this (or try), Zangief can punish some of balrog’s safer specials on block, particularly dash straight. The only unsafe dash straight is jab. Unless at max distance, he can punish lp.ds on hit and block with lp.spd and in some cases U1. mp/hp/ex are safe on HIT; the pushback from contact puts you just inside lp.spd range, but outside of U1, Super, and mp/hp/ex.spd. You can use this as a frame trap for his other specials, e.g. cr.mp xx hp.ds, st.hp . If Gief were to go for anything that wasn’t lp.spd, he’d get hit. Keep in mind that because lp.spd is so fast, the only way you can avoid getting grabbed by it as a reversal is to backdash, jump, or perform an unthrowable. Also keep in mind that mp/hp have longer startup than both lp/ex at longer ranges (especially when canceling from st.lp), so they are less likely to combo consistently.
[LIST]
[]non-ex spds, have no invincibility and will lose to any type of meaty attack. If neutral, it will lose if they are out of range (more common with hp/ex.spd).
[
]ex.spds will beat meaty strikes/safe jumps
[*]meaty throw will beat ex.spd (but loses to reversal spd)
[/LIST]
Double German Suplex
strength range startup active recovery
non-ex 1.00 2 2 45
ex 1.00 2 2 50

Running Bear Grab
strength range startup active recovery
non-ex 2.92 1 2 52
ex 5.06 1 2 50
These moves are actually the same move, the way it works is that if you’re within 1.00 grab range when the move goes active, the DGS is executed, while if you’re outside of that range the RBG comes out. EX.DGS is a bit more complex, but more on that later. The RBG is actually active until he walks the range printed above. The recovery actually happens when he reaches that range and doesn’t come into contact with any grab boxes. Any time Gief does running bear grab and it whiffs, punish with your best jump back fierce combo, at worse jump back hp, cr.hk, at best, jump back hp, Ultra 1. Again, don’t get fancy with Zangief.

ex.dgs/rbg has ex.armor thus can beat meaties and safe jumps BUT! there is a jump-in range (usually a safe jump), where you can activate ex.dgs, but it instantly goes into whiff animation allowing you a full grounded punish (cr.mp xx hp.hb etc.). It’s more likely that grief will reversal ex.spd on wakeup rather than ex.dgs/rbg .

Lariat
frame advantage
strength startup active recovery block hit
PPP 4f 2(4)7(2)7(3)9(2)8(4)3 14 -44 -
KKK 4f 2(4)5(3)8(4)3 14 -22 -
PPP Lariat Hitbox: startup/early active/late active/recovery

PPP Lariat is going to be Gief’s go to grounded AA. Because the hitbox is around his arms, he has to hit it at the right time to effectively anti-air and not get stuffed, or worse, miss altogether. PPP lariat has significantly more active frames than KKK lariat. KKK lariat has lower body invincibility, while PPP lariat has upper body invincibility. Meterless gief has to guess between meaty cr.lk/cr.lp on wakeup if he wants to beat it offensively.

Animation cues for KKK lariat are dust clouds near his waist (noticeably higher) than the dust clouds with PPP lariat which are lower to the ground. Sound cues for KKK lariat are the EEUUURRYAAA, while the cues for PPP lariat are BLOODIAAA. On whiff and block, PPP lariat is easy to punish. 100% guaranteed punishes within range are hp.hb (this can be done from 3/4 screen) as well as Super/U1 (from 1/2 screen w/o dashing). Everything else is entirely situational. Because Gief can move backwards and forwards, some punishes will be out of range once he recovers (this is often true in the case of cr.hk). If you punish with cr.hk, do so at the end of his recovery where he can’t move back and forth so much. ex.dashes can be beat as he’s moving back because they get hit twice also. Beware PPP lariat where he moves back and lp.spd’s as you try to punish.

When jumping in with fierce, aim for one of two places: 1) his elbow or 2) his head. when you vary jumping in at these two places, you make Gief have to guess as he has to hit lariat at the right time so his invincibility protects him from the jump-in. If you aim for the elbow, you can be at a range where if he wants to AA, he has to hit it late, and if you don’t press anything Lariat whiffs. This is how you establish footsie range with Gief. This is also inside the tip of jab spd range.

You an also safe jump lariat with torpedo in the corner, but you land behind him so you’re safe jump is never meaty and loses to any command throw. It does safe jump PPP lariat though.

Banishing Flat (Green hand)
frame advantage
strength startup active recovery block hit
jab 11 2 21 -7 -5
strong 13 2 22 -8 -6
fierce 16 2 23 -9 -7
ex 13 1*1 27 -9 +1
Hitboxes: jab/strong/fierce/ex

Looking at the frame data, you can see why you may think Gief ONLY has ex.GH. non-ex.gh is punishable on block AND hit (if within range obviously). In general, they are also punishable if Gief FADCs depending on if he hits you at max distance or not (this was visited earlier as an example in the first post). Also if grief does ex.gh to chip you or whatever from neutral, you can grab it on reaction like ex.dashes from about 1-2 squares apart.

How to AA Gief

This also requires a section because with Gief’ it’s ALL footsies, and yes his lp.spd is a footsie tool.

Gief’s Jump-ins: j.mk, j.hp, hp/mp.hb, knees, splash
Rog’s Anti-airs: cr.hk, cr.hp, cl/st.mp, cr.mp, cl/st.hp, hp.hb, cl/st.lk

As a precursor to these, I will note that if Gief has Ultra 2, it makes anti-airing him even more precarious since there’s always the threat of him empty jumping into U2. Thus AAing keeps Zangief from getting within hp.spd range and forcing him to use grounded footsies for fear that you’ll keep AAing, sitting and run the clock down.

hp.hb is ALWAYS the best AA (unless he has U2), it’s unlikely gief will attempt to jump-in on you when you have down-charge as it is significantly harder to bait an hp.hb at a range where it’ll whiff. It’s best to keep Gief with his back to the corner, so he can’t get optimal ambiguous spacing for jump-ins (and also so you can just sit and cr.hk all day and not have to guess whether or not you can use hp.hb as an AA safely).

j.mk
When Gief wants to bait your cr.hp, he will use this at max distance, because of the way the hitbox/hurtbox is on this move, cr.hp can whiff, so using cr.mp gives you much more horizontal range. These are the effective grounded range for boxer’s AAs:
[LIST]
[]cr.hp: 3.0 - 5.0/5.5
[
]cr.mp: trade 4.5 - 5.6
[]cr.mp: clean 4-4.5, 6
[
]cl/st.mp: 1 - 5.5
[*]cl/st.lk: 4.7
[/LIST]

The 5.0/5.5 range for cr.hp, really depends on when Gief does his j.mk, since at max distance you’re not hitting his core hurtbox, your hitting the hurtbox near the j.mk hitbox, so if he does it later, you’re more likely to whiff and get spd’d. Although cl/st.lk is a valid AA, it has a lot working against it: (1) it’s too fast and (2) it doesn’t push gief far back into deep corner at max distance (thus you already gave him room to walk out of the corner.

j.hp
This attack is incredibly hard to AA (IMO). If you’ve got really good reactions mp/hp/ex.hb will work really well as lp.hb can whiff if he’s doing it at the right range. Also mp/ex.hb have the best angle if you want to be able to link U1 as hp.hb might hit behind him and cause you to lose your charge and make it difficult to get your positioning back.
[LIST]
[]cr.hp: 2 - 5.6
[
]cr.mp: 5.5
[/LIST]

mp/hp.hb (nj.up+mp/hp)
You’ll probably only see these when Gief has you deep in the corner, but when spaced right, they can be difficult to AA, as most of them are done right out of range so it’ll only hit if you press a button. They can be AA’d, but the risk isn’t worth it. On CH you’re looking at 600+ stun, scary. I’d only use st/cl.mp and late lp/ex.hb.

knees (j/nj.down+lk)
On wakeup these are hard to deal with, this move is notoriously difficult to AA because of it’s lack of horizontal range, it’s easier to whiff punish (but beware). Gief will often jump-in and use knees at the same max distance for j.mk, to make whatever AA you attempt whiff and jab.spd (or Ultra) you’re whiffed AA. In these cases you can also punish (trip guard) with cr.hk. It’s a 2f or so window to hit, but once you get used to it, you can land it often enough. You can go air-to-air with a late j.hk to beat knees in the air (don’t forget about U2).

Body Splash (j.down+hp)
use cr.hp, cl/st.mp or headbutt. You won’t see this too often from neutral, j.hp is a better option for Gief IMO.

Normals
frame advantage
attack startup active recovery block hit
cr.hk 9f 5f 18f -5 UKD
df+hk 14f 7f 22f -11 UKD
hitboxes: cr.hk/df+hk

These are two moves you will see very seldom, simply because they’re slow, telegraph and are punishable on block. They do net a UKD which is godsend in the Balrog match, so be ready. df+hk is heavily punishable on block and because he lurches forward, it’s unlikely that he will be hitting with later active frames. At best on block, punish with U1 with straights, at worse, punish with cr.hk to eat time off the clock and reposition yourself. If you have an opportunity to counterpoke these moves, use st.hk. When counterpoking df+hk, delay the button press a bit to let the active frames finish. These two attacks also low profile headbutt, with it’s extra recovery, he will probably recover first in most cases.

                           frame advantage

attack startup active recovery block hit
cr.lp 4f 3f 6f +2 +5
cr.lk 4f 3f 7f +1 +4
st.mp 4f 2f 10f +2 +5
st.lk 4f 2f 7f +2 +5
Hitboxes: cr.lk/st.mp/st.lk/cr.lp

These are paired simply because they’re used to keep Boxer on the ground, Gief will do cr.lk, st.mp or cr.lk into tick spd. st.mp is a really quick move, so the only way you can beat it is with headbutt or an ex.dash, just be aware. I don’t think gief can O/S cr.lk with anything to beat a backdash (e.g. cr.lk, cr.lk+cr.hk) since cr.lk hs so much recovery. So blocking and backdashing is an option. Both are not punishable on block so you have to be creative. st.lk is only listed because it’s a really fast attack that can eat up dead space when he’s making his approach (also used in combos).

Also, cr.lp is getting buffed in 2012, so there may be some O/S with cl.hp for a UKD (maybe).

st.hk frame advantage
startup active recovery block hit
11f 4f 16f -2 +2
hitbox: st.hk

Gief will often use this to move in, beware of proximty blocking if you are down-backing it. If he whiffs this into spd/u1, you CAN jump out of it (only before the freeze for U1), helps if you know the ranges and you’re not down+backing it. Counterpoke with cr.hk You can also ex.ru into a decent combo since you’ll be point blank with him it’s unlikely that your follow-up will whiff.

cr.mk frame advantage
startup active recovery block hit
9f 4f 15f -5 -2
hitbox: cr.mk

Although not obvious, if he can whiff cr.mk and if you were to jab it would be in his foot, you’re in range for lp.spd. It’s weird, but generally it can be used like st.hk with less obvious horizontal movement and less recovery. This like st.mp can’t be cancelled, so fodder for ex.dashes and FA’s at close range.

Unthrowables

This is worthy of mention because all of Gief’s options except backdash, jumping, U1 and Super can beat meaty throws. Unlike most of the cast who have 4 prejump frames, gief (and some other Grapplers) have 6 pre jump frames, meaning they can add 6f of throw invincibility to any of their attacks if they tiger knee the input. Thus Gief can tiger knee, green hand, ex.spd, and just hold up+PPP/KKK for lariat and have throw invincibility. Just keep in mind that because Gief has to jump first, unthrowables lose to meaties. The setup: fwd.throw, fwd.dash, j.hp (cr.lp/throw) will 50/50 gief without super/ultra.

Edit: Gief can also lp/mp/hp.spd. This is generally because his hitbox is really weird on wakeup so he can’t easily be meatied on his first wakeup frame, and thus can spd without having to deal with the meaty, but it is NOT throw invincible, just faster than throw. Probably true for k-spd too. It’s obvious to the disadvantage Gief puts himself at by doing this on wakeup and not avoiding the throw, Balrog’s damaged of a read whiffed SPD versus a backdash or jumping is comparatively lower.

While on the topic of meaty throws, i’ll also mention that if Balrog does an actual meaty throw in the corner and Gief attempts to punish with backdash lp.spd, if the throw is ACTUALLY meaty, you have already recovered and you can hold up or forward+up for a full jump-in punish since the punish is 28f (backdash - 26f, lp.spd - 2f) and meaty throw will have recovered in ~24f). Gief can reversal spd meaty throw on wakeup because his grab box is difficult/impossible to grab on the first frame if he doesn’t do a reversal that moves his grab-box forward (which are all >4f anyway, so lose to meaty throw).

Random Notes
Dash low can be useful in this match for two reasons: (1)dash low has so much push back it’s stupid, if you dash low point-blank, any strength, gief is out of range of lp.spd and pretty much anything that he could possibly hit with on block. (2)If gief isn’t reaction spd’ing your ex.dashes at range and is attempting to lariat on reaction, you can use ex.dash straight or ex.dash low to beat PPP/KKK lariat. ex.dash low beats PPP lariat since it only has upper body invincibility, while ex.dash straight will beat KKK lariat.

Sagat

Spoiler

http://youtu.be/BsJ5dieHtgk
In general Sagat has really low mobility, so when you bring the match up close in poking/footsie range, Sagat drags when he does certain attacks, so always be aware. Also his fwd.dash in much faster than his bwd.dash (18f versus 29f). Most backdashes, even FADC backdash is punishable when in range (especially in the corner).

Specials
Tiger Knee (armor break) advantage on block
strength startup active recovery close max distance
lk.tk 7 212(14) 3+13(16) -10 +3
mk.tk 7 2
14(16) 3+14(17) -13 +2
hk.tk 7 212(14) 8+16(24) -18 -5
ex.tk 7 3
6*6(15) 3+10(13) -1 +13

Up close, these are always punishable, max damage punishes are going to start from cr.mp or cl.hk. Sagat should never use this move within poke range because it’s unsafe on block (although he can FADC the special). This attack has no invincibility on startup so it can be thrown or jabbed. It has a hitbox that is situated in front of his hurt box and is positioned in the air where it will cause most crouching lows and mids to whiff and or be beat completely at a distance; Thus it is possible to eat a tiger-knee if you’re stringing lows at max distance.

The easiest way to gauge how much disadvantage Sagat is at, is by the number of hits. If tiger knee only hits once, you can probably only punish with st.lp, while if he hits twice, you can probably punish with something harder like cl.hk or cr.mp.
Tiger Shot total advantage
strength startup duration block hit
p.ts 11 39 -2 +2
p-ex.ts 11 39 +1 -
k.ts 12 45 -7 -3
k-ex.ts 12 45 -5 -

Sagat will zone you with tigers shots. It’s important to know the ranges in which you can whiff punish them with headbutts/jump-ins/ultra/dash ultra etc. You can whiff punish his tiger shots because of the total duration of the special. Balrog’s jump is 40f (4 pre jump + 36f active jumping) the jumping frames are converted to startup/active frames of jumping normals/air special. The high tiger shot can be hit early, but the low tiger shot has to be hit late because he’s crouched down. Also you’re going to be at max jump-in range normally so stick to cr.hk/st.hp as you’re often not in range for jabs, but have enough frame advantage for sweep/standing fierce or standing forward xx super. Tiger shots can be stuffed on reaction with lp.ds from certain ranges, ex.ru can also be used albeit sparingly since it’ll whiff if he does a low tiger shot and it’ll be beat out completely with ex.'s (since they hit twice and ex dashes are slower). There are also some situations where lp.ds will trade, this is in Balrog’s favor as you do 100 damage and saga only does 65 as well as spacing since you are almost point blank, well within poke range. High tiger shots can be counter poked with cr.hk or cr.hp during his recovery (as the fireball travels over your head).

Tiger Uppercut advantage
strength startup active recovery block
lp.dp 5 8 28+16 -31
mp.dp 5 10 28+16 -33
hp.dp 5 12 26+16 -34
ex.dp 5 5*2x4 30+17 -39

Sagat’s DP is easily safe jumpable, because he has semi-normal wakeup frames and it starts up in five frames. All 5f safe jumps will avoid this special and still be considered a meaty jump in. Something to take into account is that his DPs have significantly less horizontal range than most DPs; lp.dp is almost completely vertical. It’s also pertinent to know how angry scar affects dp. A powered up dp does more damage and breaks armor. Fortunately, angry scar
Angry Scar
strength startup recovery

  •     1+0     13
    

Buffed Tiger Uppercut (Armor Break)
strength reg_dmg new_dmg
lp.dp 130 140
mp.dp 140 160
hp.dp 160 180
ex.dp 200 240
has recovery if done from neutral. You have 13f after the freeze to reversal or poke.

A situation you may find yourself in a lot is DP xx FADC.fwd DP/throw. Although from most standpoints, this is a 50/50, you can beat both options with the focus-crouch tech (down+lp+lk+mp+mk) which can absorb one hit and backdash or tech a throw. To beat this offensively, Sagat has to tiger knee to break armor, but this loses to crouch-techs, stand-techs, and blocks. Also keep in mind that the second DP doesn’t break armor because he’s used the powered up dp up already. st.hk xx angry scar is safe on block. If he DP’s and then you hold the focus-tech, you can safely get a lvl2 FA (just shy of enough time to land a lvl3 since he recovers in time) for a full punish as well.

Useful 5f safe jumps:

fwd.throw, 1xfwd.dash, st/cr.lp, j.hk/j.hp
bwd.throw, 1xfwd.dash, j.hk/j.hp
cr.hk, cr.lp, j.hk/j.hp
dash low, slight pause, j.hk/j.hp
super, 3x.fwd.dash, nj.hp

IF you successfully safe jump a DP, Sagat’s only safe option is to FADC dash forward. If he dashes back, you can punish with U1/Super, high dashes, and depending on how close he was, normals. If he charges, then releases, you can punish in-between with ex.torpedo, or Ultra (headbutt works, but he may keep charging, absorb the hit and get a lvl3). IF he doesn’t FADC, you can hold up and hit j.hk/j.hp a bit early to get a full jump-in punish.

Normals
advantage
attack startup active recovery block hit
st.hk 5 2*3 18 -3 +1
st.mk 9 3 11 0 +3

st.hk is his go-to long range poke and AA. This will beat all dashes (especially ex dashes) as well as focus attacks. It’s extremely laggy though with 18f of recovery. You can counter poke with sweep or st.hp, even Ultra/super if your reactions are good enough. If you’re crouching, you will only block the first hit (the second hit will whiff); at this point, you’re much closer than the range you’d be if you’d blocked standing. You can counter poke with st.lp and cancel into lp.ds (only) or st/cr.hk .

this is also a good poke with really good recovery. You can counter poke with st.hp, but it’s a 1f punish. Because of it’s hitbox, you can’t initiate a counter poke until after the active frames have passed

                          advantage

attack startup active recovery block hit
cr.lk 5 3 5 +3 +6
cr.lp 3 2 9 0 +3

These are Sagat’s fastest normals. Sagat can only do so many cr.lk’s in a row and still be in range to connect because on block, they have significant pushback, so cr.lk, cr.lk, won’t combo. cr.lp, is his most positive normal on block, be aware of its range when spacing dash punches.

Reserved

Hey 3n1g,

Great stuff. Also, I’m not sure if you saw this new safe jump setup from Jav1ts.

[media=youtube]pdvr9bqw1z8[/media]

yeh, saw that, it’s more a meaty smash than a safe jump, if Chun did reversal super on wakeup rather than block she would beat the smash. It’s like meaty cr.lp where you get more frame advantage if you hit on the second active frame, so with smash because it has a lot of active frames, you hit with the later ones, you’re at least even or +1 on block so chun can’t safely reversal super.

I think it has more uses against characters with bad reversals, like Fuerte who are forced to block since they don’t have any viable reversals. So Dhalsim, Fuerte, Vega/Claw, and Gen. Those characters don’t have decent reversals.

So should I apply it other characters as well?

you can apply it to any character, just on paper it’s useful against those characters because if they try something other than blocking, they’re options are limited, so you can think to yourself, let me use this setup, because to beat it offensively, he has to do this, and if he blocks I can do the same setup but use another dash so he has to think high or low, etc.

Awesome thread :slight_smile:

I’m waiting to see Balrog punishing video for Sagat

might be a while, new Job has me much busier than my last.

Video for Sagat added and a bit more information about punishing tiger-knees as well.

Really good articles. It’s pretty challenging to explain this technical stuff in a way that actually helps the players who don’t already know it. I’m sure this will help a lot of up-and-coming players, especially Balrog users.

Thanks 3n1g yet again for another amazing vid!

Care to do a Guy and Gen video? and possibly Juri if time permits?

scratch that, already seen the Gen vid.

Sorry.

lol, it’s all good. That’s not a proper video anyway. We’ll see if I get around to it. Next two items that have priority are the article on projectiles and the frame trap article.

3nigmat1c,

Been meaning to ask you for a while,but I have no idea how to perform the unthrowable TAPs and dash punches in your vid.

Care to explain please?