If the copper disk that connects the pcb (for l1) melt detaches. Is there an alternative place to solder or a way to re-fill that solder point with a copper substance of some kind. I tried to scrape it off but it apperas to be plactic at this point. One of my chords detached and took the copper contact point with it now it won’t re-attach.
If someone could help or direct me to an online source.
If this addressed somewhere I apologize. But I just burned the shit out of my hand and I’m a little ticked off right now.
L2 works fine. It’s just that the L1 solder point came off. I don’t see another copper solder point for L1. Maybe you could point out the point in the diagram?
Those copper pads are evil. Don’t use them. To quote myself:
Scrape that PS pad: The PS pad isn?t a very forgiving soul (I?ve butchered a few). Ignore those little copper pads if you have them. Their only goal in life is to fly off of the PCB (There went my X button!). Scrape the black coating and solder to it instead. It?s much more resilient.
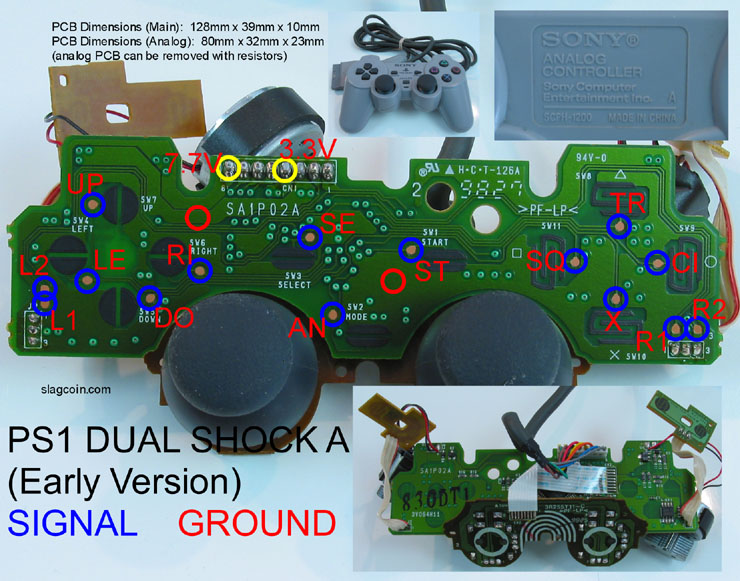
The alt point will be one of those three to the left of the L1 text in the Slagcoin diagram. I’m fairly certain it’s the top one but I can’t check since I’m at work. Connect the ground wire to it and see if it activates.
I figured out the missing copper is essential a bridge and soldering anywhere below that point is useless. I exposed some of the copper further along the line past the missing copper point (with an exacto knife) and was able to get the button to fire.
Next step: Getting the wire soldered to that thin point is going to be a PITA.
It probably sounds absurd but I’d rather solder to a trace than one of those darn copper pads. Take your time and it should turn out alright. If there’s room you may be able to scrape a little bit extra to the sides of the trace to get more copper for the solder to stick. That’s what I do on the Saturn pad.
If you aren’t already, I like the method posted on Slagcoin’s site: add solder to the metal contact, then add solder to the wire (tinning). Then just bond the 2 together with heat. It comes out very neat, little chance of error, and you use less solder overall.
Sorry for bumping an old thread, but where would i scrape using Kyle’s diagram?
I can barely see where he scraped.
Also, according to the slag diagram, there are two grounds i cannt see on my controller, and the 7.7v and 3.3v… im not sure what to do with those. any help would be great.