Project TwinTail - D3Vlicious S-Grade Playtech Pro Arcade Stick Mod

For those who remember from the “Recent Purchases and Good Finds” Thread. A friend of mine unloaded a couple of cheap sticks on me. One of these was this"Teken"(sic) stick (Playtech Pro Arcade) that was quite interesting in that it turned out to have a JLF clone inside it. This intrigued me and thus I decided to mod that stick first.

The name of the project comes from the fact that the stick has a double headed cable that ends in both a USB plug and PS2 connector.

The final product:

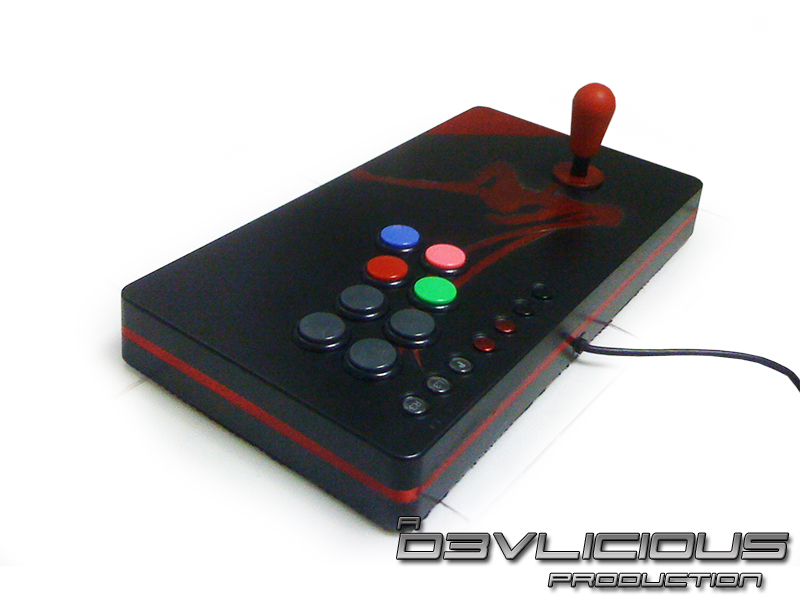
Parts used (aside from the Playtech)
-JLF-TM-8T-SK (from a HRAP EX) with a dual springs (JLF + LS-33 spring)
-Red Sanwa Bat Top
-Vermillion Sanwa Ball Top (from a HRAP3)
-4 Dark Hai Sanwa OBSF-30s
-4 Black rimmed with Playstation buttons colours Sanwa OBSF-30s (except I ordered 2 reds by mistake, which leads us to…)
-1 Green Sanwa OBSF-30 (since I had gotten a red/black OBSF-30 instead of a green/black and needed a cap, thanks to Laugh for providing this on short notice)

Special thanks go to:
Darksakul
TheRealNeoGeo
Laugh
KatipunanCowboy

Case Preparation

First order of business was prepping the case to accept 30mm buttons as well as mount the JLF-TM (sourced from Darksakul) at the correct height.

In my original post in the other thread, I noted that the stick had tall plastic washers which, I could use to mount the JLF at the correct height if I simply put them under the mounting plate (instead of over it). However, the stick was then too low, so instead I’m using regular washers to mount the stick at the correct height.

However, due to the thinness of the stick. This meant that the shaft wouldn’t let the bottom panel close. This off course meant drilling out the bottom plate. Note, that thing under it is one of two metal weights that weigh the stick down.

Yes, my bit was a bit big. A bigger problem though was that I had miscalculated the position of the stick.

But it still serves my purpose so meh.

Then we move on to the buttons. They original buttons are simply rubber contact ones that sit over a PCB. They are however the right size, the only problem being these small plastic tabs.

So with a trusty file, I filed them down.

Tabs filed down. To make sure that the buttons will fit, I tested them using some spare Hori buttons from my HRAP3.

Now as for the buttons I’m going to use? Well, they haven’t arrived on account of “I haven’t ordered them yet.”

Currently not sure what my final design scheme will be. I know what colours I’m using: red and black. But what I’m still undecided on is whether it will be red on (predominantly) black or black on (predominantly) red.

EDIT:
Had to sand the holes wider when the Sanwas arrived. Apparently, the Hori buttons are slightly smaller than 30mm.

Starting up on painting this thing.

All cleaned and prepped for primer. If you guys remember from the old pics, the case had “button labels” on masking tape. The tape gunk from this was hell to remove. Luckily, alot of soap, elbow grease and steel wool got it out. The steel wool also took care of the sticker label.

All primered up. For some reason, the primer seemed to pool in a couple of places. Ended up having to sand those before continuing.

Now at this point, I forgot to take pics of the initial, metallic black coat., so now the next batch of pics is the candy red detailing.

Prepped up for painting. Note that I’m still not doing the top panel “art” at this point.

Candy red acrylic. Note that to achieve this effect, I’m using a metallic silver base coat.

Cutting out the stencil for the art.

Final paint.

Forgot to take pics of wiring it up. Here are the finished innards.

Wires labeled with masking tape. Position of the last 4 buttons switched to MadCatz/SFIV spec. Messy enough to make JDM 714 cry. Folks with sharp eyes will also note that I’m not using the regular JLF mounting plate, but rather the one from JLF clone that came with the stick (which has different mounting holes).

If you’re wondering why the wires for the last 2 buttons are in orange, it’s because I ran out of wire before getting to them and the store didn’t have anymore grey stranded 22 AWG. That said, it’s a nice indicator for which wires to remove/cut when the owner decides that he prefers being “cooler” as opposed to being “dick.”

As a special treat, I covered the bottom with rubber mesh shelf liner so that it’s nice and comfy for lap play. As for the hole, that’s for easy access to the bottom of the shaft so that the bat top can be swapped with a balltop if necessary (comes with matching red balltop from an old HRAP3).

P.S. During this time, I was given a free LS-33 spring by someone from the local community. This promptly went into the stick for a dual spring mod. Also added some tape to the actuator (but didn’t mod the microswitches though for a full JLF Ultimate mod).

P.S. For those interested, the order of the button leads on the PCB (from left to right) is Ground, [ ], X, O, /, R1, L1, R2, L2.

any updates? wanna see how this all turns out.

I can’t wait to see your KO Fighting Stick be modded. I might mod mine to add to the list.

Still have to decide on the paint scheme and buy the buttons. Plus the JLF-TM that Darksakul is sending me hasn’t arrived yet.

I was going to ask about that. Shipping overseas always been a pain for me, usually its me trying to ship something from Asia to the US. This is my first time sending something from the US to the Philippines. D3v if you do not hear anything about getting that JLF in a few weeks time, I will send you a refund.

Give it a couple of weeks. Shipping here is notoriously slow.

So, why JLF-TM? Using the original PCB that’s not common ground? JLF-TM is cool, though. I sold one to kubebot :smiley:

its not in a balikbayan box is it?

I was going to hang on to the JLF-TM. But since I saw the demand for the non- PCB JLF, I decided to put it up on the Trading Outlet.
So far my other trades/ sales went well, and I saw that Dev wanted a JLF-TM, next thing you know the JLF-TM was going to [S]Bel-air[/S] the Philippines.

Whats a “balikbayan box”?

Look at the pics in my post in the “good finds” thread. The stick is using a JLF clone without a PCB, like the TM. Less effort then having to rig a harness.

filipinos generally send giant boxes back to their families at home
d3v should know…
i think…

Capcom Unity Forums?

Epic

No This is a very small box, just big enough to comfortably fit a JLF inside with just enough room for some foam padding to keep it safe for its long journey.

So, what’s it going to be? Black on red or red on black? Already had a spare red balltop and Lukas is sending me a black on with the TM I believe. Art will be a silhouette of a twin-tailed girl.

I usually reserve my bad cop tone for repeat offenders.

i say red on black

then again i always make my cases either black or white for some strange reason

I did looked up balikbayan box on Wikipedia, so i get the gist of it.

Red on Black or Black on Red. Hard choice, both are good combinations. The Ball top I included was the stock Balltop that came with that stick. I Pulled it from a Used Hori HRAP EX. I am using the body of the stick for Virtual-On Controller so I ended up with a bunch of cheapo Hori buttons I thrfew out and a surprisingly good condition JLF. I did place a newer mount plate on it and a newer Spring I had left over from my Agetec Mod, I tossed a LS-32 spring that went into the JLF on my agetec stick, and I didn’t need the mount plate to mount it.

You know what, I do not see that many good Red color stick cases.
I am sure D3v can pull off a good re-painting. Go for a Red Case and Black Ball Top.
But to be on the safe side, wait for the JLF to come in first.

That’s exactly why I’m thinking black on red. Since alot of sticks end up black anyhow. However, black on red works better with my plan of black rimmed buttons with PS button colours.

Also, I’m planning to have a spare bat-top on it as well, since it’s easy to switch out due to the exposed shaft bottom end.