My uncle unexpectedly came to me saying that an arcade stick he bought for cheap to play Street Fighter IV with broke and he asked if I wanted to have it for parts or something. I agreed, and it turns out that it’s a PlayStation 2 Hori Soulcalibur II arcade stick.<div><br></div><div>After taking a look at it, the four plastic stands that allowed the screws to hold the joystick in place all snapped off due to heavy abuse, so the stick is practically joystick-less. I figured that this is a sign that I should mod the thing to house Sanwa parts. I finally got the joystick apart (the plastic stands were actually still stuck to the screws, so I had to do some clever prying to get them off) and I know from other mods on Hori Fighting Sticks, I should keep the stock stick’s shaft, but here’s where I need some information.</div><div><br></div><div>Besides the metal shaft, are there any other parts I should consider keeping from the joystick assembly itself? Perhaps the actuator? The screws? I just want to make sure that when I throw a JLF in there, I have all the components from the original Hori stick to make sure the thing engages directions properly. Also, if anyone has tips for mounting the JLF, I’m all ears. I do have access to a dremel and a (crappy) power drill if that helps me out any.</div>
Ooohhh… He broke the plastic holders for the main screws that actually hold the joystick base??? <br><br>What was he doing…?? Banging on the thing???<br><br>That shouldn’t happen unless you’re handling the controller improperly. As long as don’t beat on it, drop it, or slam your fists on it, even a generic FightStick should last a while (unless you’re a heavy tournament player; you can then expect one of the parts to fail when you need it the most… Hori parts pre-Fighting Edge were lousy quality for the most part).<br><br>You might have to countersink and secure the new JLF joystick through the faceplate… That means the artwork is toast. <br>You could scan in the art BEFORE you do the mods at 600dpi and reprint it later on if it’s that important to him.<br><br>Keep all the major pieces of the joystick – ESPECIALLY the original shaft, balltop handle, and screws. DO NOT throw away any of the screws! If you’re smart, you’ll get some ziploc bags and label them with tape so that you can keep the parts safe and not lose anything.<br><br>The JLF base will definitely fit into an old-style Fight Stick base. The original Fight Stick handle fits well into a JLF base and does engage the microswitches properly. I managed to do this with a Wii Fight Stick I owned for about 20 seconds.<br><br>There are tutorials to do these kinds of mods, you know… You just have to Google them OR look at the stickies about the Tech threads.<br>
Thanks as always George. Yeah, all 4 of the plastic stands that hold the main screws for the joystick broke off through some unknown incident. I think it has to do with the fact that my uncle holds a balltop like it’s a manual transmission stick for a car and he practically only plays charge characters in SF, so he has a very heavy weight on the joystick. The plastic probably couldn’t handle that. <div><br></div><div>In any case, the mod I’m thinking of doing isn’t for him; he says he doesn’t want the thing anymore and now that it’s broke, he’ll probably buy a TE or something (I’m gonna try to find him an American parts stick though, since that’s what he grew up with). So if I have to destroy artwork, that’s fine; I’ll probably be replacing it in any case. I’ll have to look through those tutorials again since I don’t actually know how to go about countersinking screw holes. But, that’ll be an adventure in and of itself. </div>
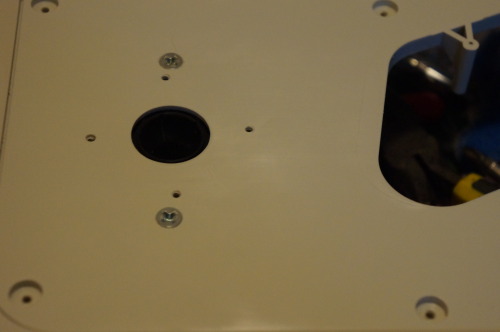
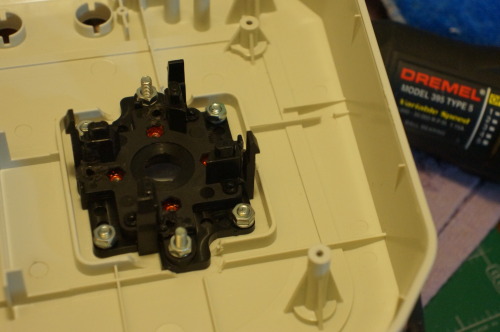
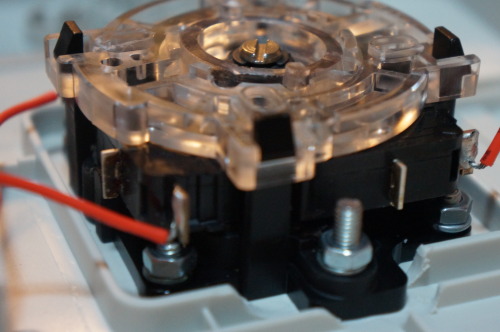
<div><br></div>just to illustrate what george already said.<div><br></div><div>EDIT- forgot to mention, using the holes already on the Hori FS casing, and the stock hori screws, screw down the JLF body on those (after you managed to flatten down/remove the plastic stands), only then make the holes pictured below, so you you’re more or less well aligned to the hole/case. you will not use the default holes obviously, and remove the screws on these after wards. hope i make sense.<br><div><br></div><div><img src=“http://25.media.tumblr.com/c3381c66d04355fad444344781e8d2f1/tumblr_mf5dnxlX921rmse96o1_500.jpg”><br></div><div><img src=“http://25.media.tumblr.com/b33e7ec4e280fcec2e3d23f04e116027/tumblr_mf5dnxlX921rmse96o3_500.jpg”><br><div>flushed mount screws, I used M4x16 (can be shorter) and M4x8 screws and appropriate washer+nuts.</div><div>using just the two ones (common on most control panels/HRAP3) the plastic warps/bends upon joystick movement (pictured above)… so I did it “ASCII style” + 2 “VF” style holes, total of 6 mounts (2nd Picture).</div><div><br></div><div>if u use HORI’s Shaft, cut Sanwa JLF actuator to roughly the same height as HORI actuator, maybe a little lower, try to feel it.</div></div><div><br></div><div><img src=“http://24.media.tumblr.com/47b9464e691ff5f8473bae60a3e3c21f/tumblr_mf5dnxlX921rmse96o4_500.jpg”><br></div><div>but as you can see, you will have to use loose switches because the bolts get in the way when using TP-MA, just so happens i desoldered omrons from the pcb assy. and just did manual wiring. other switches work too obviously. (like the stock matsushitas)… check too if the switches your Hori FS had are omrons, sometimes they use them.</div><div><br></div><div>lol way to explain countersinking screws.</div><div><img src=“http://marie.saiin.net/~scudelia/diary/archives/ikaruga_st_neji.gif”><br></div><div>make conical shape to match flat screw, there should be drill bits for these, but if you’re working on plastic, dremel with pointed tip should do fine, just be careful.</div></div>
<font face=“Arial” size=“2” style=“font-style: normal; font-variant: normal; font-weight: normal; line-height: normal; background-color: rgb(255, 255, 255);”>hibachifinal, thanks a ton! Those pictures help a lot, especially since I’m planning on mounting the JLF using the two screw holes you used in the first picture. Thanks as well for the countersinking advice. I’ll check my dremel’s bits tonight and see if I have any conical bits. That should make my work easier since I won’t have to go out and buy another bit.</font><div style=“font-style: normal; font-variant: normal; font-weight: normal; line-height: normal;”><font face=“Arial” size=“2” style=“background-color: rgb(255, 255, 255);”><br></font></div><div><span style=“background-color: rgb(255, 255, 255);”><font size=“2”><font style=“font-style: normal; font-variant: normal; font-weight: normal;”><font face=“Arial”><span style=“line-height: normal;”>That’s also a cute MS paint explanation. </span></font><span style=“font-family: Arial; line-height: 1.7em;”>説明</span></font><font face=“HiraKakuPro-W3, Hiragino Kaku Gothic Pro W3, ヒラギノ角ゴ Pro W3, Meiryo, MS PGothic, sans-serif”><span style=“line-height: normal;”>してくれて</span></font><span style=“font-family: HiraKakuPro-W3, ‘Hiragino Kaku Gothic Pro W3’, ‘ヒラギノ角ゴ Pro W3’, Meiryo, ‘MS PGothic’, sans-serif; line-height: normal;”>ありがとうございます. </span></font></span></div>