Wow i wanna do that led mod to my custom.
A thing of beauty!
Most custom sticks are built out of such thick MDF Tony Jaa’s elephant could balance on them. I admire the design, your ingenuity and your patience waiting for seven coats of paint to dry. Too awesome, thanks for sharing and inspiring I pity anyone that tries to build a stick that classy for their first project. :wgrin:
Wat method have people used for scraping off the carbon pads? What did you find most effective?
@ Beartron
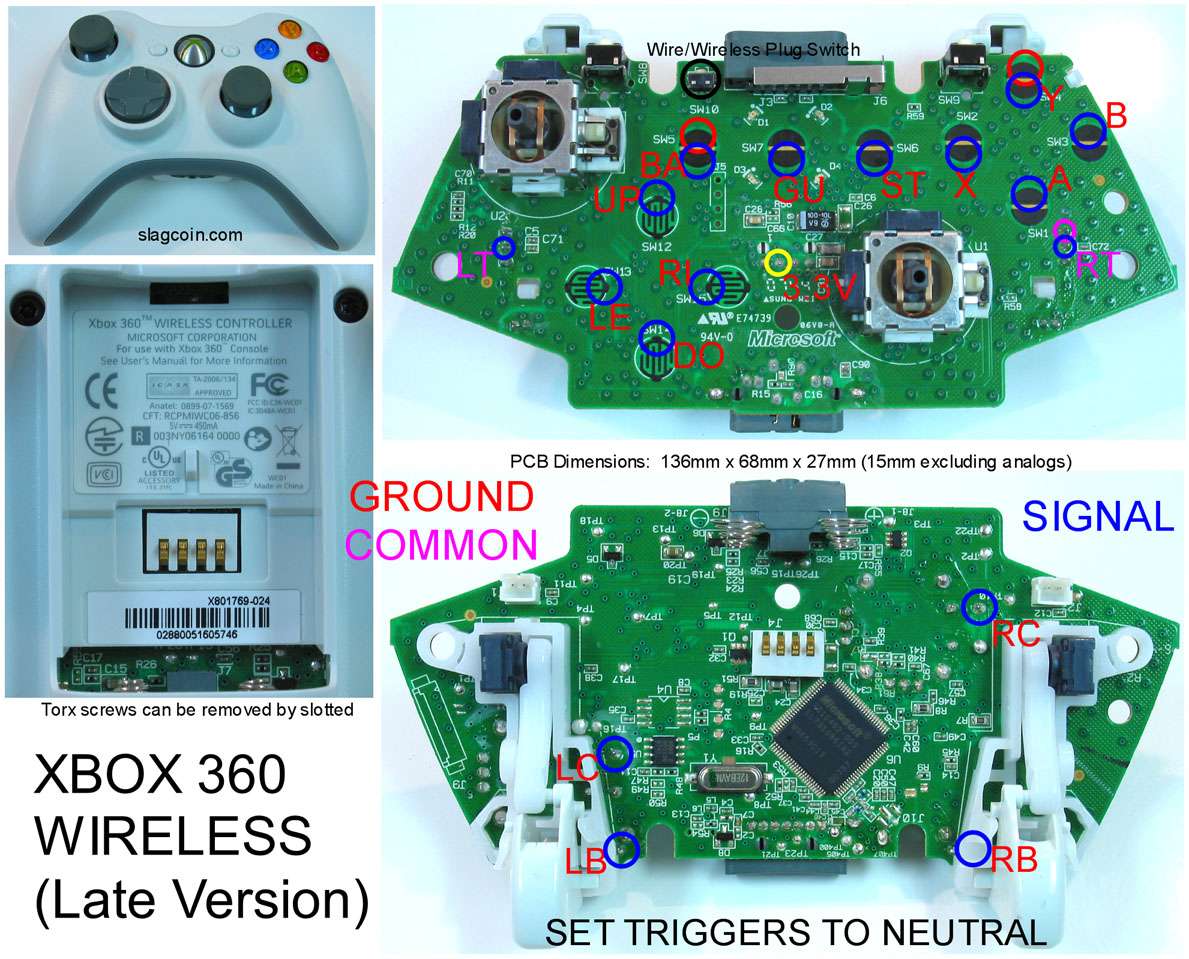
the carbon pads for the buttons on the Common Ground 360 wireless arre nice and solid copper underneath. an x-acto blade works nice. make sure you do it in strokes instead of back and forth. wipe off with a cloth every now and then, you’re looking for a shiny penny look then you’re good to go.
the carbon pad on the DPAD section of this pcb is much harder. again, use mr. x-acto blade. under a magnifying lense if possible. the pads are NOT copper under here. the only part that’s copper is the little dot part start’s the dpad directionals.
i’ve oval’d the sections im talking about in large PINK OVALs hehe.
sorry, imageshack sucks i know…
http://img145.imageshack.us/img145/561/360cgwirelessboardtoptwr6.th.jpg
thanks to RDC @ xs for the pics
i dont know if dreamcazman is still around but…
i was planning on doing something very similar to your guide button. been searching the forums, gave up, and stumbled onto this thread.
did you use the led’s from the stock board and just run extension wires to the board? did you replace them with different leds? did you need to attach a resistor or anything if using other leds? and aslo, if you used other leds, did you leave the stock ones on the board and just run 4 new ones in parallel to each respective “player” (would that even work? or would there be a lack of voltage… hmm)
i read llamas site earlier and they show how to swap out colors. wasnt sure if would work the same way if i ran extension wires.
Thanks pixeldots, that’s very helpful.
Someone on another forum said they used a Dremel to scrape the carbon pads. Thought that was a bit extreme!
Another question to anyone who’s hacked this pad:
How did you go about soldering to the L & R bumpers and Sync button? On top… underneath… remove them altogether?
Will post my results (Agetec DC stick, Sanwa parts, 360 wireless interface) and a accompanying tutorial when I’m done… before February 20th I hope 
Very nice! Btw where did you get that mat or whatever you are working on , thanks
Of course I’m still around :wgrin: , now to answer your questions…
It’s very hard to use the LED’s that are on board as they are SMD’s. I used regular bright 3mm LED’s without a resistor.
I removed the SMD’s and soldered the anode wire (positive) from each LED to the matching leg on the 3mm LED. They all use the same ground connection so connected all the cathodes (negative) legs and used a ground point on the board.
You have to remove the old LED’s first for two reasons, so the board isn’t trying to power two LED’s at the same time and also to give you a easier point to solder to.
I removed the L &R triggers and used a 4.7K resistor in place, do a search, there’s heaps of info about how to solder it in. The sync button was easy if you have a multimeter, set it to continuity and check the pins to find the right one. I can’t remember which one I soldered to, sorry.
Hehe, I think I picked it up from a craft shop or discount store. Anywhere that sells craft stuff or scrapbooking supplies should have one.
Sorry, I meant the LB and RB buttons/bumpers, not the analogue triggers (blame Microsoft for the confusing names).
Looking at your photos I can see two wires soldered to each button… but it looks like you used the guide button for your common ground… could you look at the photo on page 1 of this thread and see if it triggers your memory? I’d buy a multimeter, but I’d have no idea how to use it and I’m trying to save cash as it is by re-hacking my old DC stick.
From memory, it’s the connection that’s on the top of the button that you have to use. I can’t remember why I soldered wires to the side, I must’ve needed extra grounds or something. :looney:
Slagcoin’s diagram might help you out a bit also.
Thanks man, what is the mat called?
They’re called cutting mats. The brand written on my mat is Morn Sun if that helps any.
awesome stick and amazing cabinet
couple question about building the case.
I noticed u used 4.5mm plexi for the side walls, does that give it enough strength in terms of stability? or do you have to be gentle with it? or did the 2 thicker strips at the top panel helped to reinforced this stability?
With regards to the brackets u used for the bottom panel, was it made with plexi as well? attached to the side walls with the glue as well??
And also, did you glue the top panel onto the case? i notice there were no screws at the top.
did you have a hard time screwing the joystick onto the plexi? did u drill a pilot hole? or screw directly on?
i was deciding whether i wanna fixed the top panel, or allow the top panel to open
or sandwiching the decal between layers of panel.
i’m in the stages of planing out the pieces for my case right now, but i worry that the plexi might not be stiff enough and wud be too flexible… not sure what thickness of flexi i should be looking at… or if i should use a couple layers.
Thanks
Make me one sir :(((
The case is more than strong enough. I am not a tiny person and I do rest a bit of weight on the stick and no problems. The extra plexi does reinforce it however and it is good to have it there - better to be too strong than not strong enough, hey? Everything was glued together, no screws.
You have to make sure the holes for screws are drilled slightly smaller than the screw otherwise it will crack and there wasn’t any problem mounting the joystick as I used an ‘S’ adapter plate.
The top clear piece is held in place by the buttons, it is a very tight fit, it ain’t going nowhere and best thing is, no unsightly screws! I wouldn’t sandwich the artwork between the plexi sheets in case you ever want to change it later on.
Just thought I’d add a picture I just took today. I bought a spare dust cover (just in case I stuff up) and decided to paint it white to match the rest of the case. Wish I had done it sooner, but anyway…

God, I just realized, it’s nearly a year since I originally started this thread, stick is just as good now as it was then.
if i was still in aussie i’d probably go to you for a stick haha.
awesome stick and even more awesome cabinet!!!
thanks for the rough diagram. it definitely helps and i really like the way everything turned out. i’m no craftsman, so i’m a little worried about using the right tools for cutting the plexi and getting the holes in the right places. did you use a template for the button and stick holes?
your 360 stick is awesome, but i really want to see more of your cabinet. mostly how you mounted the TV inside it. i’m guessing you built that whole thing from scratch? it looks very professional.
Very nice, I love the artwork. It’s cool to see a stick with non-SF artwork. Unless it’s DOA4 artwork…then that’s totally un-cool.
By the way, the play and charge kit idea was frickin sweet.