I have posted a “tutorial” (in french) for putting a LS-32 stick inside a Mayflash box, you might want to check this out (WIP, but most of the work, bar the electronics is there):
I made a diagram to show everybody how i am planning to do the wiring.
Some notes / questions for the diagram
-
In the bottom right corner i spelled H5P as HP5, my mistake. Just pointing this out to avoid any confusion.
-
I assumed that you cut the wires from the stock microswitches and use these wires to connect them with the H5P harness (or the JLF-H doesn’t matter) and you don’t solder directly to the PCB.
-
You use one separate ground for the buttons and one separate ground for the stick.
-
As i point out in the diagram i understand that the black and red wires for connecting the stick are random, so in the first pair the black might be ground and the red signal and in the second pair it might be the same or it might be the opposite.
-
Lastly i know that the colors for the H5P harness might be incorrect, it doesn’t matter, i will look into to that when i am soldering the wires, i just want to get the general wiring process.
Also i know that the L, R, U, and D signals might be wrong, i just named them for convenience sake.
So here is the diagram
PAINT.NET SKILLS = SUPER EPIC FAIL FTW!
http://img172.imageshack.us/img172/6686/mayflashdiagram.th.jpg
I hope all of the above makes sense.
Any comments/suggestions? Did i completely misunderstood the wiring?
@ speedsterharry Awesome mod!
the picture looks good. you’ve got the right idea on how the wiring works.
Been reading a lot about this mod as I’m planning on doing it.
But I have one question is it necessary to have a Dremel? Making the holes larger could be done with a filer or very coarse sand paper right?
Cool. Thanks for your help!
For the holes i did them with 80 grit sandpaper and worked like a charm! Although it does take a while.
For the inside plastic that needs to go i will use 40 grit sandpaper, i don’t think it will be a problem.
However, there is also the screws that they need to go through the plastic to mount the LS-32 mounting plate or the JLF plate.
I think with a little creativity you can also avoid the dremel here as well.
Thanks for that mate, don’t think I’ll be putting any artwork on the stick so I’ll just drill through
Update:
Ok i removed the plastic and if you plan to use sandpaper use 80 grit.
I tried first with 40 grit but it’s so rough and it can’t trim the plastic well like the 80 grit can.
Also you might need to use a sharp cutter to help you cut and trim the plastic because if you use only sandpaper be prepared for a lot of grinding.
I even use a lighter to burn the plastic a bit to speed up the process. But i burned not the surrounding plastic, just the 4 little cylinders that the stock screws were in.
Yeah super ghetto methods lol.
But it worked fine and i removed without any side effects the necessary plastic that needs to go.
It took me about 30 minutes. Good luck.
Thanks for all the info mate.
speaking of super ghetto methods, if you don’t have the JLF-H you can also make your own harness using computer case LED connectors and wire (eg. pwr, led, hdd, etc). Just keep track of which wire relates to what joystick input from the harness pinout.
Just a heads up, as I pointed out an a post of mine earlier…
…for some awful reason… Mayflash saw fit to make the red wires on the stick wiring the ground instead of the black… defying what I’ve always thought of as conventional.
I lied. Three out of four times, it was the red wire that was the ground. However, it’s always the pin on the right (if you’re looking down on the top of it it… such that the connection jumpers are on the right side of the board). It’s nice that it’s common ground, though.
At least, this was the case for my PCB.
And, for what it’s worth, you don’t have to connect any of the ground wires from the PCB to the stick if you find it easier to connect both the ground for the buttons and the ground for the stick to the common ground point on the PCB.
I would recommend doing all of this with quick disconnects and terminal strips for easy alterations later, by the way. If you were dual-modding… the quick disconnects could cause trouble for physical space, but if you’re just hacking up the Mayflash, QDCs and terminal strips make life so much easier… especially if something isn’t right in your first install.
Otherwise. :tup:
Edit: went back and looked at your image again… where you noted the wiring of the directional connections… and see my post was pretty much unneeded. Oh well.
im srry if this was answered before but i would like to use the mayflash pcb into my te sticl for 360. im assuming it can be done right? if so is there an official button mapping for the numbers so i dont fuck up. and is there anything sugnificant that i need to know about besides soldering?
i appreciate the help
I’ve been lurking around the forums for ages (especially this thread) but this is my first post. Excuse the registration date.
I can confirm that you can dual PCB with a common ground PCB’d controller. I ended up using this controller but the retro stick should work as well. You must have a common ground PCB or you will not be able to dual PCB (unless you use some sort of physical switch).
I modded one of these Mayflash sticks for a friend and while the PCB is common ground, heed Kendrik’s warning well. I assumed black was ground when it actually wasn’t. Check your wire harnesses first if you plan to reuse them.
Obligatory photos.
http://img.photobucket.com/albums/v156/Freezerburn/IMG00258.jpg
http://img.photobucket.com/albums/v156/Freezerburn/IMG00257.jpg
The left cord coming out of the Mayflash stick is the 360 controller cord. I know, the wiring is hideous. I told my friend to pre-wire the terminal strips for me but didn’t give me enough slack. She works like a dream so there are no complaints. CLEAR acts as the XBOX button when plugged into the 360.
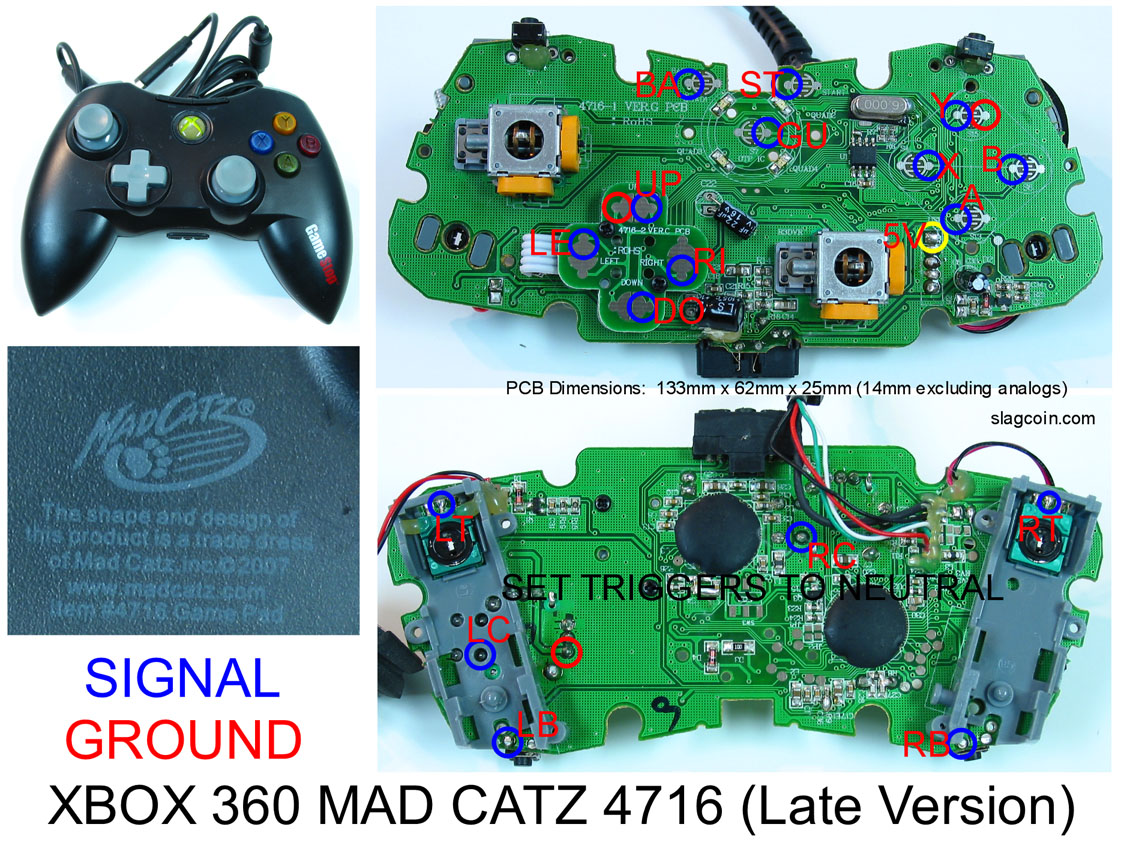
I can also confirm that the red wire beside C8 is the 5v. If you have a multimeter, you should get a max voltage reading of 4.35v (across the ground wire, beside and above the R11 wire).
On the Mayflash PCB, you’ll see the lead labels R1, R2, BU, BR, BL, BD, L2 and L1 (then GND). This maps out as…
L1 BL BU R1
L2 BD BR R2
…on the stick box. I assume the TE stick is common ground. Because if it isn’t, you can’t dual PCB.
Hope this helps. Just wanna say thanks for this thread. It made the mod that much easier.
I keep hearing that the mayflash pcb is not common ground, than i also keep hearing that the pcb is common ground, so which one is it? Thanks!
I finished modding mine with the Madcatz SE parts!
I will replace them with Seimitsu parts A.S.A.P, i just put them to experiment with soldering and worked really good.
Brokenhalo can you please answer these questions (or anyone else that knows)
- In the Seimitsu mod you did, did you mount the LS-32 straight to the Mayflash panel or did you use some kind of spacer that i can’t see in the picture?
Because i mount the SE stick straight to the Mayflash panel and the height of the shaft is a little high.
- I see you used Seimitsu screw-in buttons instead of snap-in. Are those easy to install and do they sit well?
**Edit - Scrap the first question, you clearly say that the shaft on the LS-32 is too shallow, so i assume you didn’t use any kind of spacer. **
thx freezer b. now i just need toknow if its common ground or not. w/e that means lol. and i use to be an electrician
you can use the snap in buttons or the screw in buttons. there is just enough space between the buttons that the nuts can rotate freely. i picked the screw-ins for that build cause i like the way those black/blue seimitsu buttons look :lovin:
think of it like your service panel then. each circuit in your house pulls a ground from your ground bus in the panel. therefore every switch/outlet/appliance in the house shares a common ground. if you were to check for continuity between the ground going to your stove and a random lightswitch, there would be continuity between the two grounds because they go back to the same point on the main panel. they share a common ground
Thanks for explaining that, I wanted to ask but my previous posts have made look ultra noobish so I spared myself from looking even more, by trying to google this (still trying to understand common ground/ground, huh? made myself look noobish again, nevermind). Anyway, I’ve decided to use the existing wires that connected to the joystick before to connect to the Sanwa stick I’m going to order, no longer going to use the 5 pin connector because it seems like you can use the existing or the 5 pin connector from previous posts. I want to ask, is there risk of me damaging the PCB if i wrongly connect the existing joystick wires from the PCB to the new Sanwa joystick. Gona start ordering my Sanwa parts now
oh ok thx for explaining. however, there would never be a case where there isnt a common ground in that case unless its comming from another house, or that the neutral is also considered to br grounded as well. so i understand the common ground, but how would it not be? the only thing im guessing is if there is a diffrence where ground can be like this
0–0—0
l
l
0–0--0
or a sprinkle effect where the pcb ground connects to the ground panel then sprouts out individually?
srry if im being complicated
that’s one way of thinking of it. on a non-common ground pcb, there might be 4 buttons that share a common ground. and then the 4 directionals might be on a different ground. think of this situation as there being two seperate houses.