Recently, someone uploaded a torrent with all the hitboxes for every single move in SSF4. The files are encoded with h.264 and are all very high quality running at 60fps.
I took some screencaps of Sim’s moveset, focusing on the most extended active frame of all of his moves and in some cases, the startup frames to highlight certain special properties like invincibility.
This is an explanation that was included as a readme file in the torrent:
Understanding Hitboxes
[details=Spoiler]
Solid Yellow boxes:
This represents the physical space that the character is occupying. These do not represent hittable boxes. It is there
so the characters, when both are pressing forward, they cannot pass through eachother. Moves that can pass through
the opponent, for example, akuma’s teleport, that yellow area wil lcompletely disappear so he can pass through the opponents
yellow area.
Solid Yellow long horizontal boxes:
I am not sure what this info represents. But in a lot of moves, it appears on frame 1 of the move’s startup.
Solid Red boxes:
This represents the attack’s active hitbox. If this box collides with the opponent’s vulnerable box(explained
further down), it will register a hit. The data that is shown inside the red hitbox, is not important, they are
values representing range/height/etc… basically, important info for the development team only
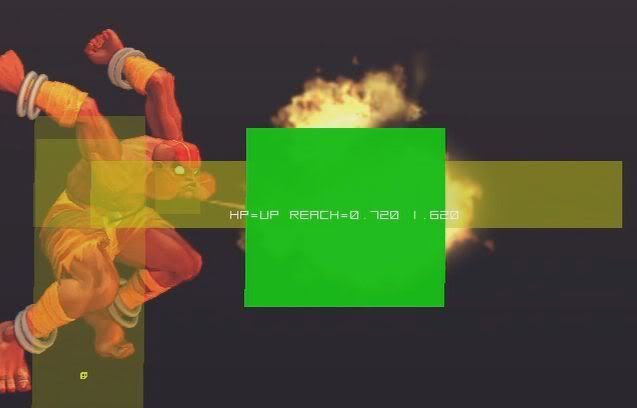
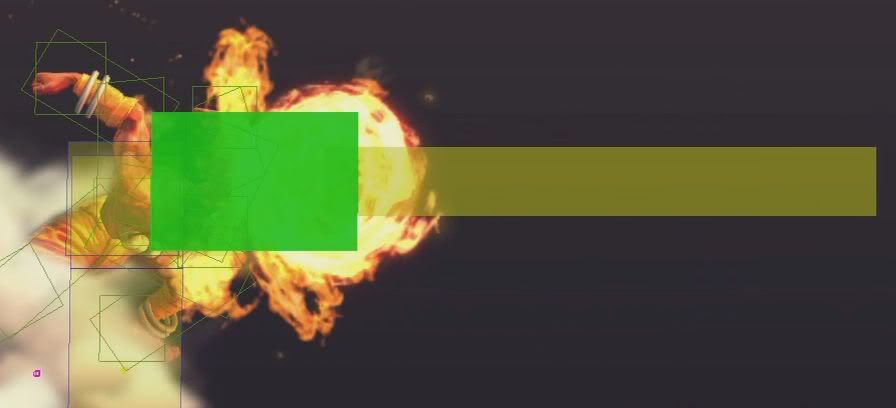
Solid Green Boxes:
This is considered a Projectile Active hitbox. Same rules apply as the red hitbox when it comes to registering a hit.
Solid Blue hitbox:
This is a throw’s active hitbox. If this throw collides with a throw vulnerable box(explained further down) on the
opponent, a throw will be triggered.
Green lined boxes:
This represents the character’s vulnerable hitbox. If any attack’s solid red hitbox or projectile’s solid green hitbox
collides with the green lined box, a hit will be registered.
Blue lined boxes:
This represents the character’s vulnerable throwable hitbox. If a throw’s Solid Blue hitbox makes contact with A blue
Lined box, a throw will be triggered
Red lined boxes:
This represents the character’s vulnerable hitbox, just like the green lined boxes, but it is invincible to projectile
attacks(solid green hitboxes). [/details]
You can also check tonylew84’s post on the Bison forums where he did something similar for that character, and which can be found here.
Standing Normals
st. jab http://i5.photobucket.com/albums/y160/razorback130/stjabactive.jpg
st. strong http://i5.photobucket.com/albums/y160/razorback130/ststrongactive.jpg
st. fierce http://i5.photobucket.com/albums/y160/razorback130/standingfierceactive.jpg
st. short http://i5.photobucket.com/albums/y160/razorback130/stforwardactive.jpg
st. forward http://i5.photobucket.com/albums/y160/razorback130/stfwd.jpg
st. roundhouse http://i5.photobucket.com/albums/y160/razorback130/strhactive.jpg
Command Normals
back jab
1st active frame http://i5.photobucket.com/albums/y160/razorback130/bjabactive1.jpg
2nd active frame http://i5.photobucket.com/albums/y160/razorback130/bjabactive2.jpg
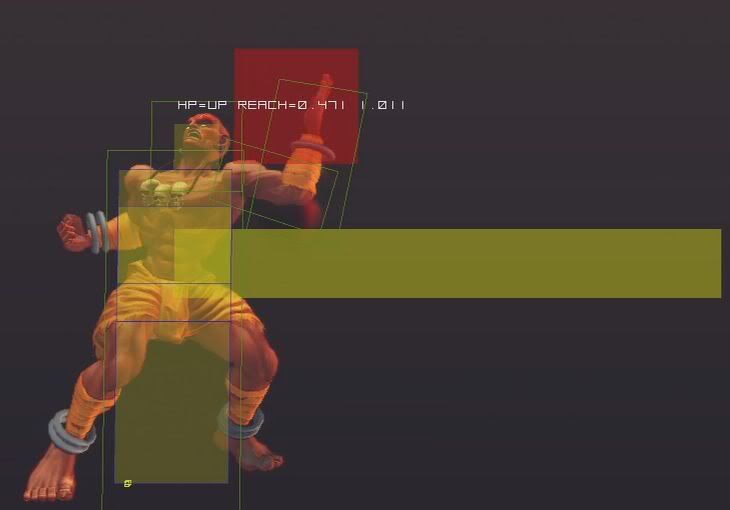
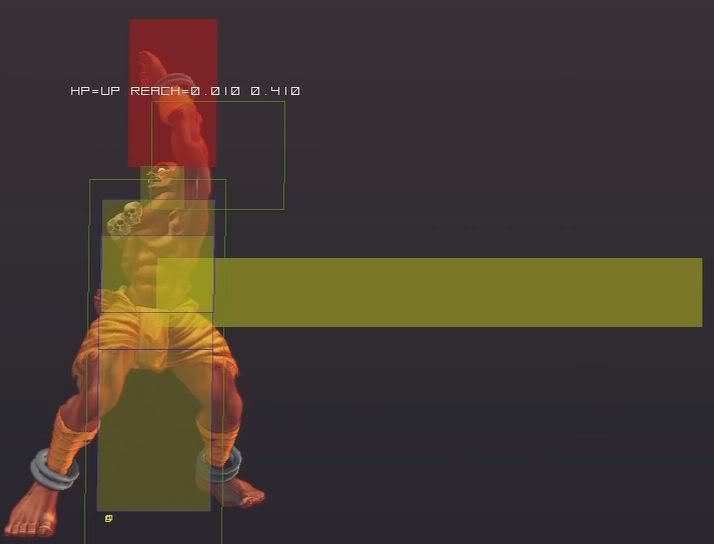
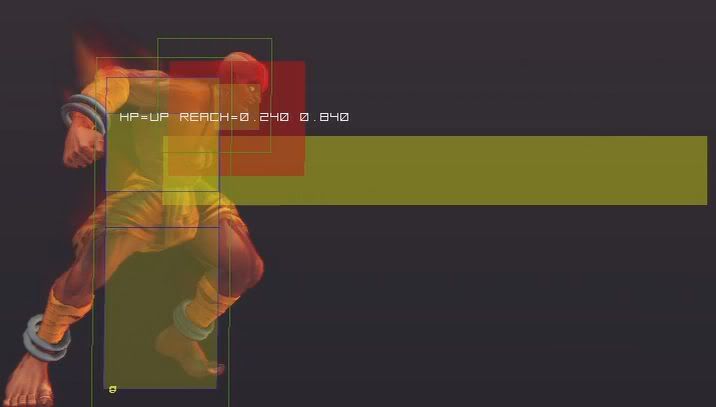
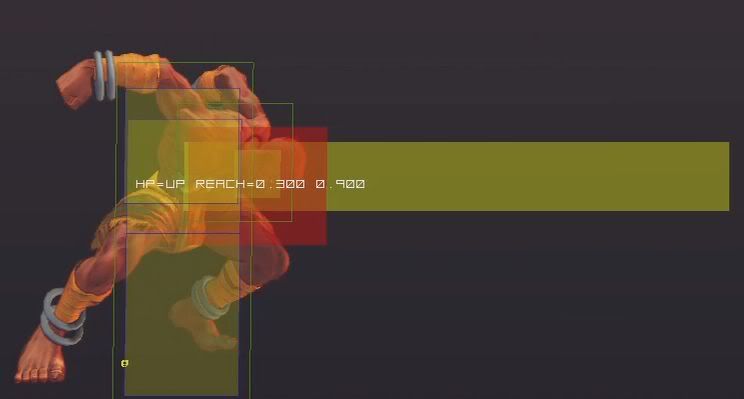
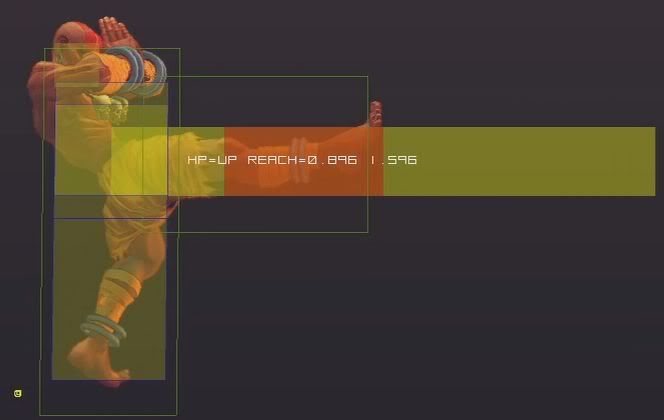
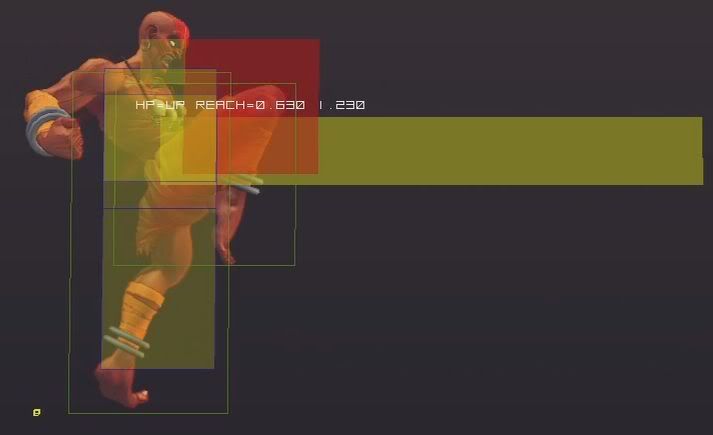
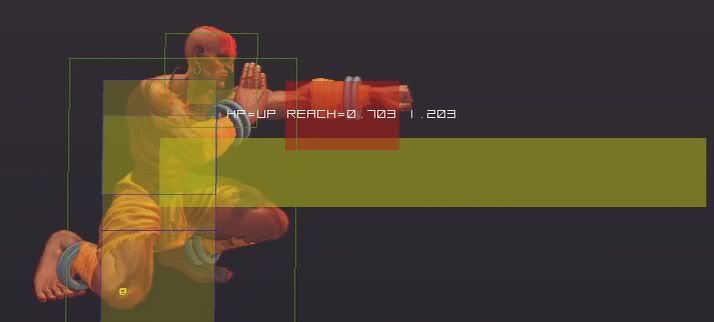
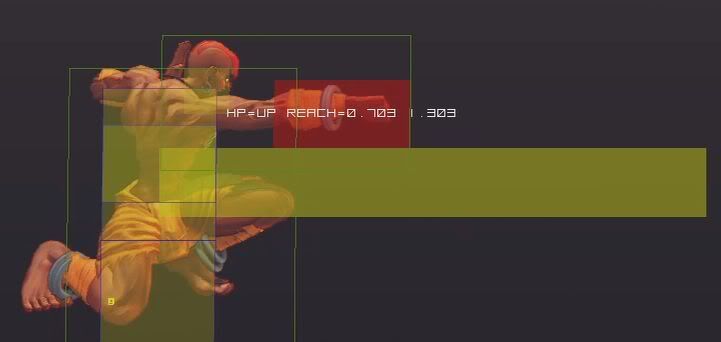
back strong
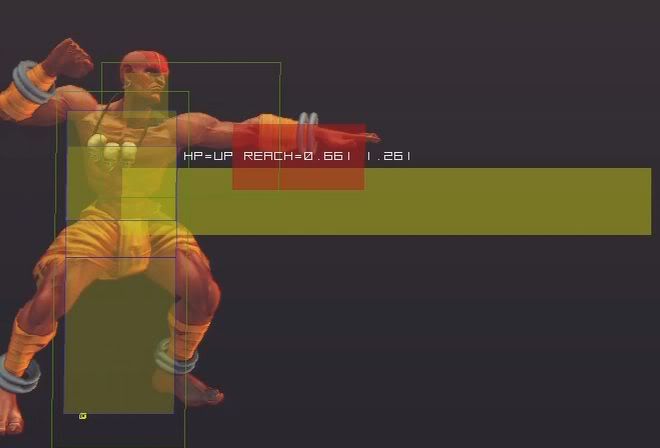
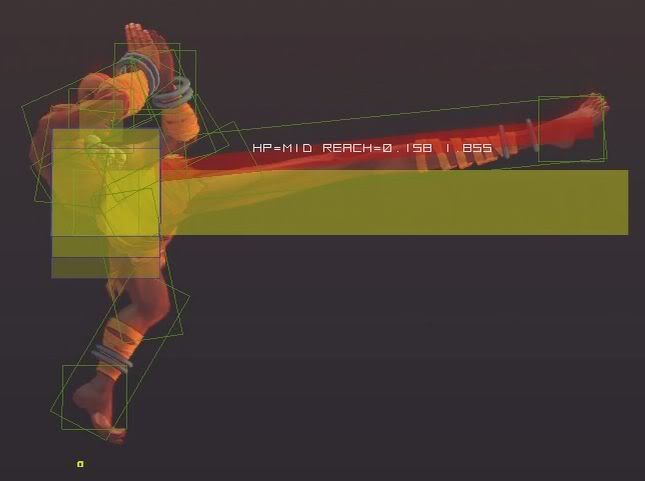
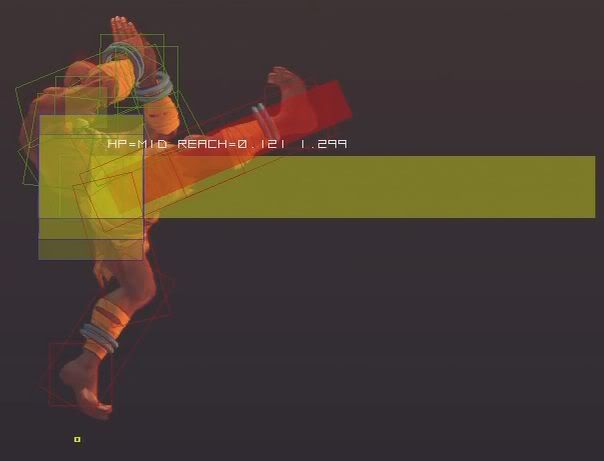
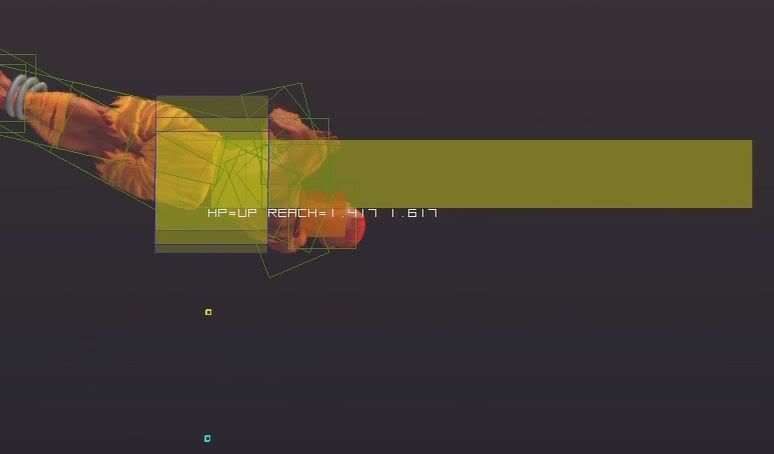
Here we can see why this is such good AA. It basically covers all of Sim’s front and goes upward almost all the way in 5 frames
1st active frame http://i5.photobucket.com/albums/y160/razorback130/bstrong1stactive.jpg
2nd active frame http://i5.photobucket.com/albums/y160/razorback130/bstrong2ndactive.jpg
4th active frame http://i5.photobucket.com/albums/y160/razorback130/bstrong4rthactive.jpg
Last active frame http://i5.photobucket.com/albums/y160/razorback130/bstronglastactive.jpg
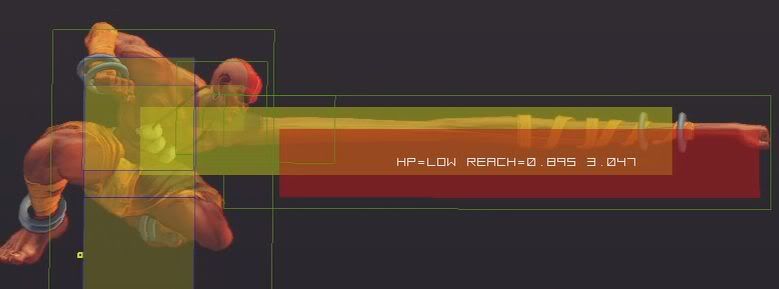
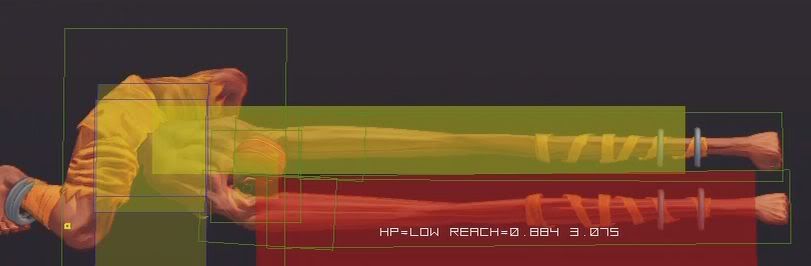
back fierce
1st hit: http://i5.photobucket.com/albums/y160/razorback130/bfierce1sthit.jpg
2nd hit: http://i5.photobucket.com/albums/y160/razorback130/bfierce2ndhit.jpg
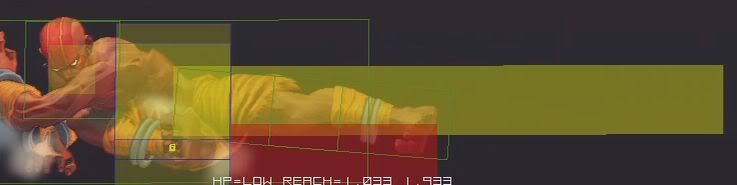
back short http://i5.photobucket.com/albums/y160/razorback130/bshort.jpg
back forward http://i5.photobucket.com/albums/y160/razorback130/bfwd.jpg
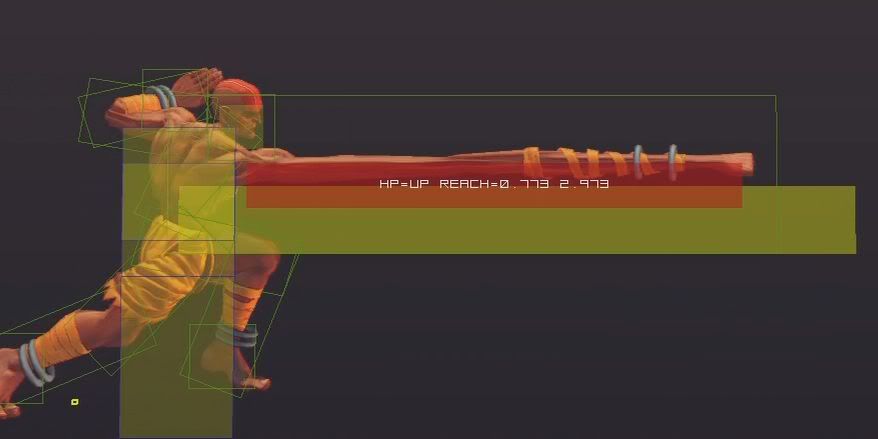
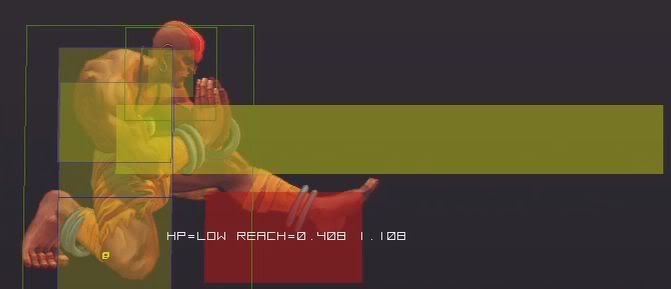
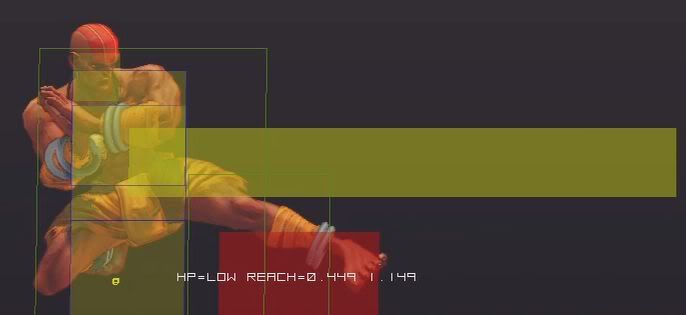
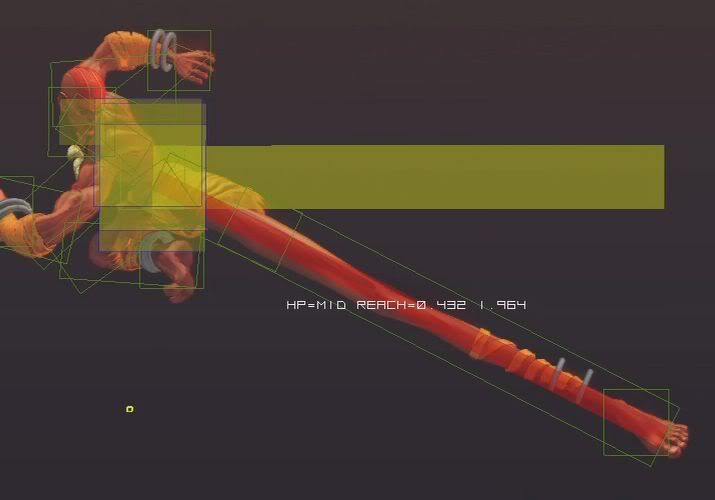
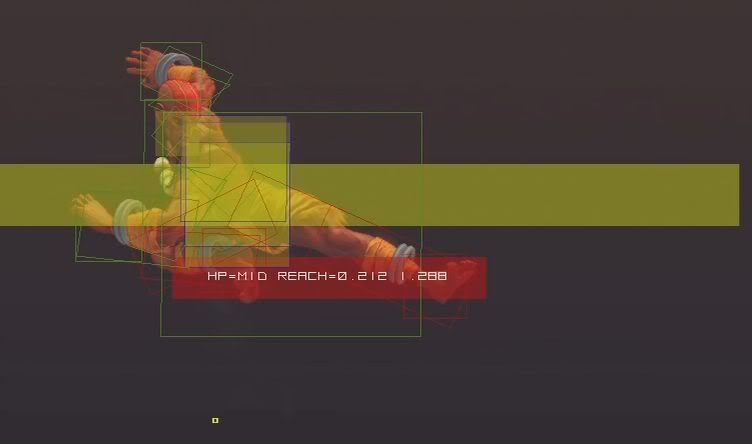
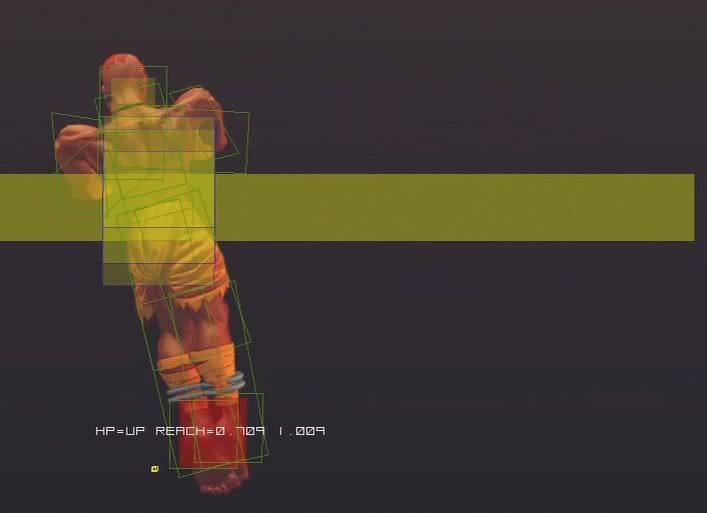
back roundhouse http://i5.photobucket.com/albums/y160/razorback130/brh1stactive.jpg <------now we know why this AA is so fantastic. Just look at that humongous hitbox on its first active frame! What’s more, Sim’s head is invincible!
Crouching Normals
cr. jab http://i5.photobucket.com/albums/y160/razorback130/crjabactive.jpg
cr. strong http://i5.photobucket.com/albums/y160/razorback130/crstrongactive.jpg
cr. fierce http://i5.photobucket.com/albums/y160/razorback130/crfierce.jpg
cr. short http://i5.photobucket.com/albums/y160/razorback130/shortslideactive.jpg
cr. forward http://i5.photobucket.com/albums/y160/razorback130/forwardslideactive.jpg
cr. roundhouse http://i5.photobucket.com/albums/y160/razorback130/rhslideactive.jpg
cr. back jab http://i5.photobucket.com/albums/y160/razorback130/crbackjab.jpg
cr. back strong http://i5.photobucket.com/albums/y160/razorback130/crbackstrong.jpg
cr. back fierce http://i5.photobucket.com/albums/y160/razorback130/crbackfierce.jpg
cr. back short http://i5.photobucket.com/albums/y160/razorback130/crbackshort.jpg
cr. back forward http://i5.photobucket.com/albums/y160/razorback130/crbackfwd.jpg
cr. back roundhouse http://i5.photobucket.com/albums/y160/razorback130/crbackrh.jpg
Jump Normals
jump jab http://i5.photobucket.com/albums/y160/razorback130/jmpjab.jpg
jump strong http://i5.photobucket.com/albums/y160/razorback130/jmpstrong.jpg <----the range on this normal is insane
jump fierce http://i5.photobucket.com/albums/y160/razorback130/jmpnfierce.jpg
jump short http://i5.photobucket.com/albums/y160/razorback130/jmpnshort.jpg
jump forward http://i5.photobucket.com/albums/y160/razorback130/jmpnforwd.jpg
jump roundhouse http://i5.photobucket.com/albums/y160/razorback130/jmpnrh.jpg
jump back jab http://i5.photobucket.com/albums/y160/razorback130/jbjab.jpg
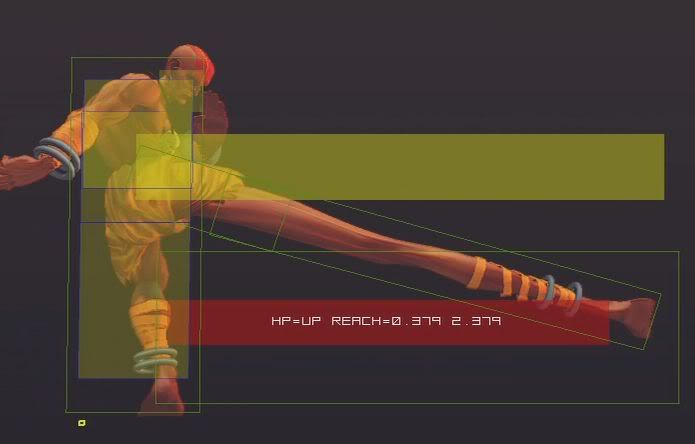
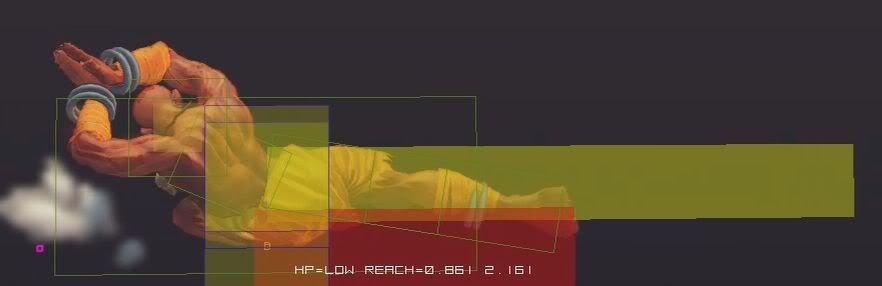
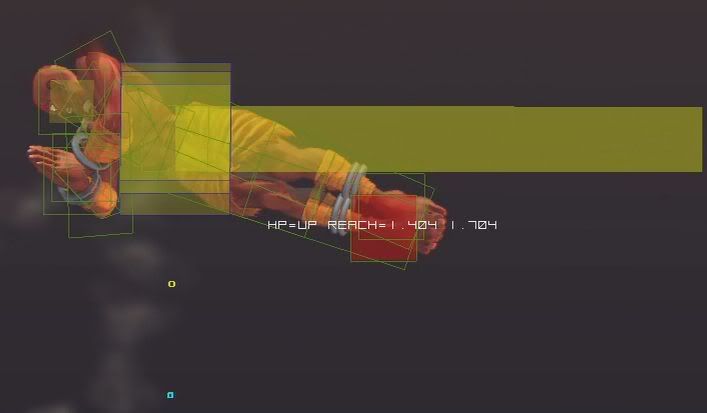
jump back strong http://i5.photobucket.com/albums/y160/razorback130/jbstrong.jpg <-- This move’s red hitbox is much longer than what one would expect.
jump back fierce http://i5.photobucket.com/albums/y160/razorback130/jbfierce.jpg
jump back short http://i5.photobucket.com/albums/y160/razorback130/jbshort.jpg
jump back forward http://i5.photobucket.com/albums/y160/razorback130/jbfwd.jpg
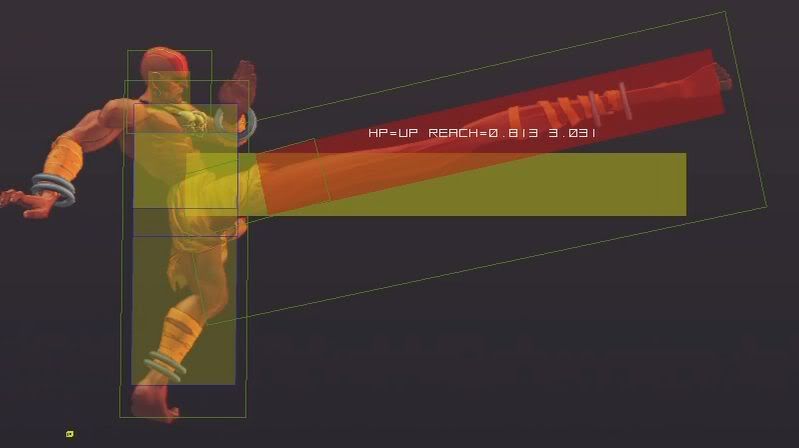
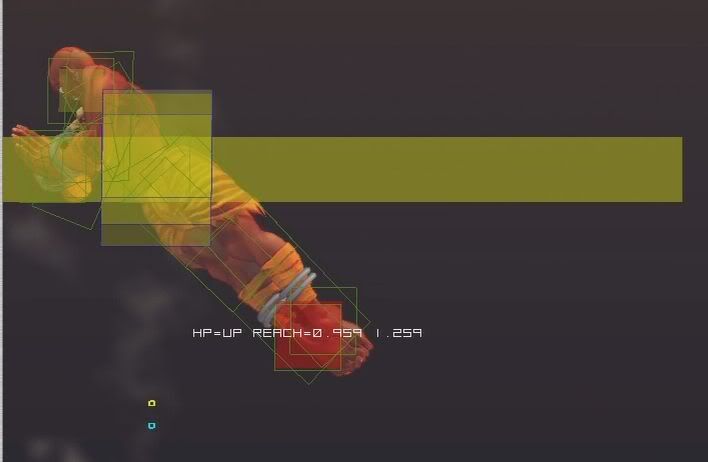
jump back roundhouse http://i5.photobucket.com/albums/y160/razorback130/jbrh.jpg <---- Another move with a deceivingly long hitbox
Special Moves
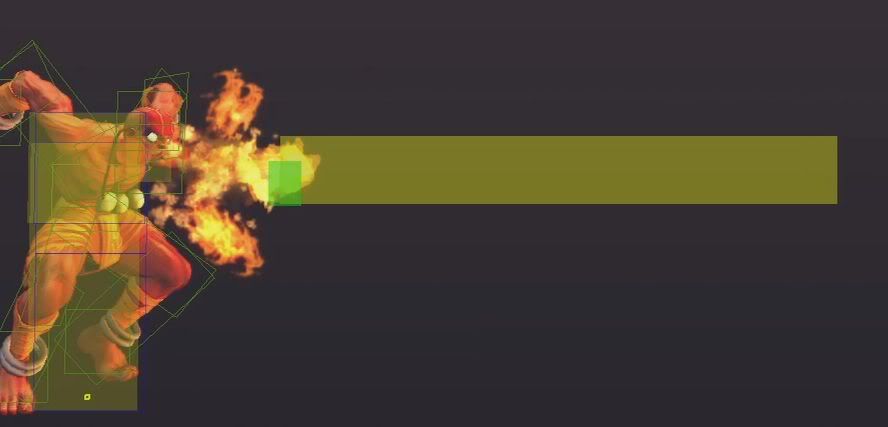
Yoga Fire http://i5.photobucket.com/albums/y160/razorback130/yogafire.jpg
EX Yoga Fire http://i5.photobucket.com/albums/y160/razorback130/EXyogafire.jpg
Yoga Flame http://i5.photobucket.com/albums/y160/razorback130/jabflame.jpg
Notice that all versions of Yoga Flame have basically the same hitbox. The difference is the start up, active and recovery frames, which are longer the stronger the punch button.
EX Yoga Flame: http://i5.photobucket.com/albums/y160/razorback130/exflame.jpg
Yoga Blast: http://i5.photobucket.com/albums/y160/razorback130/fwdblast.jpg
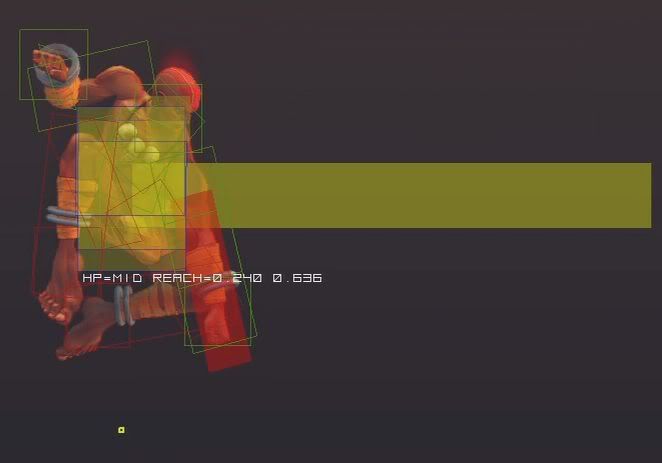
Again, basically the same hitbox on all three kicks, with the roundhouse version having a whooping 30 frame startup. Notice the hitbox around Dhalsim’s upperbody which adds vulnerability, and it’s part of the reason why this move trades with everything. Also, it has no invulnerability whatsoever.
EX Yoga Blast:
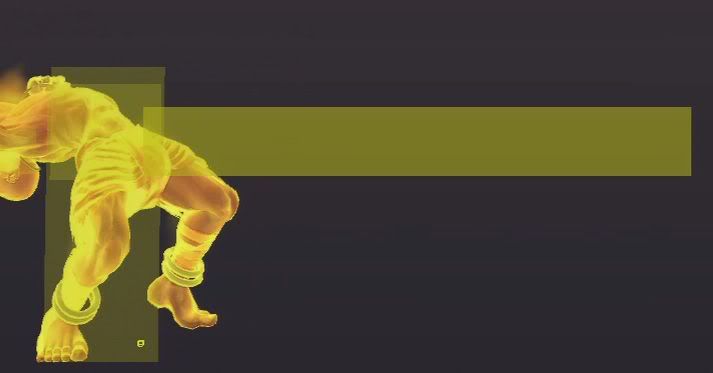
Startup: http://i5.photobucket.com/albums/y160/razorback130/exblast3rdframe.jpg <—Notice how Dhalsim is completely invulnerable. This invulnerability lasts until the first active frame:
http://i5.photobucket.com/albums/y160/razorback130/exblast1stactive.jpg
Yoga Teleport:
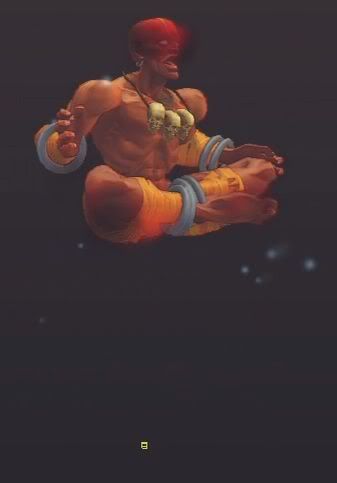
Startup: http://i5.photobucket.com/albums/y160/razorback130/teleportfirstframe.jpg Sim has full body invulnerability from the 1st frame.
As soon as Sim reappears, he spends several frames in a limbo in which he has no hitboxes whatsoever:
http://i5.photobucket.com/albums/y160/razorback130/nohitboxteleport.jpg
Afterwards he is vulnerable from the first recovery frame until he touches the ground:
http://i5.photobucket.com/albums/y160/razorback130/teleport1stvulnerable.jpg
**Drills and Mummy **
In all versions the move remains active until Sim touches the ground
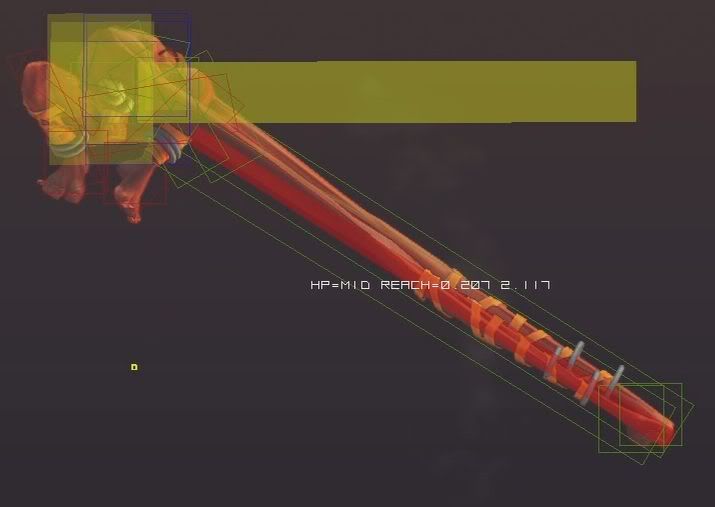
short drill http://i5.photobucket.com/albums/y160/razorback130/shortdrill.jpg
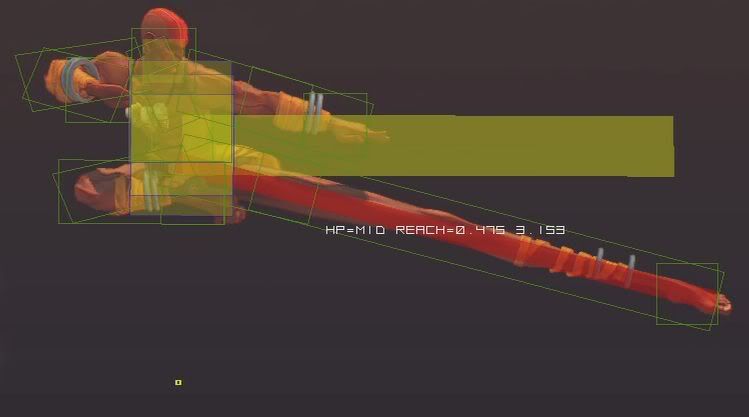
forward drill http://i5.photobucket.com/albums/y160/razorback130/fwddrill.jpg
roundhouse drill http://i5.photobucket.com/albums/y160/razorback130/rhdrill.jpg
Yoga Mummy http://i5.photobucket.com/albums/y160/razorback130/mummy.jpg
Super and Ultras
Super (Yoga Inferno)
1st Active Frame http://i5.photobucket.com/albums/y160/razorback130/super1stactive.jpg
Sim is completely invulnerable throughout the startup and up to the first active frames.
1st vulnerable active frame: http://i5.photobucket.com/albums/y160/razorback130/jabsuper3rdactive.jpg
Jab version has 1 invulnerable active frame
Strong has 2 invulnerable active frames
Fierce version has 4 invulnerable active frames
Hitbox is basically the same for all three punches, with the jab version having the least active frames.
Ultra 1 (Yoga Catastrophe)
http://i5.photobucket.com/albums/y160/razorback130/ultrastartup.jpg Sim is completely invulnerable during the Ultra flash
Sim is vulnerablethroughout the startup, and during the active frames:
1st active frame http://i5.photobucket.com/albums/y160/razorback130/ultra1stactive.jpg
Ultra 2 (Yoga Shangri-La)
Sim is invulnerable during the startup and the first 5 active frames:

On the 6th active frame, he becomes vulnerable
He’s also vulnerable during his recovery

