Converting Fighting Stick SS into a Fighting StickPS made EASY

Ok, so I had 2 Fighting Stick SS’s made by Hori, but I don’t have a Saturn or a Saturn converter to use it on other systems, so it’s been collecting a lot of dust until I found this old webpage with instructions on converting this stick into a PS1 stick. I have converted 1 of my Fighting Stick SS’s yesterday and it’s working beautifully on my PS2.

Here’s the link.

The bone of the instruction goes like this.

  1. Fighting Stick SS and Fighting Stick PS are essentially identical sticks with just different cords.
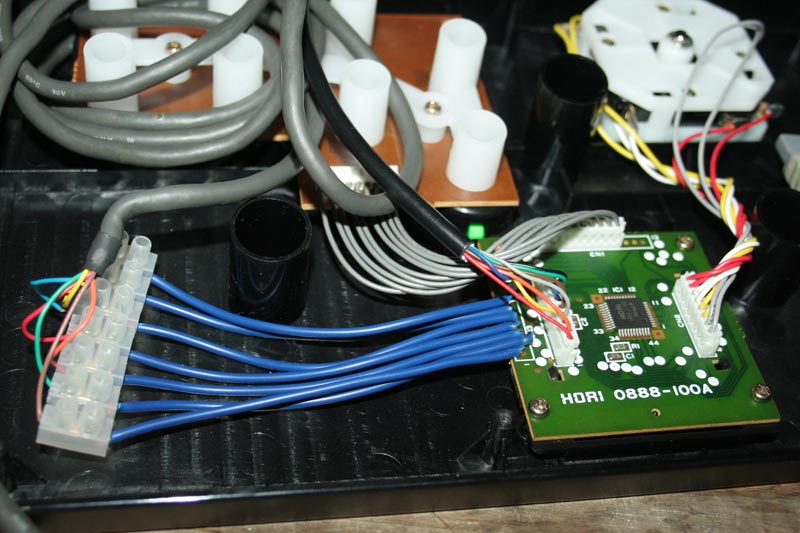
  2. There are nice soldering points on the PCB to solder a PSX cable to it.
  3. All it requires is for you to solder 7 wires.

You need the following materials to do this mod
-Fighting Stick SS
-any playstation cable taken from a pad, or even an extention cable would do it (first party or third part doesn’t matter)
-soldering iron & solder (but I didn’t even need solder)
-philips screw driver

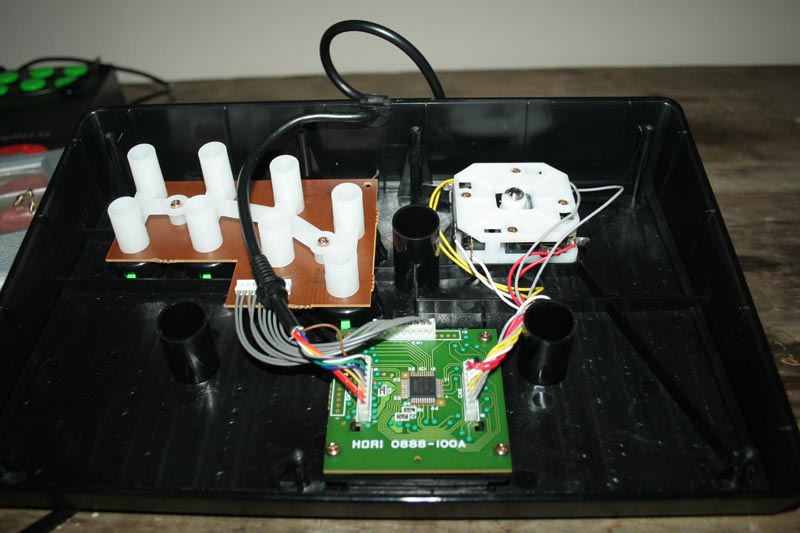
They have diagrams made with texts and also actual photos. I’ll explain the text diagrams first.

The first text diagram with “ABCDEFG” is the pin layouts if you’re looking at a PSX controller’s end. They also have the same thing in real picture if you scroll down.

The next text-diagram is showing how the PCB of a Fighting Stick PS looks like if you’re looking at it so that the word “HORI” printed on the IC would be correct-side up. This is just extra information that we don’t really need. The top row of pins are for the PSX and the one below is for Saturn.

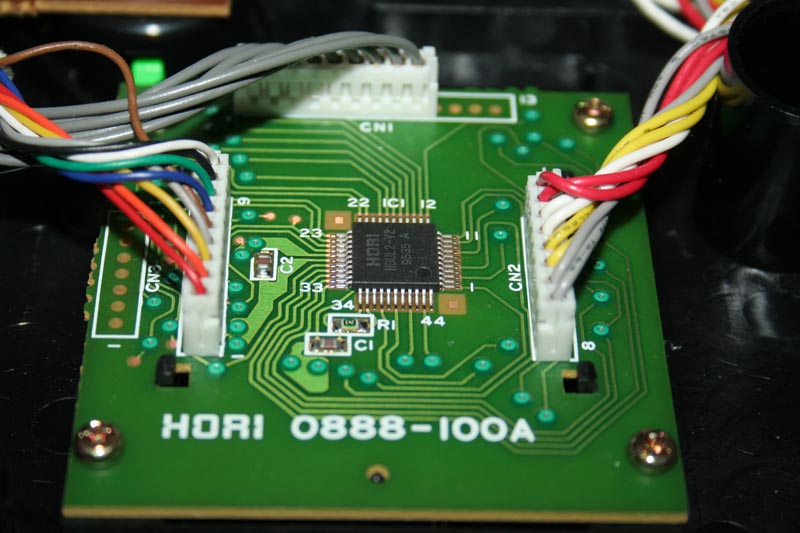
The next one is what we’re interested in. It’s the Fighting Stick SS PCB diagram with the word “HORI” correct-side up. The vertical line of pins here are the ones for Saturn and the horizontal row of pins at the top are for PSX. The order of pins for PSX goes from left to right “A G B D F E C” on the Fighting Stick SS PCB. Look at the photo and it’ll make sense or even better open up your Fighting Stick SS and it’s really easy to understand. You’ll also notice that all of the pins for the PSX is shared with the pins for the Saturn. This gives you more points to solder to.

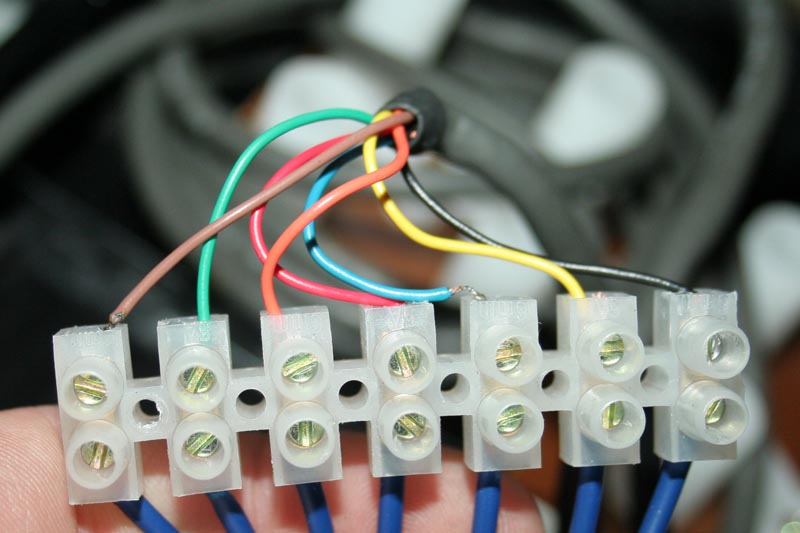
I’ve done the work for you and written down the colors of wires for each pin on the official Sony brand of the original grey Playstation controller.
A - brown
B - orange
C - black
D - red
E - yellow
F - blue
G - green

So the order of wires on the PCB would be “brown, green, orange, red, blue, yellow, black” aka “A G B D F E C”

You can use any playstation pad cable, even ps2 pad cables, cuz you’re only taking the cable from it. Note that there’s an extra wire in the DualShock series controllers. The extra wire is for the 9V and it’s usually grey. In case you have this wire in your cable, you just ignore it and connect the rest of them.

There’re at least 3 different soldering points for each wire, making it easy to solder each wire since you’re not restricted to a small area with only 1 solder point for each wire.

Important note - The color code for the wires only apply to the official Sony brand PSX controller and other Sony controllers or 3rd party controllers may have different color codes.

Also, since Saturn only had a start button and no select button, the start button on the stick becomes start+select on PS2. On cvs2, you can play the game fine and press start to go into the menus once you hit the title screen, but you can’t call the title screen by pressing start durig the intros. Obviously, pressing start (which really is start+select) during game play resets back to the titles screen. If someone has a Fighting Stick PS or is knowledged enough to look at PCB traces, they can figure out a solution to the start button problem. I’m looking into the problem myself but it might be difficult since I don’t know how the PS version looks like inside. Any high res photos of the Fighting Stick PS PCB would be great and would make this tutorial complete.

Other than the start button, everything works 100%. It took me less than 30 minutes from beginning till end to do this. I left the Saturn cable intact and just hid them inside the case and it doesn’t bother anything when I’m playing on my PS2. So this makes it a Saturn + PS stick with only 1 PCB inside.

good stuff, i guess this means i can turn my FSPS into a dual system stick. definitely gonna try this sometime.

now if there was a site to show you how to do this for a saturn pad it would be awesome. Saturn pad for ps is scarce nowadays. I wonder if it works…

Edit: found this, ps controller for saturn. looks like it might have been hacked. http://cgi.ebay.com/SONY-SMOKE-BLACK-CONTROL-PAD-FOR-SEGA-SATURN_W0QQitemZ280058921103QQihZ018QQcategoryZ3654QQrdZ1QQcmdZViewItem?hash=item280058921103

if you take apart a Hori Fighting Stick SS/PS, the board will have labels on it corresponding to Saturn layouts.

(XYZ ABC LR)

it wouldn’t surprise me if you could plug an HRAP into a Saturn either.

Sweet, that’s pretty awesome of them to do that. Good mod.

Saturn and PSX controller tech is very different, so this is truly the exception not the rule.

On a side note HOT DAMN I finally found useful information on the working of a 3do controller.

i wish they did the same to the Saturn Hori VF Sticks :frowning:

edit:

weird, the first and third links show PCBs that have buttons soldered to them. O_o
the second link (glomp.us) has a PCB that’s separate from the buttons, which is the same as my FSPS.

Thread revival.

I happened to see two of these at a local collectible store going for 9.99, which seems like a very good deal.

I would like to use the PCB for PSX and Saturn support, but I am also wondering how wiring for start and select would be done for Playstation. Could anyone help? I could purchase the stick and take a picture of the insides.

I bought 2 SS sticks this week (hope to get them next week with the mail), and I also want to use them on my saturn, ps1, ps2, and ps3 (with an adapter), but I still don’t see the solution for the start and select button…

Any news on them?

I received my 2 Fighting Stick SS’s friday and I wanted to mod them for dual use on saturn and psx/ps2 etc.
So I opened up the sticks and wanted to follow the tutorial provided here, but I’ve got a different version of the stick…

Here is a picture of the stick opened;

and the PCB with the connectors close-up;

And I thought it would be very easy to connect a psx cable to it, since there a versions of this stick with both plugs (saturn and psx) on one cable…
So I connected 7 wires to the PCB left from the Saturn cable connector and connected the PSX cable to it… Here’s a picture of it;

Close-up of the connected psx cable to my 7 wires from the stick’s PCB;

But it’s not working!
I tried several combinations of colors, but I can’t get a single signal of the stick to my ps2 or psx…

Can someone help me out and tell me how I have to connect everything? Because I have no idea how to continue this project…

Thanks in advance!

Well I know that it has to be perfectly correct, but I thought I could just take the same color combination as the stick in this tutorial… but it seems that’s wrong in this case.

Can’t I test one color at the time? connect one, press a button, see what happens, try the next one?

Would be nice if you could check out your pinout. Doesn’t matter when, I’m using the sticks on my Saturn at the moment

I have the stick with both plugs. I traced the wires going from that connector on the left to the PSX plug;

http://img.photobucket.com/albums/v664/skate323k137/HORISSPSXPINOUT2.jpg

Let me know what you find. These folks at the end of this thread would like to know too I’m sure;
http://www.racketboy.com/forum/viewtopic.php?f=25&t=5305

note only 5 pins were in use on that harness. the rest were n/c with no wires present.

edited, two wires are shared from the saturn harness. updated image.

Thnx skate323k137,

I will give it a try this evening! When it’s working I will post the results, and also on racketboy.

Just connected all the wires corresponding with your scheme and it’s not working.

I think it’s because it hasn’t got his ground cable connected.
Here’s the pinout of a psx controller and the meaning of them;

Pin Name Description

  1. DATA - Data
  2. CMD - Command
  3. N/C (9V) - Not connected (newer dual-shock controllers use it as power for the vibration mechanism)
  4. GND - Ground
  5. VCC - Vcc
  6. ATT - ATT select
  7. CLK - Clock
  8. N/C - Not connected
  9. ACK - Acknowledge

Confirm your scheme, wires 1, 2, 6, 7 and 9 are connected.
This means 3, 4, 5 and 8 aren’t
3 and 8 are supposed to be not connected, but 4 and 5 should be (at least I think)

4 is GND;
gnd has to be connected to the gnd the saturn uses. I think your dualsystem stick has 1 shared gnd for both connectors, the psx and the saturn. I have to find out where the saturn ground is connected.

5 is VCC;
“VCC can vary from 5V down to 3V and the official SONY Controllers will still operate. The controllers outlined here really want 5V.” - I have no idea what this means…

Can someone help us out with this? I have to know if the VCC signal has to be connected and where the saturn get’s his ground signal, so I can solder the psx wire to the same point.

Thnx in advance!

I’ll see what I can find out, I wasn’t able to get the other wiring harness loose last night, but if I can, I can try to find you what the psx’s 4th pin is connected to.

edit; got it loose, going back to town w/continuity tester.

edit again-** looks like the two connectors at the console end share +5 and GND from the saturns wiring harness on the PCB. I updated the original pinout image.** I’m leaving this thing open in case someone for some reason wants the whole pinout of the saturn connectors. not doing that unless someone requests. Given the pinout you provided, we ought have all the right pins now. you should be able to ‘tap in’ to the +5 and gnd wires without even soldering.

Nice work, it has to work now… Unfortunately I justed started my work day, so I’ll be home over 9 hours and then I can connect the other 2 wires to the saturn harness and see what happens.

I’ll keep you updated!

studentzki got back to me on racketboy, and confirmed the pinout i took from my dual stick system worked for him to add the PSX cord.

[s]Sorry to dig up this thread after so many years, but I’m actually trying to wire up a Fighting Stick PS for my Saturn. So far, I’ve taken a Saturn controller cable and wired it in to the FSPS PCB exactly as shown in the pictures above for the stock FS SS setup.

This of course didn’t work–that would have been too easy–so I’m in need of a pinout of the Hori’s PCB for the Saturn controller harness. Does anyone happen to have this?[/s]

Nevermind my question. After some continuity testing, I realized that the controller plug that I used was bad. I soldered another on from a third party controller and it works like a charm.

So I can confirm that it’s possible to change a Fighting Stick PS into a Fighting Stick SS (and PS if you leave its cable connected as well) by simply soldering the controller cable to the Hori PCB.

Here’s a tutorial I wrote for going from FS-PS to FS-SS (actually it’s both PSX and SS compatible)