I already posted the pictures of the result in the custom stick thread but I hope it’s OK to make a thread with a little more background info.
This is the first stick I built and I learned a lot in the process.
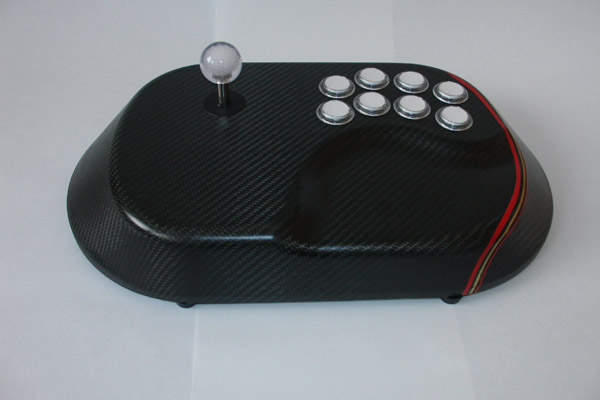
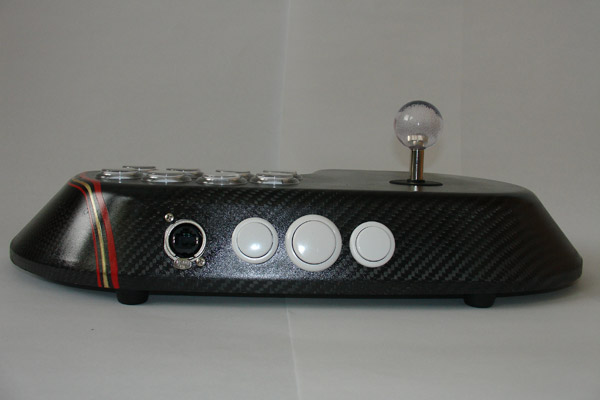
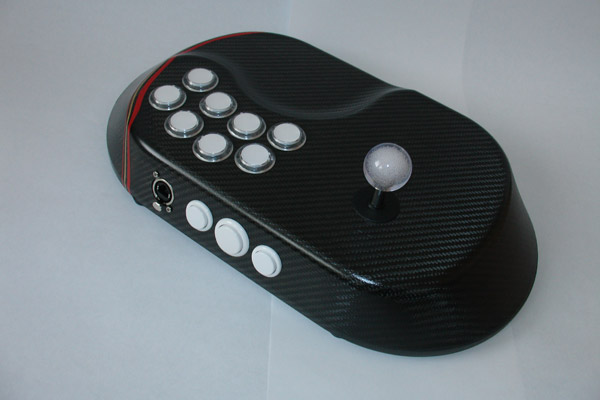
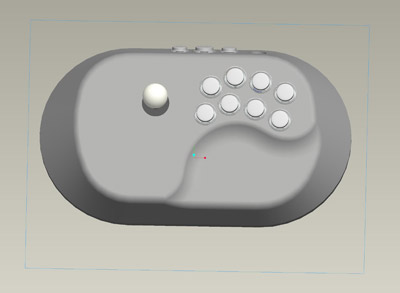
The finished stick:
[LIST]
[]All Seimitsu buttons with quick disconnects
[]Seimitsu LS-32-01, will also fit a Sanwa JLF
[]Dual-PCB with a multi-console Chtulhu and a MadCatz 360
[]Imp electronic switch to change between the Cthulhu and 360 PCB
[]The 2 PCBs are connected with a SUB-D 25 connector. All electronic components can be removed separately without soldering (except fort the Imp which is married to the Chtulhu, but they seem really happy this way).
[]RJ-45 mod
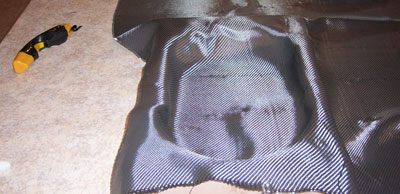
[]Case is made of carbon and glass fibre
[]Bottom is made of 6mm acrylic with rubber feet
[*]Weight: 1.7kg or 3.75 pound
[/LIST]


Initially I didnt want a stick at all. Then the SF4 release reminded me of the huge amount of BEUs that I missed. Reminded me how I had a C64 and a Competition Pro Joystick. Then I wanted to buy a stick. But here in Europe you had a hard time buying quality. The 2 MadCatz TE I pre-ordered in january are due for delivery in june. At some point I started reading shoryuken.com and I decided to build my own stick. When I started the design goals were:
[LIST]
[]Fibre reinforced plastics case, preferably carbon fibre on the outside for looks and strength.
[]Fiberglass on the inside as carbon fiber is a conductor and that doesn’t go over too well with the electronics.
[]Possibility to mount 8 buttons. I learned that many here prefer a 6 button layout but I liked the idea to have 2 extra ones. Also, Im a multiconsolero but Im also an Xbox-man and would like to have the triggers available, at least for dashboard navigtion.
[]Be able to fit a Seimitsu LS-32-01 as well as a Sanwa JLF. Havent used an arcade stick before these seemed the most popular. Ordered a LS-32 first as they were said to have the shorter throw which seemed desirable.
[]Be able to fit both Sanwa and Seimitsu buttons. Again Sanwa seems to bet he more popular choice but gotta love those clear Seimitsus!
[]Detachable cable or a protrusion on the case to wrap the cable around.
[*]Started to design the case in 3D CAD together with my colleague who did the larger part of the actual drawing, especially the trickier parts.
[/LIST]
After we figured out the case and how the components were placed we made the mold on a CNC milling machine.
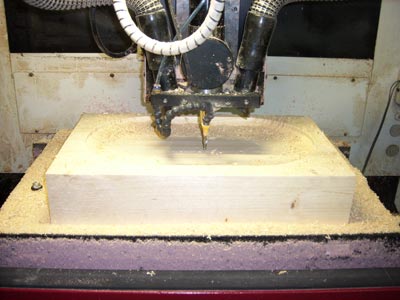
Actually we did a trial run on a block of wood to test drive the milling program.
Finished mold trying on its new clothes:
Edit:
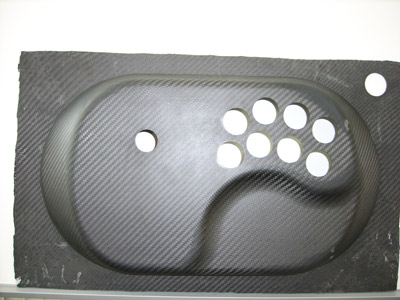
This is the case after applying the resin, curing and removing it from the mold. You can see that the edges are only roughly trimmed. This was done with a diamond cutting wheel and a Dremel. I tried the normal ones first (those which come with the Dremel) but it wasnt a good experience. The carbon is really rigid and the fine ones shattered too easily. The wider ones didnt but also didnt cut very fast but made a lot of dust. Carbon dust can enter your lungs and causes cancer, you really dont want to work with a lot of dust flying around.
The remaining skirt was quite useful for clamping the material for drilling. Drilling was done with carbide-tipped hole saws (24 and 30mm). Carbon can ruin your tools really fast because of its highly abrasive characteristics. We decided against metal or bi-metal hole saws but diamond plated ones are quite expensive. So we settled on the carbide-tipped ones which did a good job for now. Note that the resulting holes actually had a little larger diameter than nominal diameter (24.4 and 30.6mm). Nothing too bad, but the Neutrik USB and RJ-45 jacks also fit into a 24mm hole. If the hole is to big the jack does not center perfectly (with the bezel mounted from the inside) and the 2 small holes needed to screw it into position are close to the center hole. The holes on the top were drilled with an industrial floor standing drill press. The ones on the back with a normal power drill.
After drilling we removed the skirt, again with the Dremel and diamond cutting wheel.
I installed the feet fort he PCBs und taped off screws, mounting area and holes. on the interior I applied a primer for plastics followed by 2 layers of black glossy lacquer. I was thinking about another color but decided on black and Im really happy how it turned out. The picture is after the primer and first layer of black lacquer.
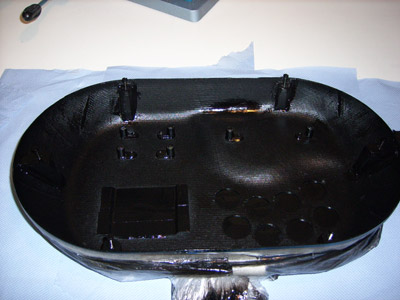
I gave each layer a day to dry in a really hot room. Theres a heat sink for the buildings AC that gives dry heat to the room.
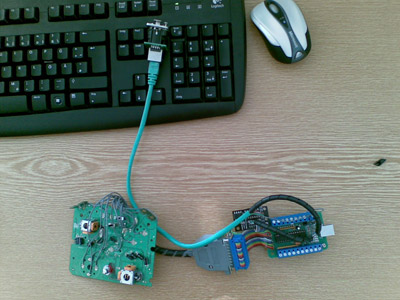
In the meantime we could finish the soldering job on the PCBs and dual PCB mod. I didnt solder in something like 20 years and my colleague never tried it before. The electrical engineering chair was kind enough to let us use their lab and also had a scrap PCB to practice. In the end soldering went much better than I feared. I tested both PCBs independently before connecting them. After that the connection and the Imp also worked on first try which was actually a bit scary as in my earlier years I wasnt able to produce working circuitry. Most comes down to Toodless boards and their design. The Cthulhu came pre-assembled and the Imp was really easy to assemble by ourselves. I didnt even fry the PIC like in the old days. Thanks and mad props Toodles, I like your products!
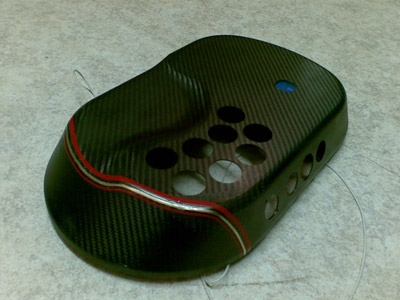
After the black lacquer on the inside was dry I removed part of the tape and tarp and applied a layer of clear coat. The clear coat was resin based, same as the black lacquer. On the outside I did not apply plastics primer. The primer is transparent but I still decided against it. I made a test with and without primer on some scrap carbon pieces and I didnt notice a difference in appearance or durability.
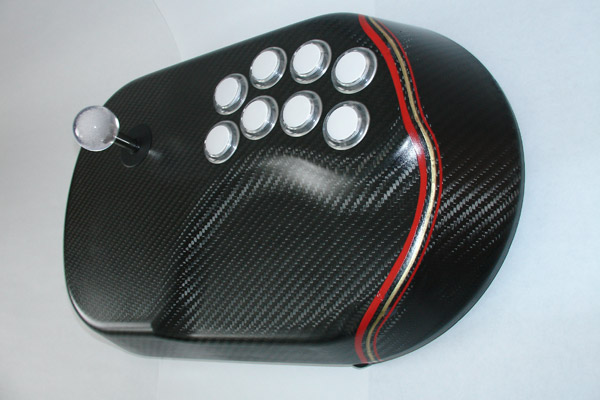
Initially I wanted to apply just the clear coat without further painting or decoration to have the carbon look on the entire surface. Sometime in the building process I ran across pin stripe masking tape and thought to add pinstripes as a little detail. I chose red and gold as together with the carbons black those are germanys national colors to add a little made in germany touch. The larger of the red stripes also masks an imperfection on the surface where I fumbled in the building process. Small but Im still annoyed with myself.
The sick is really an international thing. The Cthulhu and Imp are from the US, the Madcatz Retro Arcade was ordered from the UK, the stick and buttons are made in japan (orderd from arcadeshop.de, thanks Jan!), the carbon fibers are made in japan as well I think, bought in germany, resin is made in germany as well as the case and assembly. Most things down to tools and electronics accessories like cables and connectors were purchased through the web. Doesnt seem much today but a few years ago this would not have been possible.
The pin stripes gave me a headache as the masking tape didnt have much adhesive power given the curve radii. The pin striping could have turned out much better in capable hands but I had to scratch my itch. Probably watched too many episodes of Overhauling and the likes of it.
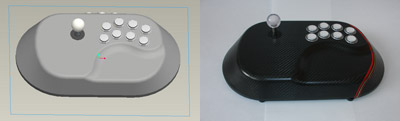
So thats pretty much my documentation. As I opened the CAD software yesterday for the screenshot it gave a funny feeling of familiarity. When I started I had my doubts if I would ever get a tangible result. But with the help of friends it turned out and it has really been a nice feeling for all of us to see the CAD render and the physical stick next to each other.
Big thanks go to all of SRK here for inspiration, motivation and information. Especially slagcoin without ever getting in touch but his website is really well made with a wealth of information.
Big thanks as well to my friends who are leaving university and are now starting their own company cs.federleicht building springs of composite materials, carbon fibre amongst other things.
Ill leave the web page with that blog on for now as I need something new to toy around with after finishing the stick. http://www.taureau.keepfree.de/Joystick/index.html
Both my colleague at Uni and me were thinking about building more sticks now as both of us were finding it was more fun to build the stick than actually playing games.