all artwork gets sandwiched between another plexi

i can’t find Ver A of the TEK-Case on the site, only Ver B. do i just buy an additional inner border if i want to turn it into a Ver A case?
EDIT
just noticed someone asked the same thing on this page 
after all these years i finally got one. liking it so far. thanks Art!

I know I probably posted this in the “Check out my New Arcade Stick” thread when I built it up a few years ago, but I’ll just post it here too:
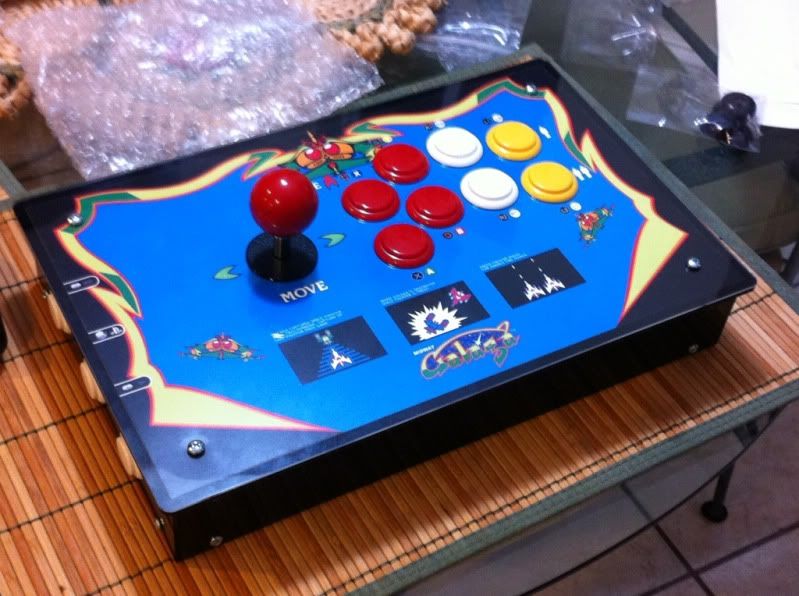
Clear on top (for the artwork I set up for it that Art also printed out for me), with Black plexi on the bottom, front, and sides. The back was left clear too to see the “Galaga Fan” name plate. Art was awesome to deal with, and my Dad, being the Galaga fan that he has always been, loved it as a Father’s Day gift. Just posting this up as a testimony to the awesome work Art does. The case is pretty straight forward to build, and the thought that went into the design is top notch. I got this one without the optional weight slots, and personally it feels fine to me - but it’s nice to know that Art even thought enough to add that; I’m sure it was based on user feedback, which he has always seemed receptive to. Major Thumbs up once again, Art!!!
i’ve been using the case almost everyday so far and really like it. a problem though is the edge of the plexi irritating my wrists from playing 20 minutes or so. any good solutions for the sharp edges? i guess once winter comes along, long sleeve sweaters will help but i was hoping there’s a way to apply a rubber guard or something.
love your work here is my case
nice work
blogger link
http://geekstuffhd.blogspot.com/?view=classic
blogger: geekstuffHD
In the name of fight sticks this case is A must for every pro fighter
Your easy guide to build your own arcade fight stick
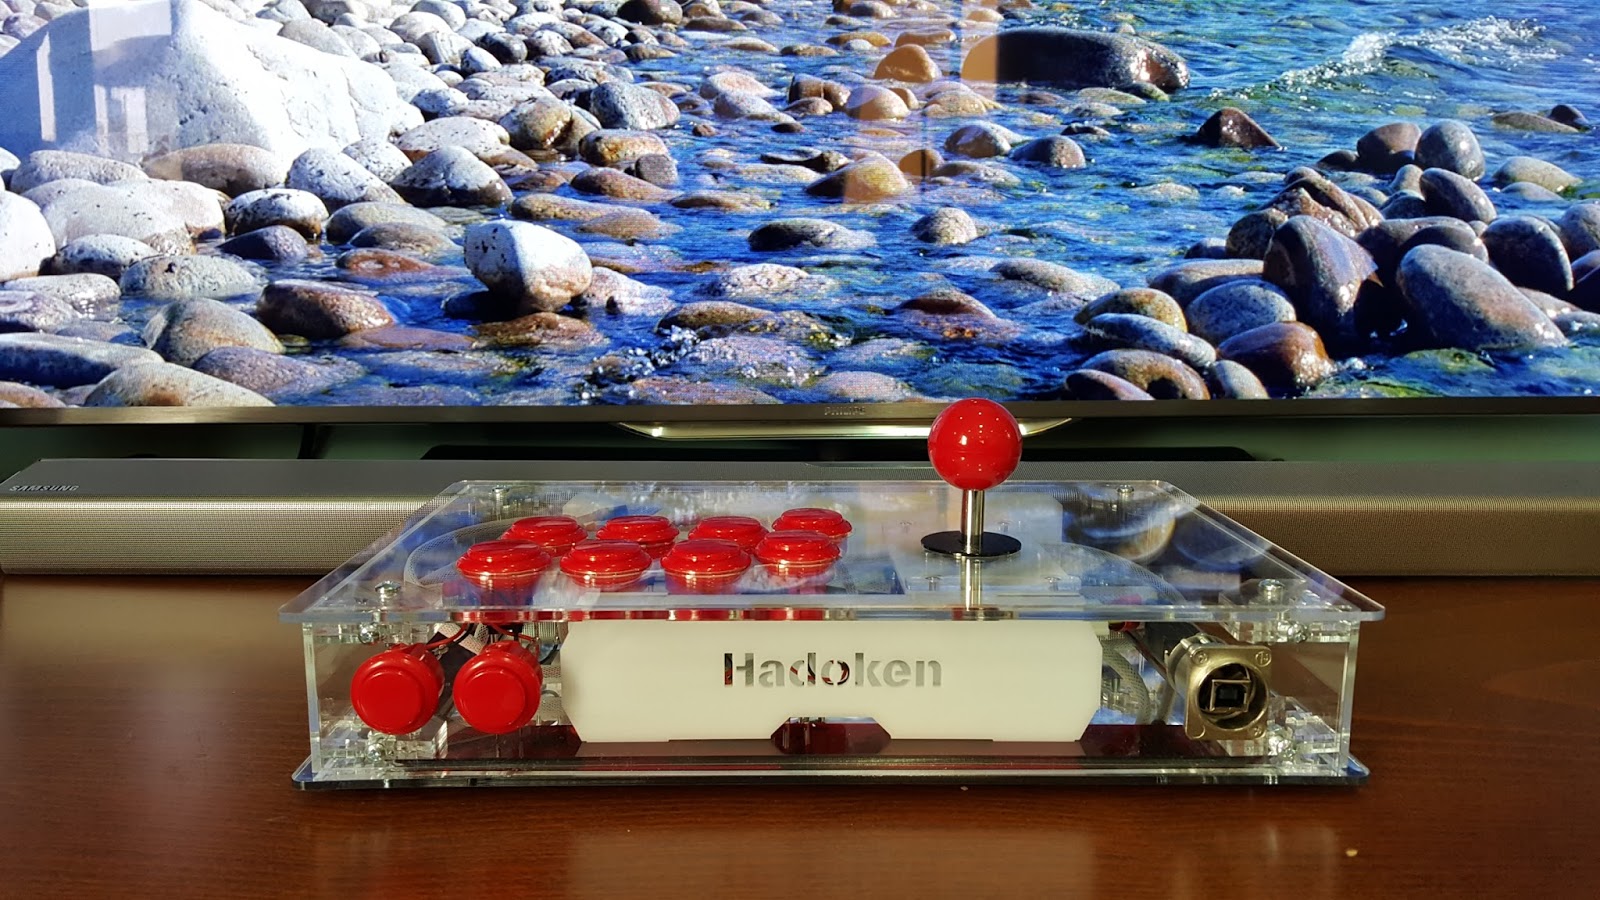
tek-innovations offers great Acrylic joystick case with wide color palette to choose from mix and match and you’re good to go. However this case is not practical for reopening and fixing something somehow you will feel like breaking it especially when the acrylic make squeaky noises but trust me it’s not going to break. I recommend building with this case if you are knowing what you are doing like buying arcade parts or crimping some connectors, however this matter is subjective to persons knowledge or background in-building geek stuff.
game play review:
on a table or desk this case work perfectly well the rubber grommets provided was excellent. on lap the Acrylic somehow dose not feel right but don’t get me wrong the case is solid when it’s all together in one pace it dose not squeak or bend down.
i was shocked when i first played my ultra street fighter 4 game on PC there is no delay on miss pressed button !. the generic PCB from Aliexpress promised zero delay and it did. to put this in easy way it is faster then my qanba q2 pro. i was able to fit 20 feet printer cable with no problem. i recommend buying this PCB instead of the PS360+ if you are playing on PC only like me because this PCB worked with all my games on steam.
cost:
- case $75
- joustic and buttons $45
- PCB $12
- neutrik usb A/B $8
total $140 worth it
Parts used in this build:
- SANWA JLF-TP-8YT JOYSTICK
- SANWA OBSF 30MM PUSHBUTTON
- generic usb joystick PCB
- NEUTRIK NAUSB-W A/B USB
- 22 AWG cables
- 110 quick disconnect terminal
- xh 2.54mm 2pin connector
- xh 2.54mm 4pin connector
- xh 2.54mm 5pin connector
- crimping tool sn-28B
- Pet cable sleeving and heat shrinks
- Philips screwdriver scissor
In case if you lose any screw these are the screw sizes for the case build: - 8-32 Thread 3/4 length pen head
- 6-32 Thread 1/2 length pen head
- 6-32 Thread 1/2 length flat head
- 8-32 hex nut and 6-32 hex nut
helped in making case:
www.tek-innovations.com
www.focusattack.com
www.aliexpress.com
future builds coming soon
let me know what do you think in the comments
talk to you gays in the next one peace
case gallery:
- name plate

-
NEUTRIK and joystick connectors
[img]http://3.bp.blogspot.com/-A_pPpfP2j8Y/Vh9lyMmQY7I/AAAAAAAAAxk/beg6hvJg02Q/s1600/20151015_112119.jpg[img] -
front view
[img]http://3.bp.blogspot.com/-FR4TuVkZ22Q/Vh9ly7jEvnI/AAAAAAAAAxw/SCwdN1XaPS0/s1600/20151015_112417.jpg[img] -
top view
[img]http://3.bp.blogspot.com/-rOHLhbDGz3E/Vh9n-a4PM-I/AAAAAAAAAx4/Q52n1yddHE8/s1600/2.jpg[img]
![http://3.bp.blogspot.com/-0mSonRoGPkg/Vh9lw3Gnq5I/AAAAAAAAAxY/K0EyPJqdoto/s1600/20151015_112107.jpg[img]](http://3.bp.blogspot.com/-0mSonRoGPkg/Vh9lw3Gnq5I/AAAAAAAAAxY/K0EyPJqdoto/s1600/20151015_112107.jpg%5Bimg%5D)
![http://3.bp.blogspot.com/-A_pPpfP2j8Y/Vh9lyMmQY7I/AAAAAAAAAxk/beg6hvJg02Q/s1600/20151015_112119.jpg[img]](http://3.bp.blogspot.com/-A_pPpfP2j8Y/Vh9lyMmQY7I/AAAAAAAAAxk/beg6hvJg02Q/s1600/20151015_112119.jpg%5Bimg%5D)
![http://3.bp.blogspot.com/-FR4TuVkZ22Q/Vh9ly7jEvnI/AAAAAAAAAxw/SCwdN1XaPS0/s1600/20151015_112417.jpg[img]](http://3.bp.blogspot.com/-FR4TuVkZ22Q/Vh9ly7jEvnI/AAAAAAAAAxw/SCwdN1XaPS0/s1600/20151015_112417.jpg%5Bimg%5D)
![http://3.bp.blogspot.com/-rOHLhbDGz3E/Vh9n-a4PM-I/AAAAAAAAAx4/Q52n1yddHE8/s1600/2.jpg[img]](http://3.bp.blogspot.com/-rOHLhbDGz3E/Vh9n-a4PM-I/AAAAAAAAAx4/Q52n1yddHE8/s1600/2.jpg%5Bimg%5D)
October 2015
blogger link
http://geekstuffhd.blogspot.com/?view=classic
blogger: geekstuffHD
In the name of fight sticks this case is A must for every pro fighter
Your easy guide to build your own arcade fight stick
tek-innovations offers great Acrylic joystick case with wide color palette to choose from mix and match and you’re good to go. However this case is not practical for reopening and fixing something somehow you will feel like breaking it especially when the acrylic make squeaky noises but trust me it’s not going to break. I recommend building with this case if you are knowing what you are doing like buying arcade parts or crimping some connectors, however this matter is subjective to persons knowledge or background in-building geek stuff.
game play review:
on a table or desk this case work perfectly well the rubber grommets provided was excellent. on lap the Acrylic somehow dose not feel right but don’t get me wrong the case is solid when it’s all together in one pace it dose not squeak or bend down.
i was shocked when i first played my ultra street fighter 4 game on PC there is no delay on miss pressed button !. the generic PCB from Aliexpress promised zero delay and it did. to put this in easy way it is faster then my qanba q2 pro. i was able to fit 20 feet printer cable with no problem. i recommend buying this PCB instead of the PS360+ if you are playing on PC only like me because this PCB worked with all my games on steam.
cost:
- case $75
- joustic and buttons $45
- PCB $12
- neutrik usb A/B $8
total $140 worth it
Parts used in this build:
- SANWA JLF-TP-8YT JOYSTICK
- SANWA OBSF 30MM PUSHBUTTON
- generic usb joystick PCB
- NEUTRIK NAUSB-W A/B USB
- 22 AWG cables
- 110 quick disconnect terminal
- xh 2.54mm 2pin connector
- xh 2.54mm 4pin connector
- xh 2.54mm 5pin connector
- crimping tool sn-28B
- Pet cable sleeving and heat shrinks
- Philips screwdriver scissor
In case if you lose any screw these are the screw sizes for the case build: - 8-32 Thread 3/4 length pen head
- 6-32 Thread 1/2 length pen head
- 6-32 Thread 1/2 length flat head
- 8-32 hex nut and 6-32 hex nut
helped in making case:
www.tek-innovations.com
www.focusattack.com
www.aliexpress.com
future builds coming soon
let me know what do you think in the comments
talk to you gays in the next one peace
case gallery:
- name plate
-
NEUTRIK and joystick connectors
[img]http://3.bp.blogspot.com/-A_pPpfP2j8Y/Vh9lyMmQY7I/AAAAAAAAAxk/beg6hvJg02Q/s1600/20151015_112119.jpg[img] -
front view
[img]http://3.bp.blogspot.com/-FR4TuVkZ22Q/Vh9ly7jEvnI/AAAAAAAAAxw/SCwdN1XaPS0/s1600/20151015_112417.jpg[img] -
top view
[img]http://3.bp.blogspot.com/-rOHLhbDGz3E/Vh9n-a4PM-I/AAAAAAAAAx4/Q52n1yddHE8/s1600/2.jpg[img]
October 2015
nice work
Started reading this thread while looking for ideas for different artwork for mine. I built it last year, but I didn’t post it here so I might as well share now:
TEK model B case in clear and purple transparent, Sega Player 2 layout, Seimitsu transparent buttons, LS40-01 joystick with the spacers left in so the shaft sits lower, and artwork laser printed on overhead projector transparency, then sandwiched between the lid and the support layer. The balltop is a custom 3d printed Skullheart balltop from Cuddleburrito.


Closeup of balltop

I also built the stick during a 3 hour livestream on the Skullgirls subreddit twitch channel, and a timelapse of this stream can be seen here:
https://youtube.com/watch?v=CAsQ646_62Q <-- Embed won’t work for me
Alas I can’t post the whole video because the music I was playing at the time was blocked in just about every country everywhere. I did intend to one day edit everything into episodes and dub it over with a new soundtrack but that never happened…
Too bad shipping double the cost for one of these case to where I live. I’d be all over a custom hitbox if it wasn’t for that.
It’s a pain living in Europe sometimes…
Agreed, I shipped mine to the UK and the shipping cost really stung.
Would work out better if we could find some kind of deal where we could get the acrylic cut over here, and shipped as a kit from a local supplier without having to go international, but Art still gets a cut of the cost for the design. Not just for the TEK case but for other things made of cut acrylic.
Its a very niche market, custom acrylic for arcade use.
Most people don’t go into the field as the market isn’t very big and the profit margins are very thin.
You can find a Laser Cut Acrylic shop that does generalize laser cut work. But you have to engineer your own designs (or hire someone to do that for you).
And the services would cost more than what you get from Art + Shipping. Also you have to factor how much it cost of the R&D of making a custom design for your laser cut Acrylic (not cheap at all).
@arthong Is there an option to get the spacers with your plexi JLF mounts? It’s currently not on your site. If it can’t be arranged, I might have to plastic weld 2 of them together to get the right height of 0.25" for a mod I’m working on. lol

I got fed up carrying it around my local SG meet so I put a handle on it. The handle is actually a drawer handle I got from ebay, and it is bolted both to the rear plexi and through to the support plexi/nameplate under it so it is quite sturdy.
I’m currently wondering if I can modify one of the weight slot kits to be a cable storage cubby…
I’m very interested in this joystick case, but does any body know if a LS-40 can be mounted without modification?
Yep, stick above your post has an LS-40-01 in it. Just put the spacers on the back side of the stick mounting plate instead of in between the mounting plate and the front panels, as I found the stick was too low down with it mounted the same way as a JLF would be.
I just ordered one of these. Woot!
I was about to order a few custom art prints for my TE2 until I noticed Arts isn’t cutting the holes for it properly… kind of defeats the purpose of having “easy swap” artwork.
Does anyone know who does quality prints like Arts but will cut the button holes properly so the art will fit over them, not under?
Edit: Sorry I don’t know how this post ended up in this particular thread  Where’s the delete button…