take the url of photo and put img tags around it like this {img}http://farm4.static.flickr.com/3661/3413925396_bf84061502.jpg{/img} but use [ ] instead of {}
Hey Bud, Glad you’re enjoying it and thanks for all your patience! To answer your question about worrying about the buttons coming out, I would say have no fear, especially if you’re using sanwa’s. Two of my HRAPS are using a 332, and even a 1/8 from earlier testing. Like yours, it doesn’t have a complete snap but is very snug. Well, it’s been like a month now? No notice of it even getting loose. Adding to that, I carried them around in my backback several times back and there’s a lot of movement in there. Took em out and all was fine. I would say don’t worry about it and just enjoy =).
I had the worse of luck working on Citiofbrass’ piece cuz he asked for a 332 6button, and he was the only one so I didn’t make extras at first. But while working to polish his, I dropped it on the side and it chipped a little. Had to ask him to wait another week to get another one. Then when I finished the new one, as I was sanding it, I reached for my desklamp the wireing got in my way and the lamp fell on his piece, causing a slight scratch. My goodness, I had to make the poor man wait and wait. But we came to a good resolution and it was a pleasure working with him =)
Wow, I can so see that thing being put into a cabinet. Great stuff =).
I’ll be asking you guys later if I can use your pics for my showcase on the website in the near future. Hope you guys say “Yes” =D
Wow, they were available? AHHHHH! Damnit, I’m still waiting for a chance to pick up a TE for the PS3. Man, I bet they were chewed up pretty quickly. How did you even find out about it’s availability? Does this mean I need to refresh Amazon over and over again! lol.
As for the cutter. You’d be surprised how much work is still put in, especially for the initial batches. On the outside you would think just put the piece in, and press “go”. While it can be that simple, there’s still hours and hours of test and trials and errors. For one, it took me like 8hrs just to make accurate outlines in Corel. The TE was easier, but the HRAP… omg, that damn curvature. I couldn’t use the templates floating around because if you zoom in, there are slight flaws in the outline particularly when it comes to the curve. To the naked eye, this means nothing when you print and cut. But to the laser, it’s so accurate you’ll see those edges are off. So I had to redo the thing and keep cutting out paper templates to fit over my hrap… adjust, print, etc.
And even after all that, there are 3 other variables to play with on the laser, which is POWER, SPEED, FREQUENCY. You have to basically find a good combination to work with Acrylic. Like, too fast and low power you don’t get a cut through all the way, or the cut isn’t that great. Low freq and you get perforation rather than smooth polished cut. The outcome is better to go slow with slightly lower power and max frequency. So just for that it’ll take about 4-5min for a piece to cut. Still better than the 10-15min to make a good router cut before =P.
What’s also interesting is I need to leave the blue film on when cutting. Initially I didn’t think this would be the case. But due to the heat of the laser, it ended up hazing the surrounding of the cut, leaving a foggy area. To counter this I left the film on. But the drawback to that is this slightly melts the edges of the film and sticks to the plexi afterwards. This doesn’t damage the plexi, but it just takes a lot more effort to get the corner of the film to peel off. In fact I could stick around trying to get at the edge of the film for 1-2min, lol.
The alternative that I’m going to try today is to rip the film off first, and apply low-tack masking tape on top, or even just regular masking tape. This should still protect the plexi but easier to rip off. It’ll add on material costs, but oh well, at least it’ll save me some headache afterwards.
Or I may need to look for another air-compressor. I’ve never used an air compressor before and it hooks to the laser, giving a good airflow inside. But my compressor always clocks at 5psi when it’s capable of 40psi. I keep turning the knob on the regulator but nothing changes. It’s possible that if I get much better airflow and tweak the settings again, I could alleviate the hazing/fogging problem. So I dunno if it’s my noobness that isn’t making the air compressor work, or I got a bad one… I’m leaning toward my noobness. Gonna get some assistance at HarborFreight and hopefully get some pointers.
Lol, I hope you guys know the effort I go through and rest assured that $18 comes with a lot of sweat. 
thx milk ham… anyway srry for the poor image its from my camera phone

sounds like doing custom panels is going to be a nightmare 
what about taking the actual panel and scanning it at the appropriate resolution? is there any way to get a vector curve out of that?
[quote= it took me like 8hrs just to make accurate outlines in Corel:[/quote]
do you have to use corel? in photoshop the pen tool is made to make very accurate curves
Wow, I had no idea there was so much work involved. I was under the impression that it was plug and play. I guess nothing is ever that easy. I hope you get your money’s worth out of that cutter, Arthong. There are a lot of applications for a laser cutter, but I’m curious what else will you use it for besides being a hero to us stick modders?
I don’t usually comment on other custom sticks, but this one is quite sick.
I’m going for the old school SF2 cabinet graphics myself.
So does this new laser cutter mean Agetec/green goblin sheets may be possible?
just thinking about the air compressor and when you mentioned HarborFreight… i began to question the quality of the air compressor versus noobness… lol def. should get that compressor checked out … and i really appreciate what you do for the community with your new laser cutter and plexi!! cant wait to get mine in!
Whew, finally got another break. Got a batch of normal 116 8buttons, heading out the door Monday, so I look forward to you guys getting it. The next batch which should be out the door by Tuesday/Wednesday are for the 6 buttons and custom art, and the 332’s as I need to readjust the laser settings to cut the 332’s better.
Heh, I actually tried to scan the panel at my work place. But it doesn’t come out very clear. And since the joystick mount prevents the copier cover from going all the way down, you get some shadowing, which I need to compensate for. The other alternative is to trace the panel with a good dark pen and scan that. I’m actually going to suggest ppl who want a custom panel to trace a dark outline of their panel for me. I think this is a much better way than to send me the actual panel, lol.
But the time sink is more of my inexperience with tracing art. Software functions like “Trace Bitmap”, or “Convert to Vector” really doesn’t work well with the tracing, nor photocopy/scan. So it was a matter of eyeing the curvature. Then aligning everything up and testing per cut. And I’m a perfectionist so add on more time for that =P
But as I’m getting use to this and understanding Corel a lot more, things should speed up, and I’ll find a good method to accommodate customs. I’m determined to do it 
I mainly use corel because that happens to be a laser cutter favorite, and all tutorials and manuals point to Corel, so it’s easier to relate. Corel also has a pen tool that works similarly as PS, but I’m just not that great with it, so it took some time =). And there are other settings in graphics that need to be modified more specifically for laser cutting, so it’s better to do as much as you can in Corel, or illustrator, rather than to import from another source.
Heh, neither did I until I started playing with this thing. But the things you can do with it is limited only to your imagination. Lets just say one of my side projects will be making a translucent acrylic black borg cube with translucent acrylic green lining adding an LED in the center… oooh.
And I’ve got some other ideas for more personalized panels and other custom work for this community. Soon as I get some time after all the immediate shipments I’ll be experimenting. There are other avenues of interest I will be looking into as well, but at this point I’m pretty much relying on you guys to help make it worthwhile. So please spread the word when you guys get yours and are satisfied with the outcome =).
Assuming “green goblin sheets” means the artwork to cutout and not some joystick lingo that I’m not aware of, then YES to both questions. Soon as I open up the custom request section, that will be one of the projects when I find someone to participate with me on it=)
Hmmm, that’s highly likely as well. I shall find out in the morning =)
Alright, back at it! Got polish to be applying!
Here is an Agetec/Green Goblin, Arthong. 
Let me know when you’ll be taking custom requests. All i need is a piece of plexi cut to 8.5x11" Thanks.
Hey Art,
Can you make some modifications to the 8 button TE plexi if I specify
the changes in the comments section on the order screen?
Or…
Would that fall under custom plexi therefore having to wait until the
custom plexi portion of your website is activated?
The changes I would like to make to the the TE plexi are
- 7 button vewlix layout
- 24mm start button in upper right corner of plexi
- No box cut out for the turbo buttons
- No holes cut out for the 6 screws
- Plexi cut to fit snug with the removable red border of the TE.
Whew… lugging all those boxes to the PO was actually a challenge when parking a block away from it =P. But I did hit a snag and couldn’t package ALL the 116’s 8buttons last night like I wanted to. Took longer than expected and it was 3am by the time. I’ll keep chugging along for round 2 and more shipping notices will be sent tomorrow =).
Ah, that’s what is meant by the “Green Goblin”. I’m pretty sure I can do it, but I’ll definitely need someone to trace that panel for me, exactly as it is. It’ll take some time to perfect the curvatures. But it’s just a matter of time =).
Hmmm, if all you need is a 8.5x11, and no holes, have you tried looking for a local plastics store? Places like Tap Plastics will cut your plexi to size, as long as they are straight cuts, for free when you buy the plastic from them. That should save you a load of money. Check around first. Now if you want it specifically to be laser cut, then sure no problem. Just let me know.
Hey Bud, I’m pretty sure I can accomodate your request now. But I need some clarification. Initially you asked to extend the size of the plexi. Was this to fit over the red border, or to fit without the red border? As it stands now, it fits pretty snug on top of the red border. But to fit it without the red border I’ll have to adjust and check things out.
Another question is what panel are you placing the plexi on top of and what is the method you’re using to keep the plexi on without the screw holes? Are you designing your own metal panel with a hole for the 24mm start button? I need to confirm you are putting this on top of a panel because the plexi itself isn’t going to hold without one, not to mention there is no joystick mount on this plexi. And if you have a 24mm hole in the right corner, I’ll need an exact location as I have no idea where to put the hole without probably a traceout of the exact panel you want. We can talk more later, but those are the main things I’m concerned about.
I could probably scan the top plate for you in hi-res (for the green gobline stick). Gotta dig a scanner out of the basement. Failing that I could always just mail one out. Button holes need to be widened out to 30mm though. Oh and I actually was asking if you would be able to make custom plexi for it.
yeah thats the stick i wanted a panel for, its all curves except for the top!
Hey Bud, I’m pretty sure I can accomodate your request now. But I need some clarification. Initially you asked to extend the size of the plexi. Was this to fit over the red border, or to fit without the red border? As it stands now, it fits pretty snug on top of the red border. But to fit it without the red border I’ll have to adjust and check things out.
Another question is what panel are you placing the plexi on top of and what is the method you’re using to keep the plexi on without the screw holes? Are you designing your own metal panel with a hole for the 24mm start button? I need to confirm you are putting this on top of a panel because the plexi itself isn’t going to hold without one, not to mention there is no joystick mount on this plexi. And if you have a 24mm hole in the right corner, I’ll need an exact location as I have no idea where to put the hole without probably a traceout of the exact panel you want. We can talk more later, but those are the main things I’m concerned about.
[/quote]
Hey Art,
I am posting under a 2nd name since I am on my computer away from home.
I posted under the name jayducky on page 3 and you can see the 7 button
vewlix template I am using. I am going to mod my TE so that no visible screws show on the top. To do so I have to alter the red border that comes with the TE. I will completely file away the inside lip of the red border so that the metal panel sits on black. That will give me enough room to flush mount the custom plexi within the red border. I am counting on the buttons and tight fitting plexi to secure the plexi in place. So I will need the dimensions of the plexi to be cut just a hair wider. On pg3 you can see where I want the start button. I will cut a 24mm hole in my metal panel to corespond where you cut the start button. I will have to secure the red border with model glue or something. I think the final results will look elegant especially once the sixaxis mod is complete.:lovin: Let me know if this is OK and I will note the modifications in the special instructions portion of the orderform.
-Jason
Got my covers last week, but been crazy busy. Managed to get one of them on the other day, but I left my camera at work. So: here’s a couple of crappy low res phone pics for now.
Before Arthong cover:

AFTER Arthong Cover:
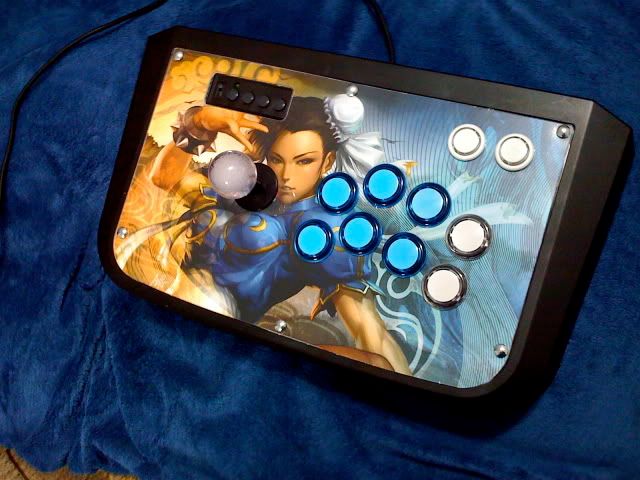
Cover was really easy to work with…I love it. Will take a better pic when I return to work. Thanks Arthur, your work is ultra top notch!
I have a quick question, Would it be possible for you to do a T5 layout? Sorry if its been asked but I am FAR too lazy to look through 7 pages. Also how long would it take if I sent you art and ordered a TE layout?