I have a little question… are this kind of controlers banned from great events like EVO? i use a keyboard-like controler with the same Paewang PCB mod.
It would be something you’d want to check with the event’s rules, as they can vary, but for Evo and the tournaments that follow their lead, they are quite welcome.
Oh thanks. Then i’ll continue with my project.
Here is the prototype:
I said I’d do it and I did it. Here’s that thread: GUIDE: Preventing SOCD on any common-ground PCB by using 7400 chips
Please see here: GUIDE: Preventing SOCD on any common-ground PCB by using 7400 chips
Thank you so much. I have a 7400 chip on its way 
Two quick questions:
-
What is the best way to make T junctions in the wire (like for the Up wire)?
-
I’m using the Paewang Revolution PCB - I don’t think it has VCC output (http://etokki.com/Joytron-Paewang-Revolution-PCB-Only). Does that mean I have to make some kind of T junction from the USB wires?
- Find where the Up button connects to your PCB, solder/connect a wire from there into the 7400. The Up button is only used by the 7400 as input into it to know when to not let Down come out, the “output” I listed was for simplicity’s sake. So you just need to connect your Up button, Up on your PCB, and the Up input on the 7400 together.
As an alternative (such as if you’re not comfortable soldering to a PCB), cut the Up button going into your PCB, solder two wires together as a lopsided Y, where the bottom of the fork and the short wire reconnect the wire you just cut, and the longer wire goes into the 7400. The long wire needs to just be long enough to let you put your 7400 whereever you need it. Be sure to insulate your solder joints with heatshrink or electrical tape, since after you make that Y you’ll have exposed wiring on the fork and on the end of the short wire. - USB puts out +5V, ideally you’d be able to solder to the PCB and solder to whereever the Voltage/+5V wire on the USB cord connects to it, if not you can make a Y like I described above to break it out.
If some of this is confusing let me know and I’ll just break out MSPaint again lol…
Also the above assumes you’re using the Up+Down=Up SOCD circuit
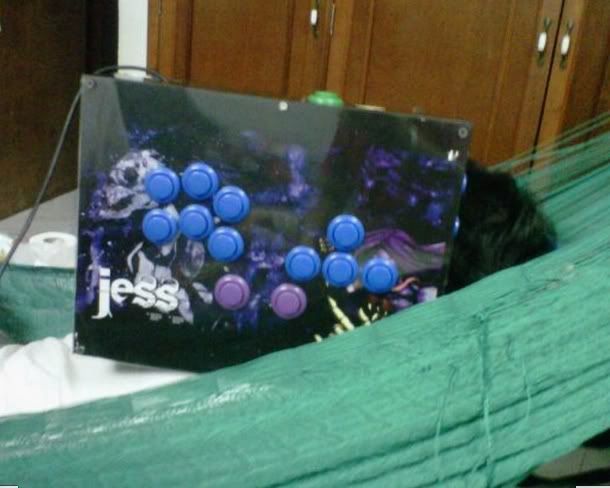
Excellent, I think you’ve pretty much answered everything (yeah I’m trying to do the Up+Down = Up SOCD). I think with the Paewang I’ll need to make a bunch of Ys like you’ve said. It uses wire harnesses for the directions so I don’t think soldering directly to the PCB is an option. Is there a cleaner way to make the Y connections, like crimps or something similar? I try to avoid solder as much as I can - I seem to have an aura about me that makes solder joints come loose during important matches 
You can solder to the Paewang, take a look at this image:

Look at the top part of the image, with the row of 8 black and red dots, you could solder to the first red dot on the left (second contact in that row of 8) to connect to Up. As for +5V from USB, look at the top image, it SHOULD be the solder dot on the far right in the row of 5 solder points near the top. I say “SHOULD” because I’ve had PCBs before that used those same color wires for USB, but the red wire in it that normally carries +5V was actually wired to something else. I would either verify this yourself with a multimeter, or by a visual check (it does actually appear to be the power line from a visual check, so this should be the correct wire), or by verifying from posts here/whereever that the Paewang PCB’s red wire is always for power.
As for not soldering.
You’re probably going to have to solder to the 7400, unless (I’m opening a can of worms here as this is a technique that takes time to master just like soldering) the oldschool wire wrap technique is do-able on a 7400. Which I don’t think it is, so disregard that entirely lol.
Anyway, for the Ys, you could get away with using Butt Splice (huhhuhhuh, I said “butt”) crimp connectors, I haven’t used them myself but you basically cut and strip your wires and then crimp them all inside the Butt Splice connector, which will connect them all electrically.
You could use wire nuts if you find them small enough for that gauge of wire, I don’t recommend it though. You could even just twist everything up really well and then cover it with a bunch of electrical tape, but I definitely don’t recommend that either.
Awesome. Thanks again 
I’ve not kept up with new tech/science in this field, but I’m pretty sure this is flat-out wrong.
In SF4, Left + Right = whichever direction is Forward
Yeah, so, for example, left+right, down, down+left+right is always going to be an SRK motion.
Greetings Tech Talk, I’m always hesitant to post here because my knowledge of tech regarding to Arcade FightSticks is mediocre, so I kind of felt intimidated. Hopefully you all can help me with the slew of questions I have.
I’ve been interested in purchasing a HitBox, but as you all may know due to Akihabara Shops manufacturing issues with the PS360+ PCBs, HitBox LLC can’t make any dual modded HitBoxes. So, currently, I’m just sitting at home, and I really want a KeyStick, so I thought about making one myself using the Joyron Paewang Revolution PCB. However, I’m a extreme newb, and want some clarifications, suggestions, advice and guidance before I take upon this project and drop money.
Here are my questions:
[LIST]
[]What’s the difference between 360+ and Joytron Paewang Revolution PCB, is there any better alternatives for Dual Mods?
[]Is Joytron Paewang Revolution PCB good and reliable?
[]What materials will I need if I were to make my own Keystick. (Case (What type), Push Buttons (Sanwa), PCB, and Wiring?)
[]Will SOCD be possible on this? (I don’t want it to be)
[]Will inputs, registration, and general motions be harder to perform using this PCB as opposed to the ‘Custom’ Toodles/PS360+ PCB that HitBox uses? So am I gimping myself out of a better product for the future?
[]I don’t know much about this, but I’ve heard talk about features such as Down+Up being Up (What is all of that about? How many of these changes are needed?), etc, I’m assuming this will not be possible on this PCB, again am I gimping myself.
[]Is it hard to make a KeyStick if it’s your first time?
[]I don’t know how to solder.
[]At the end, if I do take upon this project, I want it to be as best as possible, without hassles, cheapness and efficient. Is that possible to do?
[]Any advice, or should I just wait out until 360+ arrives and I get one from HitBox, but even than I’m hearing things such as some features that are doable on the PS3 will not work for 360, such as easier motions and such? So, maybe I’ll be getting a watered down version in the future as well.
[/LIST]
Karried, it’d take more time than I have right now to answer each of those point by point.
My recommendation is this: If you want to make an all button controller to be serious with, then you MUST have something in place to clean SOCD inputs. Otherwise, you’d make things WAY harder on you as a player than it should.
Outside of a buying an official HitBox, your options are either using an MC Cthulhu with the newest firmware, or getting a separate piece of hardware to clean the SOCD inputs between the buttons and the main pcb. The MC Cthulhu is by far your easiest, solderless solution. But, it would mean you’re boned for Xbox360 support. If you have to have Xbox360 support, you’ll have to use some SOCD cleaning hardware like described in DanAdamKOF’s thread and most likely learn to solder. If you can live without Xbox360, MC Cthulhu is all around your best choice.
But no matter what, if you dont use one of those two options to handle SOCD cleaning, then IMHO its useless to make an all button controller to begin with; you’ll be fighting the controller more than you need to.
My modded 360 TE stick has SOCD, this SOCD cleaning drama unless your trying to comply with some specific tournaments rules is ridiculously sad. It in no way negatively affects the play and unless you know what your doing trying to wire your way around is going to burn your board up and kill your short cuts.
Stickless with SOCD cleaning is nerfed, no one complains about down/forward double tap Shoryuken short cut. I don’t hear cries for Down+Left = neutral.
The idea of SOCD cleaning has nothing to do with tournament rules, especially when you realize that there are no tournament rules against using it if you can and want to. The idea is ENTIRELY to help lower the execution barrier to learning to play on one. If your hacked pad sends up+left when you press left+right+down, well, execution gets tricky, and it’s hard enough when switching from stick to an all button controller. What you don’t seem clear on is the three parts I’ve been pointing out since the beginning: the hardware, the protocol, and the software.
-If the hardware (the main controller pcb) isn’t setup right, it can easily send incorrect information. Easy example in psuedo code:
if (right)
    if(up) send(Up+Right);
    else if(down) send (Down+Right);
                else send(Right);
else
    if(left)
         if(up) send (Left+Up);
         else   if (down) send (Left+Down);
                      else send (Left);
    else send(Neutral);
Each signal line is checked only once, and if one is pressed, the opposite isn’t checked. Makes for a faster execution. It doesn’t take a genious to see that opposite inputs would be set a specific diagonal, making things like half circles funky and require HARDER execution to get right since you couldnt have left+right+down=down.
-If the protocol the pad uses doesn’t have inidividual bits for each cardinal direction, that’s it, it simply cannot send Up+Down at the left time. Gee, which ones have that limitation? How about every single third party PS3 peripheral. So, if it can’t send left+right, how will it handle seeing left+right+down from the directions? It’ll be the same as above, and hinder your execution.
-Lastly, there is the software, the actual game your playing. You picked out specific hardware that used a protocol that could send the cardinal directions separately with hardware that properly sees and send it. Good for you. It looks like the 360 TE is one such piece, and I’ll even help you out and give you another; the SIXAIXS and DS3 has the hardware to do exactly that.
But that doesn’t mean that the games will handle the data the same between them. It looks like in SF4, left+right always equals ‘forward’. In Marvel, it’s ‘don’t move’. What will it be in Skullgirls? What will it be in SFxT, 3SOE, AH3, Scott Pilgrim, VF, SoulCalibur, etc. etc. etc. You can bet your ass they aren’t actively LOOKING for it, which is why there is already different behavior in different games.
I dont trust the hardware manufacturers, and I sure as hell do not trust the game developers to come to any consensus how the games should react to receiving SOCDs. With a small piece of hardware, I can make sure that
- My execution barrier to proper use is lessened so I spend less time fighting the controller. No time wasted learning different inputs on the left side versus the right.
- My inputs will be the same on EVERY console I play on, with the same stick. No time wasted learning different inputs on the PS3 versus 360.
- My inputs will be the same on EVERY game I play, with the same stick. No time wasted learning different inputs to SPD on HDR versus SF4.
This is Tech Talk. We deal in facts, and occasionally tolerate opinions. This isn’t the place for personal insults. Man up.
Excellent points as usual. I feel like it might just be worth it to throw together a super-small cleaner board (opt for SMD parts) for people who aren’t comfortable soldering, but want a simple thing. I’d be tempted to do this just a service to the TT community, and sell it at cost; it’s a dumb circuit, but not everybody is up to the task of putting it together.
I was thinking something like this would be useful. Some SMD 7400s and a small switch or some jumpers to choose for one of them either Up+Down=Up or make it a normal Both=Neutral circuit (may as well let them choose), clear labels (“LEFT in” “LEFT out” and such), big pads, would make it a solid component for DIY ABC’ers.
Was thinking jumpers for the functionality select, or just pads for them that you can short one way or the other to reduce size. I’d almost wonder if a small, cheap AVR might actually be almost as cheap as 7400’s, and might reduce board size. Though a 2-layer board might be workable with a SOIC package on each side, it’d be harder to produce. At low quantities, the difference in chip cost would be negligible (2x7400’s at about 60c each, versus 1xATTiny, probably $1.60 each.) The code for cleaning this stuff is like, 2 well-written lines in C.
By “jumpers” I did mean close-together pads, sorry.
Yeah, I suspect that most people will want to choose one way or the other once, then never touch it again; having the ability to solder on a two or three pin header, and apply a PC jumper to choose mode, could be nice for those people who may not know which way they’d prefer it, and want to experiment. Heck, once pins have been added it would be trivial to bring the option out to a toggle switch, so that you could choose on a per-game basis. Almost certainly overkill, but options are always nice!