sorry…but is there a thread to order a custom stick?
If your talking US style i have some experience. I built a box to fit a comp stick and 6 buttons… seems easy enough, but i wanted it freakin small… minimum material.
Here are my two cents:
- My stick is about 12"x9" This is plenty of space going up and down for your design but across may be a different story. (8 buttons straight across takes up alot of room, btw: 6 is all you need for fighters). Think of it this way comp stick needs to be centered about 2.5" from the edge for a snug fit. then you have to give another 1.8" for the base to terminate. That is just your stick. My buttons start about 3.5" from the center of the stick and go in intervals of 1.6" center to center. So lets do the math 2.5+3.5+(4-1)1.6=10.8 inches.
Therefore 11" would be cutting it quite close. Remeber you will attach the sides of your box to the base of your top plate. If you are using say .75" MDF that is another 1.5 inches you need to add on either side. Also you need to wire stuff. My box is larger than what you mentioned and with less buttons but still a mess inside with all the wires.
So, if I were you I would either go with 6 buttons which would fit quite nicely in that box you described or build my top at least 3-4 inches bigger. Just to be safe.
- I messed up on building my box and made it too short. I ended up grinding away some of my base so the stick could move. This is what i learned:
-comp sticks go down 53mm as shown in the schematic (http://www.happcontrols.com/joysticks/competition_joy_e.htm)
-If you box is angled then you need to consider the slope of your box. If it is steep then use some Algebra to figure out how deep your box needs to be at the point you are installing the stick. Rough numbers for a comp stick… If you mount about 2/5 of the way down from a 12" top a 3" back plate is sufficient. (assuming your top and bottom will be attached to the top and bottom of the back plate).
-
The ground is the common circuit on the PCB. Just try to find the circuit that travels to all of the buttons. Then find an open spot to attach your ground wire.
-
Dont do that… you can… but dont… your connections will never be solid. Plus you will have a hell of a time doing that with the ground loop. Use quick discs.
-
I used .5" MDF… no problems… I even had to grind away about .25" still not a real problem. Make sure the wood is stiff and doesnt flex easily. Or better yet go buy a sheet of mdf for like $5.00 US.
Hope that helped…(and made sense)
To Samsom and Southtown: Yes.
which one?
Really, i would like to see that because this whole connect this wire to this place, but make sure you get that wire from over there and connect it the neck bone is preety god damn cofusing, as you can see I need all the help I can get. Than
ks again man :tup:
Hello everyone…
can someone please post a link for a cb map of the SOny PSX Dual Shock Controller (Playstation 1)
thx 

There’s my progress on my custom stick… i’m taking forever… yes, thos are concave buttons and a comp. joystick in a japanese layout. i’m really goofy like that, but it’ll work for my tastes.
Hey guys well i have looked at all 201 pages and looked at all links tutorials etc…pictures evertyhing! its excellent what you guys are doing but there is one thing i don’t understand and thats “grounding” what exactly is it i read it and read but i just can’t get my head around it so if someone can give me a very detailed but straight forward answer it will be greatly appreciated thank you.
well from what i know, in order to execute a command the controller has to connect the command part to the ground when it happends it tells the computer that you pressed a buttong, so when connecting an arcade buttong you take one terminal and connect it to the active part and the other terminal to the ground so when you push the button it connects the active part to the ground,
Thanks for your reply are there any tutorials and pictures of what a control looks like with the ground wires on it i’ve looked at thousands of picture but it never gets into that much detail about grounding and i heard it’s a very vital part in the controller hacking procedures.
one reason why they dont delve too deep on it is because it all depends on the pcb your going to use ,each pcb is diffrent and it’s up to you to find which is which.
just look at the copper points on your PCB, the copper points that are connected to each other is most likely the ground, and the copper points that go all the way to the little black thing and arent connected to each other are the controls
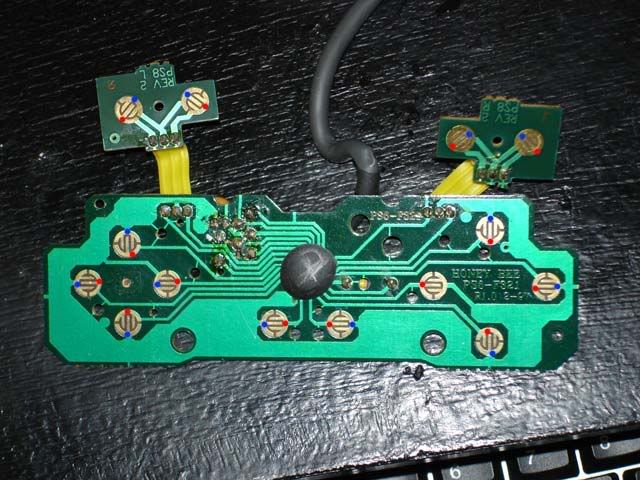
Well this is the ps1 pad i brought it’s from honeywell can someone please show me the grounds and the right buttons? will be greatly appreciated:)
http://img334.imageshack.us/img334/5601/picture0252hw.jpg
Thank you.
i colored it in the red dots are the controls (up, down, square start etc.) and the blue dots are the ground,
Great! thank you so much for that just want to verify a few more questions is this control hard to hack meaning the pcb layout etc…? are these what people call small Copper joints? i also read all you need is one good ground connection for it to work but some people say there can be two ground connections how do you tell theres a second one?
Thank you for your time it’s greatly appreciated.
thats easy to solder on no problem, yea you can have just one wire connected to the ground and run that wire arouns all your buttons but people use 2 wires to the ground one for the buttons and one for the joystick, cause it’s ugly to have a wire running from the button to the joystick :tdown:
if you look closely at the picture you’ll see that the blue dots are connected to each other via that humungouse green part, well if you take a knife and lightly scratch off the coating there youll find a big piece of copper underneath where you can just solder on no problem.
the lgiht green parts are actually copper strips with protective coating over it, if you scratch it with a knife you can solder onto it.
Excellent… i looked at a few methods of how to connect one ground but how would you do two grounds i drew a quick example of how i think it’s setup i only used 4 buttons/with microswitches because i didn’t want to add more and i know there are connections to the joystick but i didn’t want to get to detailed is this how you would go about setting up to ground wires?http://img199.imageshack.us/img199/40/sketch2uq.jpg
Great! thankyou so much for your help you’ve been excellent when i get everything together ill post my stick cheers again:)
any electric glue gun will work?..cause i dont know if the hot glue will effect the connections or the pcb…will it?
yea it wont affect the connection cause it’s basically non conductive, just make sure everythign works first cause i used a gluegun on my solder joints then i found out i soldered the select on the wrong copper point so it was hard to get the glue out lot of scraping with a cutter.
on things like this is it possible to reuse the box/parts?