So, I accidentally busted the usb jack off of my board. Replacing the jack shouldnt be too much of a problem right? Im just hoping this is more of a $3 mistake vs a $40 one.

So, I accidentally busted the usb jack off of my board. Replacing the jack shouldnt be too much of a problem right? Im just hoping this is more of a $3 mistake vs a $40 one.
I know you have to be dead tired Toodles, but I just wanted to say thanks and show some more appreciation.
Once I get over my food poisioning, I’l put up pictures of the Mayflash/Elecom , Psx, and Dual Shock pcbs to add them to the Cthulhu board.
Got a Cthulhu board from TheRealNeoGeo - And it’s wonderful! So easy to work with, thank you very much for taking the time and effort to create this lovely board!. I posted my ghettolicious stick in the “The, I love my custom stick gallery” thread 
It’s been hard keeping hush all this time but now that official pics have been released, I can finally say something.
All the wires from the buttons go to a sister board that resembles a terminal block. From that block is a ribbon cable that connects to the main PCB. The joystick looks like it is now wired to the sister board that has HOME, Turbo, button lock, and USB. This sister board is also connected to the main PCB by ribbon cables. If the joystick is wired to the main PCB, that means the wires run along the bottom of the case. And as stated before, the main PCB is common ground.
Everything you need to solder is on the main PCB. If you want to go the solderless route for multiple console support, coming up with something that doesn’t involve cutting, replacing wires/connectors, will be interesting. I will have to think of something as well. Let the pondering begin! =)
Main access to all components is obviously through the top panel.
Chances are it’s just a $3 problem, but it depends totally on what broke where. Do your best to desolder the old jack off. You can get another jack from lizardlick, or you can solder a USB wire directly to the board.
Okay, I understand. That won’t stop me from investing in the cthulhu when I get my TE stick :bgrin: After seeing seth’s CES video, it looks like it’ll be easy to have all the cables come out of the cable compartment and be able to fit them back in when there not being used. Thanks for taking the time to answer my questions.
Ok, these are the 3 PCBs I have to work with:
Dual Shock “A” :

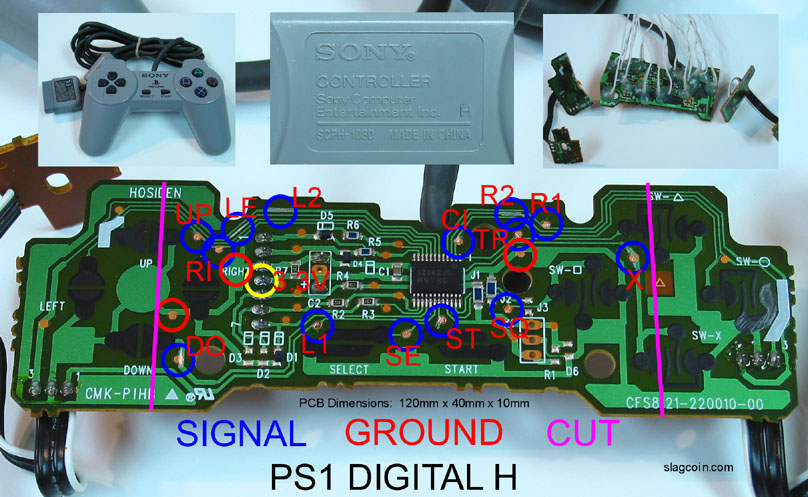
PSX “H” :
Mayflash/Elecom :
I’m apologise for the sorry shots, but I could not make the camera do any better. Sadly, I am bad with cameras.
Attaching these to the Cthulhu shouldn’t be to hard right? I also have a terminal strip, because I remember reading from someone here that was crazy about them, and it seemed useful.
I have shots of the backs too if needed
The first two are already mapped out well on slagcoin’s site:
http://www.slagcoin.com/joystick/pcb_wiring.html#PCB_DIAGRAMS
They appear to both be common ground pads, so dual’ing them shouldn’t be hard. As for the Mayflash, I don’t know if it’s common ground or not, give it a shot if you like, but it seems kind of silly to do so.
What I’d do if I were you is dual the Cthulhu you have with the digital PSX pad. Save the cord from the Mayflash for when the multiconsole version is released.
Wow, those diagrams are really useful, I can’t believe I couldn’t find that info. I will need to read up on resistors before I attempt to use anything with an analog or try a Gamecube controller, so I’ll try the PSX pad, like you stated.
.
One thing I want to make sure I understand, does “common ground” mean that it doesn’t vary between 3.3v , 5.5v and 7.7v? Or does it just mean that I can “ground” all the parts of the PCB with the same ground point?
It means there is one line that goes to all of the switches (‘common’) and that line is 0v (‘ground’). When the switches are pressed, they are connected, making the voltage on the signal line 0v. The PCB sees that 0v on the signal line and knows the switch is pressed.
A detailed explanation that may help:
http://www.instructables.com/id/SE1H1MZFH9HU4TX/
Thank you, I am definitely learning alot. But I just can’t get the soldering at all. I heat the wire, until I can feel the heat transfer throughout it, nothing. I head the copper on the pcb, nothing. The only way I can get the solder to melt, is by touching the iron’s directly for a few seconds, and then it usually smokes, beads and falls off somewhere, I accidentally got some to get on the pcb, but of course the wire didn’t bond, and now the copper is covered. I’m going to keep reading this part on Slagcoin about how to solder, maybe I can clean the tip and try again.
I will pick up tomorrow, I should have been sleep 5 hours ago, work is going to be hell…
I’m learning to solder too. I won’t be testing my newly acquired knowledge for a few days (until I get some stuff I ordered), but I found this video [media=youtube]I_NU2ruzyc4[/media] very clear and helpful in explaining all the basics. Whether or not it was enough for me to get it right the first time is yet to be seen, but maybe if you watch it it’ll help.
Look on the second page of the comments and you’ll see someone that’s trying to learn to solder to do an arcade stick modification  I thought that was a funny coincidence when I watched the video. Is that anyone here on SRK?
For a quick-and-easy (but not ideal) method of soldering a wire to a pad, melt some solder onto the pad, tin the wire (melt a little solder onto it), then touch them together and apply the iron to flow the solder together. Add some more solder afterward if you’re confident, though be aware that the wire may fall off as you do so if you’re not careful.
Hey Toodles,
I don’t know if this has been asked yet but what kind of hurdles would
you have to overcome to incorporate Dreamcast support? There are
a few fighters on that system I would like to keep playing. DC support
in the Chu board would ressurect my DC from the dead!:lol:
The difficulty with DC is the same as its always been; the protocol is FAST, way too fast for this chip to do without some supporting chips. When I get it hacked out, there’ll have to be a second board. Do NOT expect there to be any kind of update magically making it happen, because it just can’t.
As for when I can get time to work on a DC board of any kind, you’re looking at summer at the absolute earliest and no promises of any kind.
Recieved my Cthulhu board the other day and I cannot wait to put my 1st custom stick together with it. I’ll definitely post pictures when I put it together. Thanks a lot Toodles.
OK, I’m trying to decide whether to use one of these or to use an Ultimarc IPac for my dual stick mod. The IPac can be used with a variety of console adapters (that are made specifically for it). What is the advantage of using this board over something like the IPac?
IPac works as a keyboard, not as a joystick. Your call if this is a plus or minus.
IPac supports more inputs.
Cthulhu works on a Playstation 3.
If you’re ‘dual stick’ means sticks for two people to play side by side, and your only intention is to play on a PC, then go for the IPac. If you intend on playing on a console at any time, go for a Cthulhu.
Just got my Cthulhu from Lizardlick and it was a breeze to install.
Tested it out on a PS3 and also a PC. Both tested flawlessly.
I’m actually surprised how great my stick feels on the PC. I just assumed there would be a little lag due to USB ports being rated at only 125 mhz. I was even thinking about hacking my OS to push my ports up to 250 or 500 mhz. But I dont think I’ll mess with it anymore.
Just want to say thanks for making such a great product. Really, your board is awesome on so many levels.
Thanks a mil XeroDd!
I’ve gotten better with my soldering, at least to the point where I can make things stay in place, but a few points on the PSX digital pad are giving me the blues. Namely the points where you have to scratch and expose the copper under the green. I cleaned my tip good, then ended up grinding it with a stone and some sandpaper, and I also now know to “tin” the tip, which helped. Maybe my iron was too hot as well?
I did “X”, after making a mess of that whole area. I tried “R1” and “Left” with no luck, and I think I burned “L1” and “Down”. Hopefully I haven’t killed this thing. My soldering is very poor, and I will be using hot Glue to hide that fact. Here are some more pics:
Slagcoin Diagram:
Did I read that I could also just drill through and solder that way?